Introduction
This 3 part tutorial demonstrates how easy it is to create a Java EE5 Enterprise Application with Netbeans. The Web tier of the Enterprise Application will be based on the Wicket Web framework and the services tier -- the EJBs (Enterprise Java Beans) -- will serve up data from a database which will be consumed by the Web tier.
In particular, it demonstrates how easy it is for the Web tier to consume the services exposed by EJBs and to manage references to the EJBs through DI (dependency injection) using the @EJB annotation and the wicket-contrib-javaee jar library.
The tutorial has 3 parts covered in 3 separate articles:
- Part 1 will demonstrate creating the Enterprise Application in Netbeans and configuring the Web tier to use the latest build of the Wicket framework.
- Part 2 will demonstrate creating entity classes that map to an existing database and exposing data access services through EJBs.
- Part 3 will demonstrate using the @EJB annotation to provide dependency injection support in the Web tier and consuming the services provided by their backing EJBs.
At the conclusion of this 3 part tutorial we will have created a fully functional Wicket based Web application running in the Java EE5 container supplied by the Glassfish application server. The Web application will use standard Java EE5 based annotations such as @EJB to resolve references to EJBs at run time through the use of dependency injection.
It is also my hope that this tutorial will serve to dispel the belief by many that the Java EE5 container is too heavy and complex to develop for.
Part 1 - Creating A Java EE5 Enterprise Application With Netbeans
Creating The Application
Netbeans greatly simplifies the creation of Java EE5 based applications as the following demonstrates. Please follow these steps:
- Open Netbeans.
- Select File|New Project from the main menu. This will open the New Project window
- In the Categories pane select Java EE and in the Projects pane select Enterprise Application and click Next.
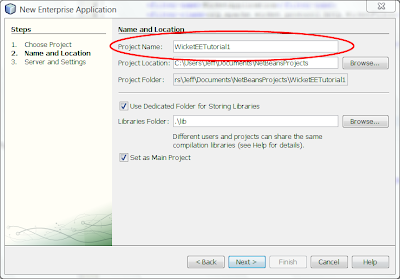
- Enter WicketEETutorial1 or any other name you chose for the Project Name as pictured below and click Next.
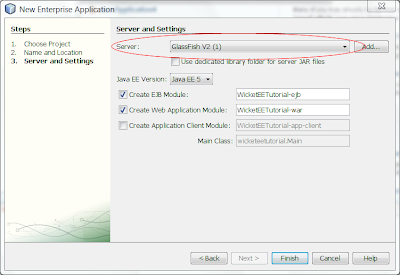
- From the Server drop-down selection list select Glassfish v2 or better. Accept the other options' default settings as pictured below and click Finish.
As a result of completing the above, Netbeans will generate and open 3 module projects in the Projects pane as pictured below.
 The 3 modules and their associated projects that were generated for us are summarized below:
- WicketEETutorial1 is an Enterprise Application module project and its ear (enterprise archive) file is what will be deployed to the server.
- WicketEETutorial1-ejb is an EJB module project and it is here where we will define our entity classes and encapsulate our JPA data access code in EJBs (Enterprise Java Beans). This module will serve as our service layer tier and provide both domain and business functionality to our Web application. Its jar file is included in the ear file mentioned above.
- WicketEETutorial1-war is a Web module project and it is here where we will define our presentation layer tier. Its war (web archive) file is included in the ear file mentioned above. As a default, Netbeans configures the web tier to serve up JSP pages. In the next step we will change this so that the web tier will use the Wicket web framework instead.
Configuring the Web tier to use Apache Wicket
For this tutorial I am using the latest release candidate of the Wicket web framework which at the time of writing this was version 1.4-rc2 and which I downloaded from the
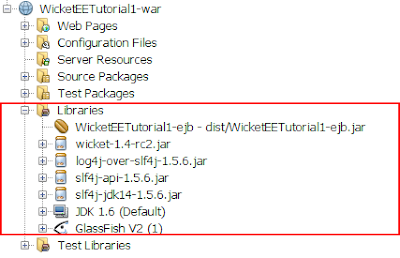
Apache Wicket web site. A basic Wicket web application only needs the wicket-1.4-rc2.jar file so I added it to the module.
Wicket has a dependency on the slf4j which is a logging API. I was able to download the SLF4J distribution from the
SLF4J web site. This distribution also includes the jar file for log4j which is a popular logging implementation. I added 3 jar files from this distribution to the module.
Now the web tier's Libraries node contains the following jars:
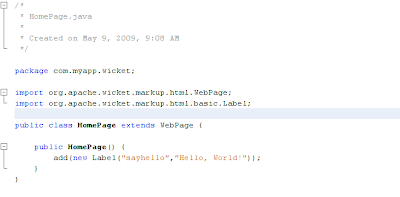
To keep this part of the tutorial as simple as can be, the web application will for now only display the gratuitous Hello, World! In the web tier module I created the following source code package and 3 files:

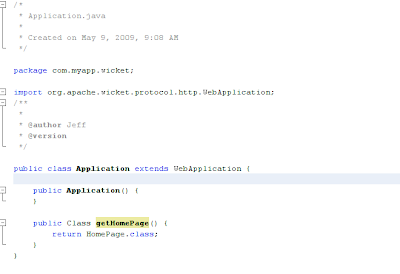
The contents of each of the above files is shown below:

The web.xml file which is located under the Configuration Files tab in the Projects pane needs to be modified as well and should look exactly like the following highlighted text:
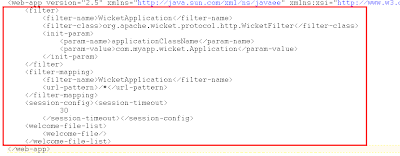
As can be seen from the Home.html and Home.java files, the span element with the wicket:id of sayhello will have its contents replaced with Hello, World!
Running The Application
When we build and run the application the following is rendered in the browser:
 Summary
This concludes Part 1 of the tutorial. As you can see, we have successfully created, built and run a Java EE5 Enterprise Application with a web tier using the Wicket web framework. The application as it now stands is trivial as it only displays the ubiquitous Hello, World! In the next part of this tutorial, Part 2, we will expand on the service side (the EJBs) and in Part 3, we will expand the web tier to consume the services exposed by the EJBs.


 The 3 modules and their associated projects that were generated for us are summarized below:
 To keep this part of the tutorial as simple as can be, the web application will for now only display the gratuitous Hello, World! In the web tier module I created the following source code package and 3 files:
 The contents of each of the above files is shown below:

 The web.xml file which is located under the Configuration Files tab in the Projects pane needs to be modified as well and should look exactly like the following highlighted text:
 As can be seen from the Home.html and Home.java files, the span element with the wicket:id of sayhello will have its contents replaced with Hello, World!
Running The Application
When we build and run the application the following is rendered in the browser:
As can be seen from the Home.html and Home.java files, the span element with the wicket:id of sayhello will have its contents replaced with Hello, World!
Running The Application
When we build and run the application the following is rendered in the browser: Summary
This concludes Part 1 of the tutorial. As you can see, we have successfully created, built and run a Java EE5 Enterprise Application with a web tier using the Wicket web framework. The application as it now stands is trivial as it only displays the ubiquitous Hello, World! In the next part of this tutorial, Part 2, we will expand on the service side (the EJBs) and in Part 3, we will expand the web tier to consume the services exposed by the EJBs.
Summary
This concludes Part 1 of the tutorial. As you can see, we have successfully created, built and run a Java EE5 Enterprise Application with a web tier using the Wicket web framework. The application as it now stands is trivial as it only displays the ubiquitous Hello, World! In the next part of this tutorial, Part 2, we will expand on the service side (the EJBs) and in Part 3, we will expand the web tier to consume the services exposed by the EJBs.


Unfortunately, the newer Netbeans 6.8 seems to be unable to deploy (and run) the resulting project. Maybe it is a issue related to the ones discussed in the last part of this tutorial (see comments here: http://jeff-schwartz.blogspot.com/2009/05/wicket-ejb-di-with-netbeans-part-3.html).
ReplyDeleteAlso, it seems that the sun-web.xml file created by NB6.8 is completely different and maybe incompatible with the one suggested in this page (different XML schema and namespace, not only different content). You have to change the XML schema declaration and the namespace to complete the tutorial (it is impossible to post the right XML code here, sorry).
It would help to have the source code corresponding to this tutorial for better understanding what is going wrong (also because copying code from a PNG image is not the most confortable way to perform this task).
Thanks