Developing Great Software

Showing posts with label javaee. Show all posts

Thursday, April 28, 2011

Wicket, Web Services, NetBeans And GlassFish

A reader recently emailed me and wanted to know about implementing a Wicket application within a Web Service environment.

I have not come across any reference where Wicket has been implemented
within a web service environment. None of the books I have read on
Wicket have addressed this area to my knowledge. I am wondering if you
have any insight as to how this would work.

The reader is expressing a very common misconception that a lot of developers have and that misconception is that you somehow have to integrate your Web Services into your Web application. Part of my response to the reader was:

“How you expose your web services has nothing to do with Wicket meaning you don't integrate your web services with wicket.”

Additionally, I went on to say:

“All you need is to create web services on glassfish (it has built in support for web services and Netbeans tooling makes this just so simple). If a client, whether your Wicket application or a paid subscriber for instance, needs to consume your web services it will consume the wsdl files produced when you created the web services.”

What I was trying to express to the reader is that Wicket is just a Web framework and not a Web Services provider. Wicket writes HTML to the browser and that’s about it. Wicket Web applications, however, can consume Web services, either those on the same server the Web application is running on or located on different servers. But Wicket itself doesn’t provide any means to consuming Web services - for that you use Java API for XML Web Services (JAX-WS).

I promised the reader that if I had the time I would write an article demonstrating how this is done which is the purpose of this article. So lets get started.

The remainder of this article assumes you have installed NetBeans 7 as well as the NetBeans Wicket plugin. If you haven’t, please do so now.

NetBeans, GlassFish v3.1 and JAX-WS

NetBeans 7 comes bundled with GlassFish v3.1 and GlassFish comes with Metro 2.1 as its SOAP Web Services provider. Metro 2.1 implements the JAX-WS specification. The synergy between Web Services, NetBeans and GlassFish is provided by the tooling built into NetBeans, which makes authoring and deploying your Web Services on GlassFish very easy, as we shall see later in this article.

When you create a Web Service you first have to decide how you want to package it (what type of application you will use to host your Web Service). You have 2 options:

1. JavaEE EJB Module project – this option should be used if your Web Services require access to EE containers. Web Services in this context are generated as Stateless SessionBeans. If your Web Service needs access to your database, for instance, you can achieve this using the @PersistenceContext annotation within your Web Service which will allow you to access your database via JPA.

2. Package in Web container – this option should be used if your Web Service doesn’t require access to other EE containers.

In this article I won’t actually cover accessing a database because I want to keep it simple but I will use a JavaEE EJB Module project and you can, if you chose, explore this later on your own by creating a Web Service method to access your own database.

Create A Web Service Project

1. If you haven’t already, fire up NetBeans and select File | New Project which will open the New Project window.

2. Select Java EE from the Categories panel and select EJB Module from the Projects panel and select Next.

3. Enter any valid project name you like in the Project Name text box. I am naming mine ‘EJBWebServicesAndWicketTutorial’. Select Next.

4. Select GlassFish Server 3.1 from the Server drop down list and make sure that Java EE 6 is selected in the Java EE Version drop down list. Select Finish to generate the project.

Create A Web Service

1. Right click the project node for the EJB project in the Projects window and select New | Web Service. This will open the New Web Service window.

2. Enter CalculatorWebService for the Web Service Name. Make sure that the Create Web Service from Scratch option is selected. Note that because our project is an EJB the Implement Web Service as Stateless Session Bean option is automatically selected for us and cannot be changed. Enter WebServices as the Package name and select Finish. NetBeans will generate your Web Service Java class in the WebServices package.

3. I will use a simple method for our Web Service that returns the sum of two integers. Replace the content of CalculatorWebService.java with the following:

package WebServices;

import javax.jws.WebService;
import javax.jws.WebMethod;
import javax.jws.WebParam;
import javax.ejb.Stateless;

/**
 *
 * @author Jeff
 */
@WebService(serviceName = "CalculatorWebService")
@Stateless()
public class CalculatorWebService {

    /**
     * Web service operation
     * @param i int
     * @param j int
     * @return  the sum of i + j as int
     */
    @WebMethod(operationName = "add")
    public int add(@WebParam(name = "i") final int i, 
    @WebParam(name = "j") final int j) {
        return i + j;
    }
}

From the above code you can see that the CalculatorWebService class is decorated with both @WebService and @Stateless attributes which is what you would expect. Also note that the add method is decorated with the @WebMethod attribute and that each of its parameters, i and j, are decorated with the @WebParam attribute.

I didn’t hand-code this though I could have. NetBeans can generate a Web method with all the correct attributes for you. If you select Design View and click the Add Operation button, NetBeans will present you with its Add Operation window that allows you to add a new Web Service method with all the proper attributes. I’ll leave this as an exercise that you can explore later on your own.

Testing The CalculatorWebService add Method

NetBeans tooling makes testing Web Services a snap so lets do that now to insure that our add service works as expected:

1. In the Project panel right click the Web Services node (not the WebServices package) and select Test Web Service which will open your browser and display the following

2011-04-28 10h23_51

2. Click the WSDL File link and save the URL somewhere (like Windows NotePad, for instance) and then page back to the above. We will use the URL in our Web Services client application, which we will build later on in the article.

3. Enter 4 in the first input field and enter 5 in the second input field and then click add. Your browser will then display the following

2011-04-28 10h30_27

As you can see from the above, the method correctly calculated and returned the sum of our two numbers. If you scroll down the browser page you can see the packaging for both the SOAP request and the SOAP response. Repeat this a few time with different sets of numbers.

We now have a working Web Service that can be consumed by any client that can consume a Web Service. Note how the Web Service we just built has no connection at all with Wicket – our project doesn’t even include the Wicket framework. Remember, Web Services provide a service whereas Wicket applications render HTML to the browser.

Now we know that our method works so lets create a Wicket application that will consume the Web Service. I’ll keep this simple and I assume that you have already installed the latest release of the Wicket plugin for NetBeans 7.

Create a Wicket Application

1. In NetBeans select File | New Project and select Java Web from the Categories panel and Web Application from the Projects panel. Enter any name you like for the Project Name, select Set As Main Project and select Next.

2. For Server select GlassFish Server 3.1 and for Java EE Version select Java EE 6 Web and select Next.

3. For Frameworks select Wicket and select Finish. NetBeans along with the Wicket plugin will generate a Wicket starter application project that includes the Wicket libraries. Also generated by the Wicket plugin are Wicket components for HomePage, BasePage, HeaderPanel, FooterPanel as well as the required Application.java and configuration files.

Now that we have a Wicket application we will use NetBeans to easily configure it to consume the Web Service we created previously.

Consuming Our Web Service

1. In the Projects panel right click the Web applications project node and select New | Web Service Client. This will open the New Web Service Client window.

2. Select WSDL URL and enter the URL that you saved previously when you tested the Web Service.

3. Enter a package name and make sure that JAX-WS Style is the selected option for Client Style. Select Finish. NetBeans will generate a Web Service Reference for us in the Web Service References folder.

Our Web application is now configured to consume the Web Service we previously created. Notice that in the above we configured our Web application using the URL that points to the Web Service’s WSDL. We could have used a project reference instead but I used the URL to emphasize that you can consume any Web Service running on any server, yours or some other, as long as you have access to its WSDL URL.

Now lets actually use the Web Service in our Wicket application.

1. In the Projects panel double click on the HomePage.html file. Notice how NetBeans opens it as well as the HomePage.java file. This behavior, among others such as generating a starter project, is a contribution of the NetBeans Wicket plugin.

2. Replace all the content in HomePage.html with the following:

<!DOCTYPE html> 
<html xmlns:wicket="http://wicket.apache.org"> 
    <head> 
        <meta charset="UTF-8"> 
    <wicket:head> 
        <title>Wicket Example</title> 
    </wicket:head> 
</head> 
<body> 
    <wicket:extend> 
       <h1 wicket:id="message">This gets replaced</h1>
       <form wicket:id="form" >
           <div wicket:id="feedbackpanel" />
           <input type="text" wicket:id="input1" /> + <input type="text" wicket:id="input2" /> = <span wicket:id="result" /><br/>
           <input type="submit" />
       </form>
    </wicket:extend> 
</body> 
</html>

From the above you can see that our markup is quite simple - we create a simple form with two text fields and a submit button.

Now, lets consume the add Web Service method.

1. Select the HomePage.java file and from the Projects panel and fully expand the Web Service References folder. Drag and drop the add method anywhere into the HomePage.java file and NetBeans will generate the call to our Web Service method for us. Rather than implement the rest of the code yourself you can replace the code in HomePage.java with the following

/*
 * HomePage.java
 *
 * Created on April 28, 2011, 6:30 AM
 */

package com.myapp.wicket;           

import org.apache.wicket.markup.html.basic.Label;
import org.apache.wicket.markup.html.form.Form;
import org.apache.wicket.markup.html.form.TextField;
import org.apache.wicket.markup.html.panel.FeedbackPanel;
import org.apache.wicket.model.CompoundPropertyModel;

public class HomePage extends BasePage {
    
    private int input1 = 0;
    private int input2 = 0;
    private int result = 0;

    public int getInput1() {
        return input1;
    }

    public void setInput1(int input1) {
        this.input1 = input1;
    }

    public int getInput2() {
        return input2;
    }

    public void setInput2(int input2) {
        this.input2 = input2;
    }

    public int getResult() {
        return result;
    }

    public void setResult(int result) {
        this.result = result;
    }
    
    public HomePage() {
        add(new Label("message", "Enter 2 ints!"));

        Form<HomePage> form = new Form<HomePage>("form", new CompoundPropertyModel<HomePage>(HomePage.this)){

            @Override
            protected void onSubmit() {
                super.onSubmit();
                // Call the add web service method to calculate the result
                result = add(input1, input2);
            }
            
        };
        
        form.add(new FeedbackPanel("feedbackpanel"));
        form.add(new TextField<String>("input1"));
        form.add(new TextField<String>("input2"));
        form.add(new Label("result"));
        add(form);
    }

    private static int add(int i, int j) {
        webservices.CalculatorWebService_Service service = new webservices.CalculatorWebService_Service();
        webservices.CalculatorWebService port = service.getCalculatorWebServicePort();
        return port.add(i, j);
    }

}

In our java implementation we add the two text  fields to the form and the the form to the page. We override the form’s onSubmit method in which we call our Web Service method and assign its return value to result. When Wicket renders the page the page will display the result. Lets try it. Run the Web application and you should see the following

2011-04-28 11h32_22

Enter a valid numeric/integer value for both input fields and select Submit. The page will render with the result.

2011-04-28 11h34_05

Here is the result I get when I enter 10 and 14. The result, 24, is rendered back to the page. If you enter a non numeric value you will get an error message.

What We’ve Learned

As the examples here have demonstrated, an application that publishes Web Services is totally disconnected from any application that consumes its services. In our case, the consumer is a Wicket application. Wicket renders HTML and in our case it renders the result of calling our Web Service.

Our Web Service implementation knows nothing about any client application that may use its services. The client application consumes the Web Service via the WSDL.

In addition, NetBeans and its GlassFish tooling really makes both publishing and consuming Web Services ridiculously easy and the NetBeans Wicket plugin, with its ability to create a starter project as well as Wicket Pages and Panels is a great productivity booster.

I hope you have enjoyed this little walk-through of publishing and consuming Web Services with NetBeans, GlassFish, Wicket and the NetBeans Wicket plugin. Please feel free to leave a comment or a question.

Thursday, March 31, 2011

Java EE6 & Wicket - Article #6 – A Wrap Up

Welcome to the 6th in a series of detailed articles on Java EE6 & Wicket. If you haven’t already, please read the following previous articles before continuing.

  1. http://jeff-schwartz.blogspot.com/2011/03/java-ee6-wicket.html
  2. http://jeff-schwartz.blogspot.com/2011/03/java-ee6-wicket-article-1-requirements.html
  3. http://jeff-schwartz.blogspot.com/2011/03/java-ee6-wicket-article-2-creating.html
  4. http://jeff-schwartz.blogspot.com/2011/03/java-ee6-wicket-article-3-generating.html
  5. http://jeff-schwartz.blogspot.com/2011/03/java-ee6-wicket-article-4-adding-jpa.html

In this, the 6th and final article in this series, we will examine the code, focusing on the integration we provided for consuming the EJB in our HomePage. I will also discuss some best practices that I’ve used here, especially pertaining to Wicket components and project structure.

Consuming EJB In Wicket

In article #3 we added the JavaEE Inject jars to the GuestBook project. JavaEE Inject is a Wicket module that provides integration through Java EE 6 resource injection and supports three annotations:

  1. @EJB
  2. @PersistenceUnit
  3. @Resource

With JavaEE Inject any Wicket application running in a Java EE6 container can consume the above 3 types of JavaEE resources. Before an application can use them, however, its WebApplication class method init must be overridden to add the JavaEEComponentInjector into Wicket’s request cycle. The code is simple as shown below:

@Override
    protected void init() {
        super.init();
        addComponentInstantiationListener(new JavaEEComponentInjector(this));
    }

What we are doing in the above code is calling Wicket’s Application class method addComponentInstantiationListener with a reference to a JavaEEComponentInjecter object which the JavaEE Inject module provides. addComponentInstantiationListener adds the JavaEEComponentInjector object to its lists of component instantiation listeners that it maintains.

With the JavaEEComponentInjector now maintained whenever a Wicket component is instantiated, JavaEEComponentInjector will scan the component for one of the above three annotations and injects their associated resources into the component.

There is one limitation, though, imposed by JavaEE Inject and that is it can only inject resources into a component that is a subclass of WicketPage. This  has implications on the modularity of our code in that we can’t directly reference EJB methods, for instance, directly in classes that aren’t derived from WebPage. Or can we? Well, we can and I will show you how we did it in GuestBook.

Techniques For Using JavaEE Inject Resources Outside Of WebPages

GuestBook uses an instance of a DataView to display the list of names of its visitors. A DataView requires a pseudo model of type IDataProvider<T> dataProvider to provide the data that it displays and GuestDataProvider serves that purpose. GuestDataProvider uses methods from our session bean to access the data in the guest table but it, like HomePage, is declared in its own file so how can it access the session bean and call into its methods?

The solution was to create the following interface that GuestDataProvider implements:

public interface IEjbDataProvider<T> extends IDataProvider<T> {
    AbstractFacade<T>  getFacade();
}

GuestDataProvider is declared as abstract because it doesn’t actually implement getFacade which is defined as returning an instance to AbstractFacade. Instead, GuestFacade relies on its subclasses to provide the method’s implementation.
In the HomePage constructor we create an instance of a GuestDataProvider and override its getFacade method by returning the reference to our session bean.

public class HomePage extends BasePage {

    @EJB(name = "GuestFacade")
    private GuestFacade guestFacade;

    public HomePage() {
        super();

        add(new FeedbackPanel("feedback"));

        /*
         * A loadable and detachable model whose sole purpose is to always
         * return a new Guest object when its load method is called.
         */
        LoadableDetachableModel<Guest> newGuestLoadableDetachableModel = new LoadableDetachableModel<Guest>() {

            @Override
            protected Guest load() {
                return new Guest();
            }
        };

        /*
         * The guestForm uses a nested model. The outer model is a compound property
         * model and the inner model is a light weight loadable and detachable model.
         */
        Form<Guest> guestForm = new Form<Guest>("guestform", new CompoundPropertyModel<Guest>(newGuestLoadableDetachableModel)) {

            @Override
            protected void onSubmit() {
                Guest guest = getModelObject();
                guestFacade.create(guest);
                setModelObject(new Guest());
                guest = new Guest();
            }
        };

        /*
         * Add the custom NameTextField compent for
         * first and last name to the form, nesting each
         * in a FormComponentFeedbackBorder for displaying
         * data entry errors.
         */
        guestForm
                .add(new FormComponentFeedbackBorder("firstNameBorder")
                .add(new NameTextField("firstName")));
        guestForm
                .add(new FormComponentFeedbackBorder("lastNameBorder")
                .add(new NameTextField("lastName")));
        add(guestForm);

        GuestDataProvider gdp = new GuestDataProvider() {

            @Override
            public AbstractFacade<Guest> getFacade() {
                return guestFacade;
            }
        };

        /*
         * When dealing with potentially large lists of data it is
         * better to use a DataView whose constructor takes a data
         * provider as its second parameter.
         */
        DataView<Guest> guestListView = new DataView<Guest>("namelist", gdp) {

            @Override
            protected void populateItem(Item<Guest> item) {
                Guest guest = item.getModelObject();
                item.add(new Label("name", guest.toString()));
            }

        };

        add(guestListView);

    }
}

This demonstrates that though JavaEE Inject places restrictions on where we can inject resources there are simple patterns that we can employ to overcome them.

Wicket Models Put To Best Use

HomePage also uses loadable/detachable models for both the form and the list of visitor names it displays. When Wicket completes its request cycle the components containing them will not contribute any model data to the serialization of the page.

Though I won’t go into detail here, understanding and mastering Wicket models is a critical component of your Wicket education. If you don’t know the difference between static and dynamic models or you aren’t familiar with loadable/detachable models you can read my article here to get up to speed on this subject.

Components

Now, lets talk a bit about Wicket components and some ideas that I’d like to share with you.

Whenever I develop a Web application I like to encapsulate business rules so that they can be reused. Presentation components are a prime target for encapsulating business rules, especially if they are used more than once on a page or on more than one page. Business rules encompass issues like requiring the user to enter a value for an input field, min and max values, etc.

Some frameworks make extending their presentation components more difficult than one would imagine. On the other hand, this is one area where Wicket shines – Wicket’s components are strikingly easy to extend and to imbed business rules in.

In article #1 we expressed the business rules for GuestBook as follows:

  • Limit the number of characters our visitors can key in for their first and last names to a maximum of 45 characters each.
  • Both first and last name are required.

GuestBook uses NameTextField, a subclass of TextField, to encapsulate and enforce its business rules.

public class NameTextField extends TextField<String>{

    /**
     *
     * @param id
     * @param model
     */
    public NameTextField(String id, IModel<String> model) {
        super(id,model);
        setRequired(true);
    }

    /**
     *
     * @param id
     */
    public NameTextField(String id) {
        this(id,null);
    }

    @Override
    protected void onComponentTag(ComponentTag tag) {
        tag.put("maxlength", "45");
        tag.put("size", "55");
        super.onComponentTag(tag);
    }


}

Since both first name and last name must enforce the same requirements on the user it makes sense to encapsulate the logic in one place. In the above code we set the component’s required flag to true and we override the onComponentTag method to output the ‘maxlength’ and ‘size’ attributes for the input tag.

This is a prime example of applying the ‘Don’t Repeat Yourself’ (DRY) principle in action and Wicket, to its credit, makes this an incredibly easy process.

Now a word or two on structuring your code.

Project Structure

One of the things I really hate is dealing with a project which just dumps everything into a single package whose name provides absolutely no insight as to the purpose of the code contained in it. Bad! Bad! Bad!

In GuestBook, package names provide useful insight as to the purpose of the code they contain. The packages also serve to layer the project’s structure by areas of concern, namely entities, session beans and Wicket which it further sub groups into components and data providers.

Some Final Thoughts

Well that just about wraps things up for this series but before we say goodbye I’d like to extend my thanks to all the developers and contributors who have made Java, Wicket and its infrastructure of contributed libraries and NetBeans the productive resources they are for us.

I hope you have enjoyed reading this series and following along with me as much as I have enjoyed sharing my time with you.

Please feel free to leave your comments for any of the articles in this series and I will try to find the time to respond to them all.

May all your days coding be happy and productive ones.

Wednesday, March 30, 2011

Java EE6 & Wicket - Article #5–Building Out The Guest Book Web Application Using NetBeans

Welcome to the 5th in a series of detailed articles on Java EE6 & Wicket. If you haven’t already, please read the following previous articles before continuing.
  1. http://jeff-schwartz.blogspot.com/2011/03/java-ee6-wicket.html
  2. http://jeff-schwartz.blogspot.com/2011/03/java-ee6-wicket-article-1-requirements.html
  3. http://jeff-schwartz.blogspot.com/2011/03/java-ee6-wicket-article-2-creating.html
  4. http://jeff-schwartz.blogspot.com/2011/03/java-ee6-wicket-article-3-generating.html
  5. http://jeff-schwartz.blogspot.com/2011/03/java-ee6-wicket-article-4-adding-jpa.html

In this, the 5th article in this series, we will complete the implementation of the GuestBook Web application. So lets get started.

Modifying The Generated Markup And Code

If you haven’t already, fire up NetBeans because we are going to make a few changes to the generated code so that our GuestBook’s home page will look like the image in article #1. In order to do that we will compose the HomePage using Wicket Markup Inheritance.

Our HomePage displays a Wicket logo which you can download here. Place the logo  in the com.myapp.wicket package.

Next, we need to make a few changes to the generated code. Create a new HTML file in the com.myapp.wicket package and name it BasePage.

  1. Right click on the com.myapp.wicket package, select New | Other to open the New File window
  2. Select Web in the Categories panel and then select HTML in the File Types panel and click the Next button.2011-03-30 08h45_57
  3. Enter BasePage for the HTML File Name and click the Finish button. NetBeans will generate the BasePage.html file and open it in the editor.

Replace the generated markup with the following markup and save the file:

<?xml version="1.0" encoding="UTF-8"?>
<!DOCTYPE html>
<html xmlns:wicket="http://wicket.apache.org">
<head>
<meta name="description" content="A guest list of the rich and famous written in Java and Wicket">
</head>
<body>
<div wicket:id="headerpanel"></div>
<wicket:child/>
</body>
</html>

Replace all the code in com.myapp.wicket.BasePage.java with the following code and save the file:

package com.myapp.wicket;           

import org.apache.wicket.markup.html.WebPage;

/**
*
* @author Jeff
* @version
*/

public class BasePage extends WebPage {

/**
* Construct.
* @param model
*/
public BasePage() {
super();
add(new HeaderPanel("headerpanel"));
}
}

Replace the HTML markup in com.myapp.wicket.HeaderPanel.htm with the following markup and save the file:

<?xml version="1.0" encoding="UTF-8"?>
<!DOCTYPE html PUBLIC "-//W3C//DTD XHTML 1.0 Transitional//EN" "http://www.w3.org/TR/xhtml1/DTD/xhtml1-transitional.dtd">
<html xmlns:wicket="http://wicket.apache.org">
<head><title></title></head>
<body>
<wicket:panel>
<wicket:link>
<img src="Apache_Wicket_logo.png" style="float:left;"/>
</wicket:link>
<h1 style="margin-left: 180px; color: #E9601A; font-style: italic; font-size: 1.5em; font-family: sans-serif; font-weight: bold; line-height: 59px; white-space: nowrap">
<span wicket:id="headerpanneltext">Java EE6 And Wicket EJB Tutorial</span>
</h1>
<hr style="color: #E9601A; background-color: #E9601A; height: 1px;"/>
</wicket:panel>
</body>
</html>

Replace the Java code in com.myapp.wicket.HeaderPanel.java with the following code and save the file:

package com.myapp.wicket;           

import org.apache.wicket.markup.html.basic.Label;
import org.apache.wicket.markup.html.panel.Panel;

/**
*
* @author Jeff
* @version
*/

public class HeaderPanel extends Panel {

public HeaderPanel(String id)
{
super(id);
add(new Label("headerpanneltext", "Java EE6 And Wicket EJB Tutorial"));
}

}

Replace all the HTML markup in com.myapp.wicket.HomePage.html with the following markup and save the file:

<?xml version="1.0" encoding="UTF-8"?>
<!DOCTYPE html>
<html xmlns:wicket="http://wicket.apache.org">
<head>
<wicket:head>
<title>Guests</title>
<wicket:link>
<link rel="stylesheet" type="text/css" href="style.css"/>
</wicket:link>
</wicket:head>
</head>
<body>
<wicket:extend>
<div>
<div style="margin-top: 20px; padding-left: 15px;">
<h2 style="color:#333333; white-space: nowrap;">Please Sign Our Guest List</h2>
<div wicket:id="feedback"></div>
<form wicket:id="guestform">
<label>First Name:
<span wicket:id="firstNameBorder">
<input wicket:id="firstName" type="text"/>
</span>
</label>
<br/>
<label>Last Name:
<span wicket:id="lastNameBorder">
<input wicket:id="lastName" type="text"/>
</span>
</label>
<br/>
<input type="submit"/><input type="reset"/>
</form>
</div>
<hr style="background-color: #E9601A; color: #E9601A; height: 1px; margin-top: 20px;"/>
<div style="margin-top: 20px; padding-left: 15px;">
<h2 style="color:#333333; white-space: nowrap;">Visitors Who Have Signed Our Guest List</h2>
<div wicket:id="namelist" style="white-space: nowrap;">
<span wicket:id="name" style="font-size: 1.2em; color: #333333;">name</span>
</div>
</div>
</div>
</wicket:extend>
</body>
</html>

Replace all the Java code in com.myapp.wicket.HomePage.java with the following code and save the file:

package com.myapp.wicket;

import com.myapp.wicket.components.NameTextField;
import com.myapp.wicket.dataproviders.GuestDataProvider;
import com.myapp.entities.Guest;
import com.myapp.sessionbeans.AbstractFacade;
import com.myapp.sessionbeans.GuestFacade;
import javax.ejb.EJB;
import org.apache.wicket.markup.html.basic.Label;
import org.apache.wicket.markup.html.form.Form;
import org.apache.wicket.markup.html.form.validation.FormComponentFeedbackBorder;
import org.apache.wicket.markup.html.panel.FeedbackPanel;
import org.apache.wicket.markup.repeater.Item;
import org.apache.wicket.markup.repeater.data.DataView;
import org.apache.wicket.model.CompoundPropertyModel;
import org.apache.wicket.model.LoadableDetachableModel;

public class HomePage extends BasePage {

@EJB(name = "GuestFacade")
private GuestFacade guestFacade;

public HomePage() {
super();

add(new FeedbackPanel("feedback"));

/*
* A loadable and detachable model whose sole purpose is to always
* return a new Guest object when its load method is called.
*/
LoadableDetachableModel<Guest> newGuestLoadableDetachableModel = new LoadableDetachableModel<Guest>() {

@Override
protected Guest load() {
return new Guest();
}
};

/*
* The guestForm uses a nested model. The outer model is a compound property
* model and the inner model is a light weight loadable and detachable model.
*/
Form<Guest> guestForm = new Form<Guest>("guestform", new CompoundPropertyModel<Guest>(newGuestLoadableDetachableModel)) {

@Override
protected void onSubmit() {
Guest guest = getModelObject();
guestFacade.create(guest);
setModelObject(new Guest());
guest = new Guest();
}
};

/*
* Add the custom NameTextField compent for
* first and last name to the form, nesting each
* in a FormComponentFeedbackBorder for displaying
* data entry errors.
*/
guestForm
.add(new FormComponentFeedbackBorder("firstNameBorder")
.add(new NameTextField("firstName")));
guestForm
.add(new FormComponentFeedbackBorder("lastNameBorder")
.add(new NameTextField("lastName")));
add(guestForm);

GuestDataProvider gdp = new GuestDataProvider() {

@Override
public AbstractFacade<Guest> getFacade() {
return guestFacade;
}
};

/*
* When dealing with potentially large lists of data it is
* better to use a DataView whose constructor takes a data
* provider as its second parameter.
*/
DataView<Guest> guestListView = new DataView<Guest>("namelist", gdp) {

@Override
protected void populateItem(Item<Guest> item) {
Guest guest = item.getModelObject();
item.add(new Label("name", guest.toString()));
}

};

add(guestListView);

}
}

Replace the content of com.myapp.wicket.style.css with the following content and save the file:

body {
white-space: nowrap;
}

.feedbackPanelERROR {
color: red !important;
list-style: circle;
font-weight: bold;
}

.feedbackPanelINFO {
color: green;
list-style: circle;
font-weight: bold;
}

We need to create a properties file in which we will declare the warning messages that Wicket will use when validating the input form on the HomePage.

  1. Right click on the com.myapp.wicket package in the Projects panel and select New | Other to open the New File Window.
  2. Select Other from Categories and select Properties File from File Types and click the Next button.
  3. Enter HomePage for the File Name and click the Finish button. NetBeans will open the properties file in the eiditor.

Add the following content to the the com.myapp.wicket.HomePage.properties file and save the file:

firstName.Required=First Name Is Required. 
    
lastName.Required=Last Name Is Required.

Next, we will add a custom TextField component to the project.

  1. Right click on Source Packages in the Projects panel and select New | Other to open the New File window.
  2. Select Java from Categories and Java Class from File Types and click the Next button.
  3. Enter NameTextField for the Class Name and enter com.myapp.wicket.components for the Package name and click the Finish button. NetBeans will open the NameTextField.java file in the editor.

Replace all the Java code in the NameTextField.java file with the following and save the file:

package com.myapp.wicket.components;

import org.apache.wicket.markup.ComponentTag;
import org.apache.wicket.markup.html.form.TextField;
import org.apache.wicket.model.IModel;

/**
* A domain specific extension of a Wicket TextField
* that sets the required flag and adds the maxlength=45
* and size=55 attributes to be rendered.
*
* Demonstrates how you can easily extend Wicket
* components to provide domain specific requirement.
*
* @author Jeff
*/
public class NameTextField extends TextField<String>{

/**
*
* @param id
* @param model
*/
public NameTextField(String id, IModel<String> model) {
super(id,model);
setRequired(true);
}

/**
*
* @param id
*/
public NameTextField(String id) {
this(id,null);
}

@Override
protected void onComponentTag(ComponentTag tag) {
tag.put("maxlength", "45");
tag.put("size", "55");
super.onComponentTag(tag);
}


}

Next, we will add an interface to the project.

  1. Right click on Source Packages in the Projects panel and select New | Other to open the New File window.
  2. Select Java from Categories and select Java Interface from File Types and click the Next button.
  3. Enter IEjbDataProvider.java for the Class Name and enter com.myapp.wicket.dataproviders for the Package name and click the Finish button. NetBeans will open the IEjbDataProvider.java file in the editor.

Replace all the Java code in the IEjbDataProvider.java file with the following and save the file:

package com.myapp.wicket.dataproviders;

import com.myapp.sessionbeans.AbstractFacade;
import org.apache.wicket.markup.repeater.data.IDataProvider;

/**
* Extended interface definition of IDataProvider<T> that provides type safe access to session beans.
* Provides the ability to access a session bean in any object.
*
* Use Case: Need to access session in objects other than a Wicket WebPage.
*
* Background - The JavaEEComponentInjector enables Java EE 5 resource injection in Wicket Pages but
* often we need to access to session beans from other objects such as DataProviders and Models. This
* interface supports such a use cases.
*
* Usage
* public class HomePage extends BasePage {
* @EJB(name = "GuestFacade")
* private GuestFacade guestFacade;
* private Guest guest;
*
* public HomePage() {
* super();
* guest = new Guest();
* GuestDataProvider gdp = new GuestDataProvider() {
*
* @Override
* public AbstractFacade<Guest> getFacade() {
* return guestFacade;
* }
* };
*
*
* @param <T>
* @author Jeff
*/
public interface IEjbDataProvider<T> extends IDataProvider<T> {
AbstractFacade<T> getFacade();
}

Next, we will add a Java class to the project.

  1. Right click on com.myapp.wicket.dataproviders in the Projects panel and select New | Other to open the New File window.
  2. Select Java from Categories and select Java Class from File Types and the click the Next button.
  3. Enter GuestDataProvider for Class Name and click the Finish button.

Replace all the Java code in the GuestDataProvider.java file with the following and save the file:

package com.myapp.wicket.dataproviders;

import com.myapp.entities.Guest;
import java.util.Iterator;
import java.util.List;
import org.apache.wicket.model.IModel;
import org.apache.wicket.model.LoadableDetachableModel;

abstract public class GuestDataProvider implements IEjbDataProvider<Guest>{

@Override
public Iterator<? extends Guest> iterator(int first, int count) {
int[] range = {first, count};
List<Guest> guests = getFacade().findRange(range);
return getFacade().findRange(range).iterator();
}

@Override
public IModel<Guest> model(final Guest object) {

final Integer id = object.getId();

LoadableDetachableModel<Guest> ldm = new LoadableDetachableModel<Guest>(object) {
@Override
protected Guest load() {
return getFacade().find(id);
}
};

return ldm;
}

@Override
public int size() {
return getFacade().count();
}

@Override
public void detach() {}

}

The last change we must make is to com.myapp.wicket.Application.java file. Replace all the code in Application.java with the following code and save the file:

package com.myapp.wicket;           

import org.apache.wicket.protocol.http.WebApplication;
import org.wicketstuff.javaee.injection.JavaEEComponentInjector;
/**
*
* @author Jeff
* @version
*/

public class Application extends WebApplication {

public Application() {
}

@Override
protected void init() {
super.init();
addComponentInstantiationListener(new JavaEEComponentInjector(this));
}

@Override
public Class getHomePage() {
return HomePage.class;
}
}

With all these changes in place you should now be able to run the project in your browser.

In the next and last article we will examine the code, focusing on the integration we provided for consuming the EJB in our HomePage. I will also discuss some best practices that I’ve used here, especially pertaining to Wicket components and models. If you don’t know the difference between static and dynamic models or you aren’t familiar with loadable/detachable models you can read my article here to get up to speed on this subject. Stay tuned!

Tuesday, March 29, 2011

Java EE6 & Wicket - Article #4 - Adding JPA Persistence And EJB Support

Welcome to the 4th in a series of detailed articles on Java EE6 & Wicket. If you haven’t already, please read the following previous articles before continuing.

  1. http://jeff-schwartz.blogspot.com/2011/03/java-ee6-wicket.html
  2. http://jeff-schwartz.blogspot.com/2011/03/java-ee6-wicket-article-1-requirements.html
  3. http://jeff-schwartz.blogspot.com/2011/03/java-ee6-wicket-article-2-creating.html
  4. http://jeff-schwartz.blogspot.com/2011/03/java-ee6-wicket-article-3-generating.html

Data Access

The GuestBook Web application we are building must access the data from the guest table in the guestbook database which we created together in the 2nd article. The goal of this article is to provide access to the database using JPA and Enterprise Java Bean (EJB).

NetBeans built in tooling supports creating Entity beans from an existing database table. We will use this feature to generate an Entity bean from the guest table.

NetBenas built in tooling also supports creating an EJB. We will use this feature to create a stateless session bean with JPA access functionality which is commonly referred to as a facade and in the next article we will inject an instance of this facade into our Wicket pages that will allow them to access the guestbook database.

One of the new features of EE6 EJB is, unlike EE5, it doesn’t require we implement interfaces when access is local (meaning from the same container).

First, we will generate our Entity bean from the guest table and then we will create the EJB to provide access to the database. So lets get started.

Create A New Entity Class From A Database Table

In the Projects panel right click on the Source Packages item and select New | Other which will open the New File window. In the Categories list select Persistence and in File Type select Entity Classes from Database and then click the Next button.

  1. Expand the Data Source dropdown and select New Data Source to open the Create Data Source window. Enter guestbook for the JNDI Name and from the Database Connection dropdown list select the database connection which we created in the previous article and click OK.

    2011-03-29 08h24_36

  2. If prompted for the password enter the password you created when you installed MySQL and click OK.

  3. From the list of Available Tables select the guest table and then click the Add button to add it to the Selected Table list and click the Next button.

    2011-03-29 08h29_15

  4. Enter com.myapp.entities for the Package name and click the Next button.

    2011-03-29 09h46_00

  5. Select java.util.List for the Collection Type and then click the Finish button.

The result of the above steps is NetBeans created Guest.java POJO with JPA annotations and placed it in the com.myapp.entities package. NetBeans also created the JPA configuration file persistence.xml. If you fully expand the project node in the Projects panel you will see the following:

2011-03-29 09h48_16

If you open the Guest.java file you will see that it contains standard JPA annotations, getters and setters and numerous named queries. While you have the file open we will apply a change to its ‘toString’ method which we will use when be  build at the application:

  • If it isn’t already, open Guest.java and replace the ‘toString’ method (it is located at the bottom of the file) with the following:
    • @Override
      public String toString() {
          return firstName + " " + lastName;
      }

We will make use of this method i

Create The EJB

  1. In the Projects panel right click on Source Packages and select New | Other to open the New File window.

  2. From Categories select Persistence and from File Types select Session Beans For Entity Classes and click the Next button.

  3. Select com.myapp.entities.Guest from Available Entity Classes and click the Add button to add it to the list of Selected Entity Classes and then click the Next button.

  4. Enter com.myapp.sessionbeans for the Package and click the Finish button. Notice how we didn’t create any interfaces in this last step.

    2011-03-29 09h54_26

The result of the above steps is NetBeans created 2 classes in the com.myapp.sessionbeans package, AbstractFacade.java and  GuestFacade.java.

2011-03-29 10h41_36

  • AbstractFacade.java is an abstract class that implements generalized functionality.
  • GuestFacade.java, a subclass of AbstractFacade.java, provides Guest.java type specific behavior and is annotated with @Stateless marking it as a stateless session bean.

One more thing to do and then we are done. Fully expand Server Resources in the Projects panel and open the sun-resources.xml file. If you set up your MySQL installation to require a password then make sure the Password’s property tag in this file has your correct password. If it doesn’t add your password and save the file. I’ve modified mine as follows:

<property name="Password" value="admin"/>

In the next article we will build out the Wicket parts of GuestBook and use the features provided by the JavaEE Inject Library which we added to our project in the 3rd article to inject the GuestFacade.java session bean into our Wicket pages. Stay tuned!

Monday, March 28, 2011

Java EE6 & Wicket - Article #3 – Generating The Guest Book Web Application Using NetBeans And Deploying It To GlassFish

Welcome to the 3rd in a series of detailed articles on Java EE6 & Wicket. If you haven’t already, please read the following previous articles before continuing.

  1. Java EE6 & Wicket
  2. Java EE6 & Wicket - Article #1 - Requirements, Architecture & Resources
  3. Java EE6 & Wicket - Article #2 – Creating A Backing Datastore And Schema Using MySQL

In this, my 3rd article in this series, we will discuss and demonstrate the generation of the initial GuestBook Web application using the popular NetBeans IDE and the Wicket plugin so please, if you haven’t already, install these two on your development machine before continuing with the rest of this article.

Simple Deployment With Java EE6 And The EJB 3.1 Specification

EE5 frequently required the use of an Enterprise Application Archive for deploying EE Web application. This usually meant having to use multiple projects to deploy even the simplest of EE applications. One of the new features of EE6, sometimes called EAR-less applications,  addresses this issue and makes deploying EE6 applications much simpler. Rather than going into the details here, you can read the article Java EE6: EJB3.1 Is a Compelling Evolution, which provides an excellent review of this new feature as well as EE6 in general. The GuestBook Web application that we are now going to create will use this new feature.

OK, lets get started.

Generating The GuestBook Web Application

If you haven’t already, fire up NetBeans.

  1. From the main menu select File | New Project which will open the New Project window.

  2. Select Java Web in the Categories panel and Web Application from the Projects panel and click the Next button.

  3. Enter GuestBook for the project name and click the Next button.

    2011-03-28 08h40_21
  4. If they aren’t already, select GlassFish Server 3 as the server and Java EE 6 Web as the Java EE version and then click the Next button.

    2011-03-28 08h46_44
  5. The Wicket plugin added Wicket to the list of frameworks that you can use in Web applications. In the Frameworks panel select Wicket as the framework to use in our application and then click the Finish button.

    2011-03-28 08h55_28

When we clicked the Finish button NetBeans generated our GuestBook application for us and displays it in the Project panel. If you fully expand the GuestBook node in the Projects panel you will see the following:

2011-03-28 09h54_44

Notice the Wicket jars that are listed under the Libraries node in the above image. These jars were contributed by the Wicket plugin when the project was generated. The plugin also contributed a number of files in our com.myapp.wicket package. In essence, the Wicket plugin generated a basic Wicket application for us that we can run right out of the box, so lets do that now.

Run the application by clicking on the Run Main Project icon located on the main tool bar. Your browser should open, if it isn’t already, and a new page will open and display the application’s output as in the following image:

2011-03-28 10h03_15

That’s pretty cool considering the minimal effort that was required on our part to get this application up and running at this point.

If you look at the NetBeans Output window you should see a GlassFish Server 3 tab. If you click on this tab you should see that our application has been deployed onto the GlassFish server for us. Also, you should see the following output from Wicket telling us that it is running in development mode.:

2011-03-28 10h26_31

Lets ignore the application that the Wicket plugin generated for us for the time being because we now want to turn our attention to adding EJB support to the project. First, though, a little background.

Wicket’s Single Purpose

Wicket has been designed to solve only one specific problem which is to enable component-oriented, programmatic manipulation of markup. In fact, its creators say as much and you can read their own words in their Wicket’s Vision statement here.

As such, Wicket doesn’t provide out-of-the-box support for EJB. Wicket does have, though, many libraries that have been contributed to the project and which provide a lot of the extras that we often need. One of these libraries is the JavaEE Inject Library and it provides the ability to use the @EJB, @PersistenceUnit and @Resource annotations in our Wicket applications. I suggest that you go to the web site hosting the library and read up on the details before continuing with the remainder of this article because it is important to understand not only what the library does for us but how it does it.

Adding The JavaEE Inject Library To Our Project

To keep things simple, I’ve created a compressed file named guestbooktutorialadditionaljars.zip which contains all the jars required by the JavaEE Inject Library and I posted it here. Download the file onto a folder on your machine and extract its content. Then follow these steps to add the jar files to the project:

  1. In the Projects panel right click on the Libraries node and select Add Jar/Folder to open the Add Jar/Folder window.
  2. Navigate to the folder on your machine where you extracted the contents of the guestbooktutorialadditionaljars.zip to and select all 3 jar files (important - do not select the zip file itself if it happens to also resides in the same folder, only select the 3 jar files) as pictured below. 2011-03-28 11h20_27
  3. Now click the Open button to close the window and add the 3 jar files to the project.

The result of the above is that NetBeans has added the 3 jar files we selected to our project’s classpath which we can see by looking at the files listed under the Libraries entry in the Projects panel.

2011-03-28 11h31_13

We’ve now included all the jars that our project requires and in the next article we’ll discuss and demonstrate adding JPA persistence support to the project. Stay tuned!

Sunday, March 27, 2011

Java EE6 & Wicket - Article #2 – Creating A Backing Datastore And Schema Using MySQL

Welcome to the 2nd in a series of detailed articles on Java EE6 & Wicket. If you haven’t already, please read the following previous articles before continuing.

  1. Java EE6 & Wicket
  2. Java EE6 & Wicket - Article #1 - Requirements, Architecture & Resources

In this, my 2nd article in this series, we will discuss and demonstrate creating the backing datastore that our GuestBook Web application will use. To accomplish this, we will rely on NetBeans which has excellent built in support for working with MySQL. If you haven’t already created a connection to MySQL in NetBeans you will need to do so before continuing. If you’d like to view an excellent tutorial that demonstrates connecting to MySQL I recommend you read Connecting to a MySQL Database.

Create A New Database

Now that you have connected to MySQL in NetBeans we can get started. If it isn’t already, fire up NetBeans and open the Services tab.

We want to create a MySQL database that will be dedicated to the GuestBook Web application that we will build together in later articles. NetBeans MySQL support makes creating a new database trivial as the following steps demonstrates.

  1. In Services, expand the Databases item, right click on the MySQL entry and then select Create Database.
  2. In the Create MySQL Database window enter guestbook in the New Database Name field. It should look exactly
    like the following image. Now click OK.
    2011-03-27 13h36_27

When we clicked OK NetBeans created a new database called guestbook. It also created a new jdbc connection for the guestbook database and added it as an item listed under Databases as the image below shows.

2011-03-27 13h55_56

Create A New Table With Test Data

Now that we have created the guestbook database and jdbc connection we can create a table which we will call guest and which will serve to store the information that our GuestBook Web application visitors will provide. We also want to load the table with some test data which we will use to insure that our database is working properly and also later on when we test our GuestBook Web application.

To make this step easier for you, I’ve created a SQL script that we will run to generate the table and load it with test data. This is the script that we will run:

CREATE  TABLE `guestbook`.`guest` (

  `id` INT NOT NULL AUTO_INCREMENT ,

  `firstName` VARCHAR(45) CHARACTER SET 'utf8' COLLATE 'utf8_general_ci' NOT NULL ,

  `lastName` VARCHAR(45) CHARACTER SET 'utf8' COLLATE 'utf8_general_ci' NOT NULL ,

  PRIMARY KEY (`id`) );
 
INSERT INTO `guestbook`.`guest` (`firstName`, `lastName`) VALUES ('James', 'Taylor');

INSERT INTO `guestbook`.`guest` (`firstName`, `lastName`) VALUES ('Eric', 'Clapton');

INSERT INTO `guestbook`.`guest` (`firstName`, `lastName`) VALUES ('Bill', 'Gates');

INSERT INTO `guestbook`.`guest` (`firstName`, `lastName`) VALUES ('Steven', 'Jobs');

INSERT INTO `guestbook`.`guest` (`firstName`, `lastName`) VALUES ('John', 'Glenn');

INSERT INTO `guestbook`.`guest` (`firstName`, `lastName`) VALUES ('John', 'Kennedy');

INSERT INTO `guestbook`.`guest` (`firstName`, `lastName`) VALUES ('Glenn', 'Ford');

INSERT INTO `guestbook`.`guest` (`firstName`, `lastName`) VALUES ('Al', 'Pacino');

INSERT INTO `guestbook`.`guest` (`firstName`, `lastName`) VALUES ('President', 'Obama');

The above script creates a table by defining its schema in the CREATE TABLE command. The schema declares 3 columns - id, firstName and lastName. The id column is defined as an auto incrementing column whose values will serve as the table’s primary key. The first and lastName columns are used to store the first and last names of the visitors to our GuestBook Web application. They are both defined as being required and able to store up to 45 characters.

The interesting part of the firstName and lastName column definitions are our use of CHARACTER SET 'utf8' and COLLATE 'utf8_general_ci' to define the character sets and collation for these columns:

  • By using CHARACTER SET 'utf8' in the column definitions we are instructing MySQL to use the utf8 character set for the characters stored in these columns. This will allow us to store the names of our GuestBook Web application’s visitors from all over the world whose names might require 3 bytes per character.
  • By using COLLATE 'utf8_general_ci' in the column definitions we are instructing MySQL to use case insensitive collation on these columns. The benefit of this is that when we query on the guest table we will be able to order the result set on firtName and lastName and MySQL will order the result set using case insensitive collation on these columns.

The remaining statements in the script, the INSERT statements, insert rows into the table whose data will be used to test the GuestBook Web application.

NetBeans has built in support for running scripts against an already created database. Please follow these steps to run the above script against the guestbook database:

  1. In NetBeans Services right click on the jdbc connection that was created when we created the guestbook database and select Execute Command to open a SQL Command window in the editor.
  2. Copy the script from above and paste it into the SQL Command editor window and then click on the Run SQL icon located on the window’s button bar. Now fully expand the the guestbook jdbc connection in the Services pane and you should see the following:
    2011-03-30 12h16_18 

We can see that NetBeans successfully applied our SQL script to the guestbook database creating the guest table which contains id, firstName and lastName columns. We can now issue a query against the table to retrieve the list of names we loaded the table with:

  1. In the Services window, right click on the guest table’s entry and select Execute Command.
  2. In the newly opened SQL Command window, type SELECT * FROM guestbook.guest ORDER BY firstName, lastName and then click on the command window’s Run SQL icon located in its icon bar to run the query against the guest table. When the query completes the result set will be displayed listing the 9 rows of data that we loaded into the guest table:
    2011-03-30 12h19_58

With our database preparation out of the way the next article will focus on the fun stuff – generating an ear-less dynamic web application, adding the Wicket framework to it and deploying it to GlassFish. Stay tuned!

Thursday, March 24, 2011

Java EE6 & Wicket - Article #1 - Requirements, Architecture & Resources

Welcome to the first in a series of detailed articles on Java EE6 & Wicket. If you haven’t already, please read my previous article before continuing.

Lets begin with a discussion of the requirements for GuestBook, the Web application we will create.

It is always a good idea to define the purpose of an application right up front so here’s ours for GuestBook

  • Present a Web page that allows visitors to sign a guest book and view a list of visitors who have signed the guest book.

Rather simple, isn’t it. But even simple applications have business rules so here’s ours for GuestBook

GuestBook Requirements – Business Rules

  • Collect the first and last name of each visitor.
  • Limit the number of characters our visitor can key in for their first and last names to a maximum of 45 characters each.
  • Both first and last name are required. So when either are omitted we have to display appropriate and informative warning messages and also highlight the offending data entry fields.
  • The list of names displayed should be rendered to the browser in a case-insensitive manner.

GuestBook Requirements – GUI

Good! We’ve succinctly defined our business rules but we haven’t decided what GuestBook should actually look like. My budget for the project is zero so I can’t hire a professional graphic artist. Therefore, I’ve enlisted the assistance of Vincent Van Gosh, a friend of mine, to work up an image of the page. Below is what he came up with. Nothing fancy, mind you (so what do you expect to get for free these days, anyway?) but it will serve our purpose.

As you can see from the above image, the GuestBook application consists of a single page on which are the following sections:

  1. A header section display the Wicket graphic and the title.
  2. Below the header section is a form which visitors use to enter their first and last names to sign the guest book. Both fields are required and each field is limited to a maximum of 45 characters. The form also contains two buttons, one for submitting the form and one for clearing out its contents.
  3. Below the form section is a list of the names of the visitors who have previously signed our guest book. The first and last names are in ascending order by first and then last name and collated in a case-insensitive manner.

GuestBook Requirements – Data

We can’t display the list of names of our visitors if we don’t store them somewhere. So here are the requirements for storing visitor data.

  • We will use the popular open source MySQL relational database as our datastore.
  • The name of the table in which we will store the data is going to be called ‘guest’.
  • The schema for the quest table defines three columns: 1) id (an auto increment identity column); 2) firstName (a variable character column able to store up to 45 characters) and 3) lastName (like firstName, a variable character column able to store up to 45 characters).
  • The firstName and lastName columns should be defined so that they use case-insensitive collation. Remember, above we stated that the list of names displayed should be rendered in a case-insensitive manner.

GuestBook Architecture

So far we have expressed the purpose for GuestBook, we defined its business rules, worked up a graphic for what we want the Web page to look like and defined the data requirements. But we haven’t touched on what architecture we will use for actually developing GuestBook, so lets define that now.

  • GuestBook will be developed as a browser-based Web application.
  • We will use Oracle GlassFish as the Java EE6 application server.
  • For our presentation tier we will use the Wicket Web framework.
  • MySQL will be used for the datastore tier.

So our architecture stack looks something like the following:

Browser
Java EE6/GlassFish
Wicket MySQL

IDE

I originally thought about also using Eclipse in these articles but in all honesty the Netbeans tooling is far superior to that of Eclipse when it comes to targeting Java EE and GlassFish. In my opinion, Eclipse is a great IDE. In fact, I use it very often and I am very comfortable and productive with it but I’ve come to recognize that both IDEs have their strengths and weaknesses and so I’ve opted to use NetBeans for these articles.

What you will need to complete GuestBook

Following is a list of items that I will use to complete the GuestBook application. If you intend to code along with me (and I certainly hope that you do) then you will need to have these items installed on your development machine. The list provides links to each item’s home page and download page.

ITEM DESCRIPTION
HOME PAGE
DOWNLOAD PAGE COMMENT
MySQL Community Server
Open Source Database http://www.mysql.com/ http://www.mysql.com/downloads/ Version 5.5.10 at the time of writing this article
MySQL Workbench To design, manage and document database schemata http://www.mysql.com/ http://www.mysql.com/downloads/ This is totally optional as I will provide the database schemas for you. But it is a very good tool to have so I thought I’d mention it here.

Version 5.2.33b at the time of writing this article
NetBeans Open Source Java IDE http://netbeans.org/ http://netbeans.org/downloads/index.html Version 6.9.1 at the time of writing this article.
Wicket Plugin For NetBeans Adds wicket support to the NetBeans IDE http://netbeans.org/ http://plugins.netbeans.org/PluginPortal/
faces/PluginDetailPage.jsp?pluginid=3586
Supports NetBeans 6.9.1 at the time of writing this article

Please download and install the items listed above. In the next article, Java EE6 & Wicket - Article #2, we will focus on setting up the GuestBook MySQL database. We will define the database schema for the GuestBook application and apply it to create the guest table. We will also load the guest table with data that will be used during testing.

Tuesday, March 15, 2011

Java EE6 & Wicket

Back To The Future

It's been a while since I've written about Java EE & Wicket. My last articles on the subject covered Java EE5 and EJB dependency injection (DI) in Wicket objects. Since I wrote those articles Java EE6 has been released along with compliant EE6 servers like GlassFish, Wicket has seen a number of point updates and the popular NetBeans IDE has upgraded its tooling.

The most interesting new feature that EE6 provides, at least from my perspective, is EAR-less deployments. With EE5 you often needed to resort to having to implement an EAR module and tie all the sub projects into that. Java EE6 eliminates that requirement - though EARs are still supported – which greatly simplifies creating Java EE6 applications and NetBeans supports creating EAR-less projects.

It would be impossible to cover all the new features that EE6 provides so I’ve decided to write a few articles covering my favorite Java related topics – EE and Wicket. In my opinion NetBeans has much better tooling and plugin support for dynamic Web projects that use Wicket so I will also discuss its tooling support for EE6 and Wicket.

I will use a simple Guest Book application as the context for the articles and I will try to keep each article small but well focused so as not to overwhelm you with too much information all at once. As I see it now the topics for each article will be something along the lines of the following:

  1. An introduction presenting the requirements for the GuestBook Web application as well as discuss its architecture. I will also identify those pieces of the architecture that you will need to download and install on your development box.
  2. Creating a backing datastore and schema using MySQL – here I’ll discuss creating the database that will be used as the backing data store for the Guest Book Web application.
  3. Generating the Guest Book Web application using NetBeans and deploying it to GlassFish. We will also add all the required jar files to the project.
  4. Adding JPA Persistence support to the project.
  5. Building out the Guest Book Web application using NetBeans and testing it.
  6. A wrap up.

This is what the finished Guest Book Application will look like:

2011-03-16 16h44_45

Stay tuned! I’ll be rolling these articles out over the next few weeks so please check back frequently.

Updated 3/31/2011

Here’s a list of urls for the 6 articles in this series:

  1. http://jeff-schwartz.blogspot.com/2011/03/java-ee6-wicket-article-1-requirements.html
  2. http://jeff-schwartz.blogspot.com/2011/03/java-ee6-wicket-article-2-creating.html
  3. http://jeff-schwartz.blogspot.com/2011/03/java-ee6-wicket-article-3-generating.html
  4. http://jeff-schwartz.blogspot.com/2011/03/java-ee6-wicket-article-4-adding-jpa.html
  5. http://jeff-schwartz.blogspot.com/2011/03/java-ee6-wicket-article-5building-out.html
  6. http://jeff-schwartz.blogspot.com/2011/03/java-ee6-wicket-article-6-wrap-up.html

Thursday, May 21, 2009

Wicket + EJB + DI With Netbeans - Part 3

Part 3 - Using The @EJB Annotation To Provide Dependency Injection Support In The Web Tier And Consuming The Services Provided By Their Backing EJBs For this last part of the tutorial I am going to demonstrate how to use Wicket in an EE container environment such as Glassfish. wicket-contrib-javaee is a wicket module that provides integration through Java EE 5 resource injection. With wicket-contrib-javaee you can use the following 3 annotations in your wicket pages:
  • @EJB
  • @PersistenceUnit
  • @Resource
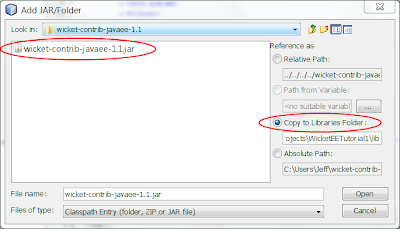
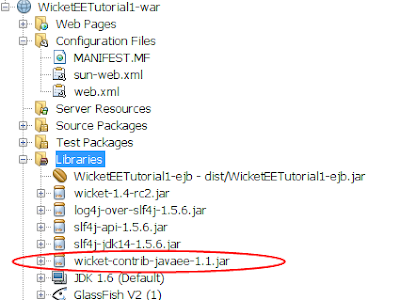
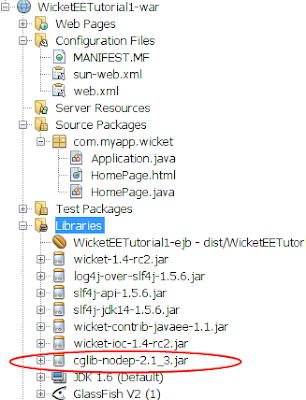
In particular, I will demonstrate how to use the @EJB annotation for dependency injection of the CustomerFacade ejb that was developed in Part 2 of this tutorial. Adding wicket-contrib-javaee-1.1.jar Begin by downloading the wicket-contrib-javaee-1.1.jar which can be found here on SOURCEFORGE.NET. Once you have downloaded the jar and saved it locally it then needs to be added to the WicketEETutorial1-war module:
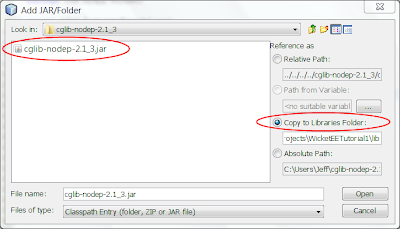
  1. Right click the Libraries node and select Add Jar/Folder. This will open the Add Jar/Folder window.
  2. Navigate to the location where you saved the wicket-contrib-javaee-1.1.jar file and select it. Make sure that the Copy To Libraries Folder option is selected.
  3. Click Open and Netbeans will add the jar file to the module.
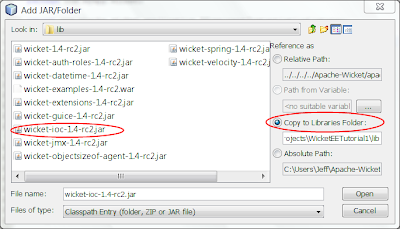
Now we need to add the wicket-ioc jar to the module. wicket-ioc.jar is included with the wicket distribution which we downloaded in Part 1 of this tutorial. Adding wicket-ioc jar
  1. Right click the Libraries node and select Add Jar/Folder. This will open the Add Jar/Folder window.
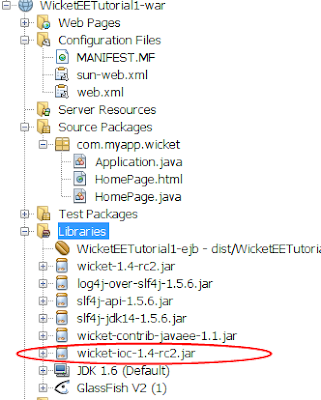
  2. Navigate to the location where you saved the wicket distribution that we downloaded in Part 1 of this tutorial. In the lib folder select the wicket-ioc jar file. Make sure that the Copy To Libraries Folder option is selected.
  3. Click Open and Netbeans will add the jar file to the module.
The wicket-ioc jar has a dependency on cglib jar so we need to include that in the module as well. Adding cglib jar The cglib jar is hosted on SourceForge and you can download it from here. Once you have downloaded the jar and saved it locally it then needs to be added to the WicketEETutorial1-war module:
  1. Right click the Libraries node and select Add Jar/Folder. This will open the Add Jar/Folder window.
  2. Navigate to the location where you saved the cglib jar file and select it. Make sure that the Copy To Libraries Folder option is selected.
  3. Click Open and Netbeans will add the jar file to the module.
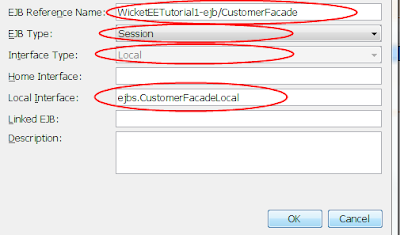
The web.xml file needs to be modified to include a reference to the CustomerFacade ejb. Adding A Reference In web.xml To CustomerFacade EJB In the Projects pane expand the Configuration Files node and double click the web.xml file to open it in the editor and click on the References tab.
  1. Expand the EJB References panel and click the Add button. This will open the Add EJB Reference window.
  2. Enter WicketEETutorial1-ejb/CustomerFacade for the EJB Reference Name.
  3. Select Session for the EJB Type.
  4. Select Local for Interface Type.
  5. Enter ejbs.CustomerFacadeLocal for the Local Interface.
  6. Click the OK button to save the changes to the web.xml file.
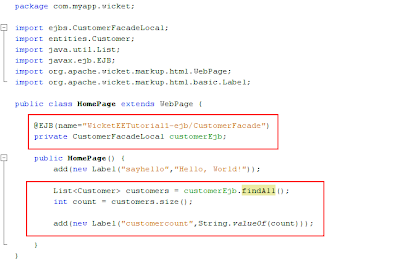
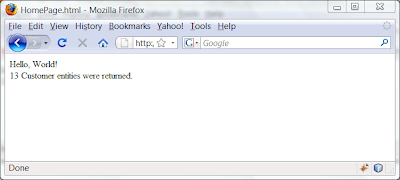
Now we need to override the init method in Application.java. Modifying Application.java Open the Application.java file and add the following code: @Override protected void init() { super.init(); addComponentInstantiationListener((IComponentInstantiationListener) new JavaEEComponentInjector(this)); } Right click in the editor and select Fix Imports to add the needed import statements. Application.java file should now look like the following:Now we need to modify HomePage.java where we wiill include the @EJB annotation for the CustomerFacade ejb and consume its services. Adding The @EJB Annotation Open HomePage.java in the editor and add the following to the HomePage class definition: @EJB(name="WicketEETutorial1-ejb/CustomerFacade") private CustomerFacadeLocal customerEjb; *** Note that the name we are providing for the @EJB annotation is the same one we used when we added the EJB reference to the web.xml file. Now everything is in place for us to actually consume the data access services that are provided by the CustomerFacade ejb so lets add some more code to the HomePage constructor to get a list of Customer entities and get a count of how many entities there are in the list. Consuming The Data Access Services Provided By The CustomerFacade ejb Modify the HomePage constructor so that it looks exactly like the following: public HomePage() { add(new Label("sayhello","Hello, World!")); List customers = customerEjb.findAll(); int count = customers.size(); add(new Label("customercount",String.valueOf(count))); } Right click the editor and select Fix Imports to add the needed import statements. Your HomePage.java file should now look like the following; Open HomePage.html in the editor and modify its markup so that it looks exactly like the following; We have added a Wicket component that will display the number of Customer entities in the list of Customers returned from calling the findAll method of the CustomerFacade ejb. We are now ready to build and run our application. Running Our Application Rick click the WicketEETutorial1 node in the Projects pane and select Run to build and run the application. Your browser should open and render the following; As you can see from the above image, we were able to obtain a reference to the CustomerFacade ejb via the use of the @EJB annotation and call the findAll method which the CustomerFacade ejb exposes. findAll returned a list of Customer entities and from the list we were able to obtain a count of Customer entities. Summary Netbeans greatly simplifies the whole process of generating the Enterprise Application's modules. Netbeans wizards generate a lot of code that we would otherwise have to hand code ourselves. To a very large degree Netbeans trivializes Java EE5 applications allowing us to focus on the domain issues of the application and not its plumbing and wiring. Who said Java EE was too heavy and complex? I hope this tutorial demonstrated that neither is true. With the addition of the wicket-contrib-javaee jar file, Wicket applications gain the ability to use Java EE5 annotations that allow it to take full advantage of services esxposed in enterprise java beans when running in a Java EE5 container such as the one Glassfish provides. All in all, very cool, isn't it? And easy, too!And how cool is it to be able to use Wicket as the web framework in a Java EE application and have it be able to consume services exposed through ejbs using standard Java EE annotations? Though this application was trivial by design so as to keep it simple for demonstration purposes, the principles demonstrated here will work for applications of much greater size and complexity. Conclusion This concludes the tutorial and I hope you had as much fun following along as I had presenting it. Please feel free to provide your comments. I look forward to hearing from you.

About Me

My photo
New York, NY, United States
Software Developer