Developing Great Software

Saturday, December 26, 2009

UIComposer On Project Kenai


UIComposer v0.4a Now On Project Kenai

I have created a new project on Project Kenai to house UIComposer which is currently at version 0.4a. 

UIComposer is a Wicket custom control that provides similar functionality as Facebook's "What's On Your Mind" page widget. It is composed of an optional image which can be associated with a link, a data entry field for user input and a button that posts the user's data back to the server using AJAX.

UIComposer comes in many flavors but using it in your applications is easy. All its resources and dependencies are fully self contained. So adding UIComposer is as simple as adding its lib to your project, importing it into your source files and creating the control:
import UIComposer.Wicket.Component.UICompositeWithImage;
.
.
.
add(new UICompositeWithImage("uicomposite", "What's on your mind?") {
.
.
.
UIComposer's use of abstract methods allow tailoring the controls' behavior at run time making it suitable in situations that are specific to each application.

Access to the project's source code is available using Subversion at the following url:
https://svn.kenai.com/svn/uicomposer~subversion
Anonymous access to the repository is allowed but if you aren't already I would recommend you create your own account on Project Kenai to reap the greatest benefit as it affords many resources to developers.
 
Included in the distrobution is a Wicket application, UIComposerTestApp, for testing its various flavors and ways of using UIComposer.

You will need to install Subversion on your system in order to obtain the UIComposer source code.

If you use Netbeans then you are in luck. Netbeans has excellent integration with Subversion and Project Kenai. In Netbeans, once you are logged in to Project Kenai, you can effortlessly download the project directly into Netbeans, all without leaving the Netbeans IDE.

Please down load UIComposer. Play with it! Try to break it! Provide lots of feedback! Bug tracking is supported via Jira which is accessible from the project's home page on Project Kenai. The more feedback the better UIComposer will be.

Currently UIComposer is covered under the GPL-2.0 source license. I am entertaining loosening the licensing restrictions with the lesser version of GPL but only after considerable thought has been given to doing so.

In the new year I will contribute numerous articles that deal with creating custom Wicket components and UIComposer will serve as an example for many of them. But UIComposer is more than a tool for future articles, it is my contribution to the Wicket community. I hope users of the Wicket framework who need the features that UIComposer provides will take advantage of it, work with me and provide their feedback.

Oh, and one more thing, that mug in the picture at the top of the page is mine :)

Jeff

Thursday, December 24, 2009

Some Musings About This Year & Next

Oracle's pending purchase of Sun seems appropriate in the sense that it seems to add to the year end anxiety. Oracle will, I imagine, be able to alleviate the EEC's concern over MySql and will eventually see the EEC approve the deal. But developers have their concerns about where that will leave Netbeans, the free and open source Java IDE and rich client platform. Hopefully, Oracle will fully embrace Netbeans and provide the assets that are needed to move Netbeans along. And there is much to do.

Recently released Netbeans v6.8 has lots of new features. It is very good but at times it is too memory hungry and brings my HP laptop (Vista OS with 2 gigs of memory) to its knees. The project scanning/indexing issue seems to have reappeared in this release for who knows why. Current support for Groovy and Grails, which I believe will see a tremendous growth in the coming year, is nowhere near where it could be. Intellij Idea, for example, really shines here and sets the bar that Netbeans will have to aim for in the coming year if it wants to attract and keep Groovy and Grails developers. The Zend framework needs to be among the PHP frameworks that are supported and Wicket support needs to be folded into Netbeans.

Wicket has seen much improvement in 2009 and I am confident that it will continue to do so in 2010. Its developers are top-notch and its developer community is alive and well. Hopefully, the new year will see improved support for Java EE/EJB along the same lines that Wicket currently has for Spring.

Cloud computing became a reality in 2009 and should see healthy adoption in 2010.

Apparently the Intype editor project isn't dead after all and its developers seem to have a renewed determination towards putting out a new release. For all of us who have wished for a TextMate like editor for Windows, well we seem to be a few steps closer to that end.

In the few remaining days of 2009 I will place my custom Wicket component on Project Kenai which will serve as the subject for numerous future articles. I am very excited about this. I was going to postpone putting the project on Kenai because it needs some minor refactoring and there is one api that I haven't even touched on yet. After some thought, though, I decided that it was more important to get it out there, that the remaining tasks should be visible and hopefully will attract developers' input and contributions to the project.

And, finally, a voice on the radio just told me that this was the most dangerous time of the year for people to experience heart problems. I imagine this year will be even more severe than most due to the state of the economy and the prospect of a long and protracted recovery. Hopefully, those who found themselves struggling in 2009 will see better things coming their way during the coming year.

A very happy holiday and new year to you all.

Jeff

Saturday, August 29, 2009

Improving Wicket's Support for Java EE5 Applications

I am a huge fan of the Wicket Web framework. Wicket has made Web application development fun again for me and for many other developers by greatly lowering the impedance mismatch that exists between HTTP and the Java language. As perfect as Wicket is, though, it could use some improvement in its ability to support Java EE5 based applications. So here I offer my take on what I believe can be done to make Wicket an even better framework. Currently Wicket's support for Java EE5 applications is provided by wicket-contrib-javaee. By adding this add-on to your Wicket application you can reference the functionality exposed by any EJB simply by using the @EJB annotation and adding a few lines of initialization code to the Wicket WebApplication class. However, some developers who have worked with this add-on have voiced concerns about it causing problems in their applications. At the same time, the support behind this add-on appears to be somewhat questionable. This is an unfortunate state of affairs but one which could be rectified if the functionality provided by it was instead folded into the core Wicket distribution. This should not be seen as an endorsement of EE but rather as a recognition that there is a significant interest to employ Wicket in EE applications. This recognition would be similar to that which has already been given to Spring and Guice by having included their interfacing libraries as part of Wicket's core distribution. Such an adaption could result in a greater acceptance of Wicket in environments where EE is the chosen platform for Enterprise applications. In conjunction with this I would also suggest that the next edition of the marvelous Wicket In Action book include a new chapter dedicated to showing just how easy it is to create this type of application. I would gladly contribute it myself if I were asked :) Sincerely, Jeff

Friday, August 28, 2009

Coming Soon - An Article About Developing Custom Ajax Enabled Wicket Components

As I have been very busy looking for full-time work I haven't had time to devote to writing my next article. I've got 5 cats to feed and they eat a lot so I better land a job soon or I might wind up eating my 5 cats LOL. Anyway, I gave it a lot of thought and my next article will be about developing custom Ajax enabled Wicket components. The component that I will create in the tutorial will be similar to the What's On Your Mind component seen on Facebook pages. In the process I will demonstrate how Wicket makes developing this type of component almost trivial. Sincerely, Jeff

Friday, July 17, 2009

Wicket, A Stateful Web Framework

HTTP Is Stateless Desktop application programmers as well as programmers developing in a traditional multi-user, client/server environment don't normally have to worry about maintaining the state of an application's objects. After all, programming languages like C, C++, Java and C# have built-in mechanisms that maintain a variable's state during the lifetime of the application, insuring that the value of a variable is maintained and that it is 'reachable' upon referencing that variable. The stateless nature of HTTP, however, creates artificial workflows for web applications that do not exist in applications developed for the desktop or for a traditional multi-user, client/server environment. Because HTTP doesn't persist an application's state across multiple HTTP requests means that application servers and frameworks have to provide some mechanisms to allow the programmer to do this. A common method uses hash tables that are stored to physical memory or to a database or file system at the end of processing an HTTP requests. The ability to persist these values so that they can be read back when the next HTTP request hits the server for the same client session provides the glue or the narrative thread that web applications need in order to bind the multiple HTTP requests into something that simulates an unbroken (broken by HTTP request boundaries) and contiguous workflow. Managing this session state is the responsibility of the application programmer. Every application and workflow imposes its own requirements as to what and when something is required to be persisted and herein lies the problem: getting this right 100% of the time is often the most difficult challenge a developer faces when developing a web application that is maintainable, responsive and scalable. To make matters worse, the difficulty grows proportionately as the application grows in complexity and as more maintenance is done. With tight schedules and dwindling budgets there is often no time to thoroughly conduct a regression test to ensure that new bugs aren't being introduced. My own experiences working on web applications have led me to believe that this isn't the best approach to dealing with the stateless nature of HTTP and that there has to be a better way. I have spent far too many nights and weekends debugging and fixing problems related to changes made to application logic and the subsequent mismanagement of session state needed to support the work flows across multiple HTTP requests to think that this is an optimal solution. Using The Session Hash Table Perhaps now is a good time to provide an example of how hash table based session state frameworks attempt to overcome the stateless nature of HTTP and the types of problems that are associated with this technique. I will juxtapose Wicket's approach to handling this after. Lets consider what appears on the surface to be a rather simple scenario, that of maintaining and displaying a counter whose value represents the number of times the web page is processed on the server and rendered in the browser. When the user requests the web page for the first time it should be rendered displaying a value of 1 for the counter. When the user clicks the button on the web page the browser should issue a get request back to the server. The application running on the server should process the get request by incrementing the counter and rendering the page back to the browser displaying the current value of the counter. The web page itself is simple and looks like the following: The first time the user requests the page it will be rendered in the browser with a value of 1 for the counter. Each subsequent click of the button whose label is 'Click Here' will result in the browser issueing a get back to the server and the page being rendered to the browser with an incremented counter. The image below shows what the page would look like after being rendered for the second time: Notice how the counter's value in the above image is 2. This is in response to it having been incremented on the server. So what does it take code-wise on the server to provide this functionality? Using a web framework such as ASP.DotNet and ASPX Web Forms, the object associated with an aspx page would be created in response to the HTTP request and the object's load method would be called in which it would retrieve the value from the session state hash table using a string value to identify the value. It would then convert the value to an integer, increment the value by 1, convert the value back to a string, assign the value to the label on the web page, save the value to the session hash and lastly render the page back to the browser. But wait! What would happen if this is the first time the page is processing? If you didn't compensate for this and have an alternate branch of logic the named value wouldn't exist in the session hash table and the program would abort because it was attempting to manipulate a null string reference. But wait! Couldn't you instead, you ask, store the value in a field of the aspx page object and just increment it every time it processes the request? The answer is no because ASP.DotNet like many other frameworks does not persist the state of the objects that represent web pages and HTML controls on the server between HTTP requests. Instead, ASP.DotNet as do many other frameworks instantiates the object associated with the web page every time a new request arrives. Instantiation of the object causes the object's fields to be assigned their initial values according to the object constructor or to their appropriate default initial values based on their variable types. While this is a trivial example, it isn't hard to see how this way of dealing with persisting state between HTTP requests can quickly snowball out of control. Now imagine that there is a web framework out there that actually does persist the objects associated with web pages and HTML controls across HTTP requests. Suddenly, schemes such as having to save application state in hash tables and persist them across HTTP requests are no longer necessary. Now your favorite object oriented programming language behaves almost the same way in web applications as it does in desktop or client-server applications. Imagine that the fact that the web application is running in a stateless HTTP environment is hidden from the developer and the framework takes care of persisting and restoring the objects associated with your application's web pages and HTML controls for you. Enter Wicket, Simply Eloquent and Eloquently Simple Well, you are not left to your imagination because there actually is a web application framework that does this and a whole lot more for you. It is the Java based Apache Wicket web framework. Using the example from above, here is the actual code written to the Wicket web framework that renders the web page pictured above: That's it. Nowhere is there code to save or retrieve string values from a session based hash table. Nor are there alternate paths of logic needed to differentiate processing that should happen the first time a web page is being requested from all other requests. There is just "normal" Java code - i is initialized in the HomePage constructor and i is incremented in response to the button's onClick method. The current value of i is rendered back to the browser in response to each request. This style will seem very familiar to those who have coded Java SE Swing based applications or to anyone who has coded desktop applications using other programming languages such as C# or even Basic. And if you are thinking that there must be some magic happening in the HTML page well there isn't and here it is: Nothing but pure HTML. Wicket is a Model/View/Controller based framework. HTML pages never mix markup with code. They are strictly the 'view' part of the MVC equation. The actual magic is happening behind the scenes and within the Wicket framework's request cycle processing which is responsible for persisting the HomePage object at the end of each request cycle and restoring it at the start of each request cycle. This is completely transparent to the application developer who can just assume that objects behave like... objects. Wicket hides the stateless nature of HTTP and enables coding web applications like one would code non web applications. Of course the developer must exercise sound judgment when deciding what and how much to persist in the objects associated with Wicket web pages and HTML controls. Persisting a list of 100,000 database records, for instance, for thousands of concurrent users is wasteful and could cause severe degradation or even cause the server to fail altogether. For instance, persisting a database table row's unique identity in a web page object is preferable to persisting the actual row of data since the database itself already serves as the underlying cache for the data. Having the identity of the row of data is enough to allow the data to be retrieved through a query to the database when and if it is needed. Wicket also provides a model architecture that promotes this type of resource usage. Wicket's LoadableDetachableModel class provides the developer with the ability to persist only the minimum amount of information across HTTP requests - such as a data row's identity value - which can be used to query the database for the actual data when and if it is needed and released at the end of the request. Summary The Apache Wicket web framework eliminates one of the greatest challenges faced by developers of web applications, the dreaded persistence problem caused by the stateless nature of HTTP. Wicket also provides numerous other advantages to developers of web application, some of which I have already written about and which you can read here in my blog. I hope you have enjoyed reading this article as much as I have enjoyed presenting it to you. And as always, please feel free to leave your comments.

Thursday, May 21, 2009

Wicket + EJB + DI With Netbeans - Part 3

Part 3 - Using The @EJB Annotation To Provide Dependency Injection Support In The Web Tier And Consuming The Services Provided By Their Backing EJBs For this last part of the tutorial I am going to demonstrate how to use Wicket in an EE container environment such as Glassfish. wicket-contrib-javaee is a wicket module that provides integration through Java EE 5 resource injection. With wicket-contrib-javaee you can use the following 3 annotations in your wicket pages:
  • @EJB
  • @PersistenceUnit
  • @Resource
In particular, I will demonstrate how to use the @EJB annotation for dependency injection of the CustomerFacade ejb that was developed in Part 2 of this tutorial. Adding wicket-contrib-javaee-1.1.jar Begin by downloading the wicket-contrib-javaee-1.1.jar which can be found here on SOURCEFORGE.NET. Once you have downloaded the jar and saved it locally it then needs to be added to the WicketEETutorial1-war module:
  1. Right click the Libraries node and select Add Jar/Folder. This will open the Add Jar/Folder window.
  2. Navigate to the location where you saved the wicket-contrib-javaee-1.1.jar file and select it. Make sure that the Copy To Libraries Folder option is selected.
  3. Click Open and Netbeans will add the jar file to the module.
Now we need to add the wicket-ioc jar to the module. wicket-ioc.jar is included with the wicket distribution which we downloaded in Part 1 of this tutorial. Adding wicket-ioc jar
  1. Right click the Libraries node and select Add Jar/Folder. This will open the Add Jar/Folder window.
  2. Navigate to the location where you saved the wicket distribution that we downloaded in Part 1 of this tutorial. In the lib folder select the wicket-ioc jar file. Make sure that the Copy To Libraries Folder option is selected.
  3. Click Open and Netbeans will add the jar file to the module.
The wicket-ioc jar has a dependency on cglib jar so we need to include that in the module as well. Adding cglib jar The cglib jar is hosted on SourceForge and you can download it from here. Once you have downloaded the jar and saved it locally it then needs to be added to the WicketEETutorial1-war module:
  1. Right click the Libraries node and select Add Jar/Folder. This will open the Add Jar/Folder window.
  2. Navigate to the location where you saved the cglib jar file and select it. Make sure that the Copy To Libraries Folder option is selected.
  3. Click Open and Netbeans will add the jar file to the module.
The web.xml file needs to be modified to include a reference to the CustomerFacade ejb. Adding A Reference In web.xml To CustomerFacade EJB In the Projects pane expand the Configuration Files node and double click the web.xml file to open it in the editor and click on the References tab.
  1. Expand the EJB References panel and click the Add button. This will open the Add EJB Reference window.
  2. Enter WicketEETutorial1-ejb/CustomerFacade for the EJB Reference Name.
  3. Select Session for the EJB Type.
  4. Select Local for Interface Type.
  5. Enter ejbs.CustomerFacadeLocal for the Local Interface.
  6. Click the OK button to save the changes to the web.xml file.
Now we need to override the init method in Application.java. Modifying Application.java Open the Application.java file and add the following code: @Override protected void init() { super.init(); addComponentInstantiationListener((IComponentInstantiationListener) new JavaEEComponentInjector(this)); } Right click in the editor and select Fix Imports to add the needed import statements. Application.java file should now look like the following:Now we need to modify HomePage.java where we wiill include the @EJB annotation for the CustomerFacade ejb and consume its services. Adding The @EJB Annotation Open HomePage.java in the editor and add the following to the HomePage class definition: @EJB(name="WicketEETutorial1-ejb/CustomerFacade") private CustomerFacadeLocal customerEjb; *** Note that the name we are providing for the @EJB annotation is the same one we used when we added the EJB reference to the web.xml file. Now everything is in place for us to actually consume the data access services that are provided by the CustomerFacade ejb so lets add some more code to the HomePage constructor to get a list of Customer entities and get a count of how many entities there are in the list. Consuming The Data Access Services Provided By The CustomerFacade ejb Modify the HomePage constructor so that it looks exactly like the following: public HomePage() { add(new Label("sayhello","Hello, World!")); List customers = customerEjb.findAll(); int count = customers.size(); add(new Label("customercount",String.valueOf(count))); } Right click the editor and select Fix Imports to add the needed import statements. Your HomePage.java file should now look like the following; Open HomePage.html in the editor and modify its markup so that it looks exactly like the following; We have added a Wicket component that will display the number of Customer entities in the list of Customers returned from calling the findAll method of the CustomerFacade ejb. We are now ready to build and run our application. Running Our Application Rick click the WicketEETutorial1 node in the Projects pane and select Run to build and run the application. Your browser should open and render the following; As you can see from the above image, we were able to obtain a reference to the CustomerFacade ejb via the use of the @EJB annotation and call the findAll method which the CustomerFacade ejb exposes. findAll returned a list of Customer entities and from the list we were able to obtain a count of Customer entities. Summary Netbeans greatly simplifies the whole process of generating the Enterprise Application's modules. Netbeans wizards generate a lot of code that we would otherwise have to hand code ourselves. To a very large degree Netbeans trivializes Java EE5 applications allowing us to focus on the domain issues of the application and not its plumbing and wiring. Who said Java EE was too heavy and complex? I hope this tutorial demonstrated that neither is true. With the addition of the wicket-contrib-javaee jar file, Wicket applications gain the ability to use Java EE5 annotations that allow it to take full advantage of services esxposed in enterprise java beans when running in a Java EE5 container such as the one Glassfish provides. All in all, very cool, isn't it? And easy, too!And how cool is it to be able to use Wicket as the web framework in a Java EE application and have it be able to consume services exposed through ejbs using standard Java EE annotations? Though this application was trivial by design so as to keep it simple for demonstration purposes, the principles demonstrated here will work for applications of much greater size and complexity. Conclusion This concludes the tutorial and I hope you had as much fun following along as I had presenting it. Please feel free to provide your comments. I look forward to hearing from you.

Monday, May 18, 2009

Wicket + EJB + DI With Netbeans - Part 2

Part 2 - Creating Entity Classes That Map To An Existing Database And Exposing Data Access Services Through EJBs With Netbeans For this part of the tutorial I am going to use the Sample database that comes with the Java DB which should have been installed when you installed Netbeans and Glassfish. You can verify that the Sample database is recognized by Netbeans by expanding the Database node in the Services pane where you should see a connection listed there that looks like the highlighted one below. If you fully expand the connection node you can see that there are a number of tables already defined. For this tutorial we want to create one entity class for the Customer table. However, we will not have to hand code this entity class because Netbeans has excellent tooling support for generating entity classes that map to tables in a database. Creating Our Customer Entity Class Please follow these steps to create the Customer entity class for the Customer table in the Sample database:
  1. In the Projects pane right click the WicketEETutorial1-ejb module node and select New|Other from the context menu. This will open the New File window. In the Categories pane select Persistence and in the File Types pane select Entity Classes From Database and click Next.
  2. Expand the Data Source drop-down menu in the Data Tables Pane and select the jdbc/sample option. Netbeans will fill the Available Tables list with all the tables defined in the Sample DB.
  3. Uncheck the Include Related Tables option.
  4. Select the CUSTOMER table from the list of Available Tables.
  5. Click the Add button and then click Next.
  6. Enter entities as the package name in the Package field and the click the Create Persistence Unit button. In the Create Persistence Unit window accept all the defaults and click the Create button. Now click the Next button.
  7. In the Mapping Options pane select java.util.List for the Collection Type and click the Finish button.
Upon completing the above steps, Netbeans will create the Customer entity class and place it in the entities package. Netbeans will also generate the persistence.xml file and place it under the Configuration Files tab. With our entity class and persistence unit file created we can now go on and encapsulate our database access code in EJBs. Like our entity class we will not have to hand code our database access code. Netbeans has excellent tooling support for generating database access code that map to existing entity classes. Creating Our Customer Data Access EJB Please follow these steps to create the EJB that will encapsulate the database access code:
  1. In the Projects pane right click the WicketEETutorial1-ejb module node and select New|Other from the context menu. This will open the New File window. In the Categories pane select Persistence and in the File Types pane select Session Beans For Entity Classes and click Next. As you can see, Netbeans has filled the Available Entity Classes list with the Customer entity class we created.
  2. Select the Customer entity in the list of Available Entity Classes.
  3. Click the Add buttom and then click the Next button.
  4. In the Generated Session Beans pane enter ejbs for the package name. We want to create a local interface so make sure the Local checkbox is checked.
  5. Now click the Finish button.
Upon completing the above steps, Netbeans will create the local interface and implementation class files for the Customer entity that we selected and place these files in the ejbs package. Summary This concludes Part 2 of the tutorial. As you can see, Netbeans greatly simplifies coding the service tear in an Enterprise Application. We have taken advantage of the tooling available in Netbeans to generate our Customer entity class, persistence.xml and CustomerFacade EJB class files for us. In the next part of this tutorial, Part 3, we will expand the web tier to consume the services exposed by the CustomerFacade EJB that we have just created.

Wednesday, May 6, 2009

Wicket + EJB + DI With Netbeans - Part 1

Introduction This 3 part tutorial demonstrates how easy it is to create a Java EE5 Enterprise Application with Netbeans. The Web tier of the Enterprise Application will be based on the Wicket Web framework and the services tier -- the EJBs (Enterprise Java Beans) -- will serve up data from a database which will be consumed by the Web tier. In particular, it demonstrates how easy it is for the Web tier to consume the services exposed by EJBs and to manage references to the EJBs through DI (dependency injection) using the @EJB annotation and the wicket-contrib-javaee jar library. The tutorial has 3 parts covered in 3 separate articles:
  1. Part 1 will demonstrate creating the Enterprise Application in Netbeans and configuring the Web tier to use the latest build of the Wicket framework.
  2. Part 2 will demonstrate creating entity classes that map to an existing database and exposing data access services through EJBs.
  3. Part 3 will demonstrate using the @EJB annotation to provide dependency injection support in the Web tier and consuming the services provided by their backing EJBs.
At the conclusion of this 3 part tutorial we will have created a fully functional Wicket based Web application running in the Java EE5 container supplied by the Glassfish application server. The Web application will use standard Java EE5 based annotations such as @EJB to resolve references to EJBs at run time through the use of dependency injection. It is also my hope that this tutorial will serve to dispel the belief by many that the Java EE5 container is too heavy and complex to develop for. Part 1 - Creating A Java EE5 Enterprise Application With Netbeans Creating The Application Netbeans greatly simplifies the creation of Java EE5 based applications as the following demonstrates. Please follow these steps:
  1. Open Netbeans.
  2. Select File|New Project from the main menu. This will open the New Project window
  3. In the Categories pane select Java EE and in the Projects pane select Enterprise Application and click Next.
  4. Enter WicketEETutorial1 or any other name you chose for the Project Name as pictured below and click Next.
  5. From the Server drop-down selection list select Glassfish v2 or better. Accept the other options' default settings as pictured below and click Finish.
As a result of completing the above, Netbeans will generate and open 3 module projects in the Projects pane as pictured below.The 3 modules and their associated projects that were generated for us are summarized below:
  1. WicketEETutorial1 is an Enterprise Application module project and its ear (enterprise archive) file is what will be deployed to the server.
  2. WicketEETutorial1-ejb is an EJB module project and it is here where we will define our entity classes and encapsulate our JPA data access code in EJBs (Enterprise Java Beans). This module will serve as our service layer tier and provide both domain and business functionality to our Web application. Its jar file is included in the ear file mentioned above.
  3. WicketEETutorial1-war is a Web module project and it is here where we will define our presentation layer tier. Its war (web archive) file is included in the ear file mentioned above. As a default, Netbeans configures the web tier to serve up JSP pages. In the next step we will change this so that the web tier will use the Wicket web framework instead.
Configuring the Web tier to use Apache Wicket For this tutorial I am using the latest release candidate of the Wicket web framework which at the time of writing this was version 1.4-rc2 and which I downloaded from the Apache Wicket web site. A basic Wicket web application only needs the wicket-1.4-rc2.jar file so I added it to the module. Wicket has a dependency on the slf4j which is a logging API. I was able to download the SLF4J distribution from the SLF4J web site. This distribution also includes the jar file for log4j which is a popular logging implementation. I added 3 jar files from this distribution to the module. Now the web tier's Libraries node contains the following jars: To keep this part of the tutorial as simple as can be, the web application will for now only display the gratuitous Hello, World! In the web tier module I created the following source code package and 3 files: The contents of each of the above files is shown below: The web.xml file which is located under the Configuration Files tab in the Projects pane needs to be modified as well and should look exactly like the following highlighted text: As can be seen from the Home.html and Home.java files, the span element with the wicket:id of sayhello will have its contents replaced with Hello, World! Running The Application When we build and run the application the following is rendered in the browser:Summary This concludes Part 1 of the tutorial. As you can see, we have successfully created, built and run a Java EE5 Enterprise Application with a web tier using the Wicket web framework. The application as it now stands is trivial as it only displays the ubiquitous Hello, World! In the next part of this tutorial, Part 2, we will expand on the service side (the EJBs) and in Part 3, we will expand the web tier to consume the services exposed by the EJBs.

Wednesday, April 29, 2009

Will We Ever See Netbeans v7?

With Oracle's acquisition of Sun Microsystems the big question in my mind and those of many dedicated Netbeans users is what will happen to the Netbeans IDE platform? Will we ever see a release of Netbeans v7? While the release of Netbeans v6.7 is highly anticipated, its development was begun under the auspices of Sun, who throughout the years has steadfastly committed itself to the platform. Will Oracle follow suit and provide the level of human, financial and organizational capital that will be required to take Netbeans to its next generation? I guess we will have to wait and see but I think you can guess what I am hoping.

Sunday, April 5, 2009

JPA/Hibernate and Wicket Repeating Views with Netbeans- Part 2

[***Note This is the second and final article in this series and requires that you have completed the exercises in the first article in this series. If you haven't already, please do so now before preceding with the exercises in this article.] This is the second and final article in this series of using JPA/Hibernate and Wicket repeating views. This article will cover the remaining tasks that will allow us to render the the data from the Customer table in a tabular view to the browser using Apache Wicket repeating views and models. Wicket's Repeating Views Wicket's repeating views allow you to render data from a collection of objects, such as a List. HTML tables can be used to display the information in the browser where each row in the table represents one item in the List collection and columns in the table represent each List item's fields. The markup we want to generate for this exercise is an HTML table with the following elements:
  • A table header with header columns for each of the columns from the Customer table that we want to display. For our exercise, we will display the Customer ID, Customer Discount Code, Customer Zip, and Customer Name columns from the Customer table.
  • A table row for each of the Customer entities returned when we query the Customer table for its contents. The cells in these rows will contain data from their corresponding fields in the Customer entity objects that are returned when we query the Customer table. Their corresponding fields are customerId, discountCode, zip, and name.
[***Note Because there is a one-to-many relationship between the Customer entity and the DiscountCode entity, the customer's discount code can be referenced through the Customer entity. We will see this later when we write the code to actually render the data to the browser.] Wicket provides numerous components that render content and markup to the browser. Among these are repeating view components that repetitively render the same markup but with varying content depending on the current item associated with the current view. The item associated with current view in our example is the current Customer entity from a List of Customer entities that we want to render. Models - IModel and IDetachable Wicket's components access data through models. This is the Model part in Wicket's Model View Controller implementation. Models are wrappers around data; they keep a reference to the data they are wrapping. Wicket provides numerous models such as Model, PropertyModel, CompoundPropertyModel, and LoadableDetachableModel to name a few. All models must implement the IModel interface, which publishes two methods:
  • T getObject() - returns and object of type T.
  • void setObject(T object) - set the model data to object of type T.
IModel also extends the IDetachable interface which publishes one method:
  • void detach() - detaches the model data and is called after rendering has completed.
Wicket Is A Stateful Framework Wicket is a stateful web framework; at the end of a request, after the markup has been sent to the browser, Wicket stores the page, component hierarchy, and associated models (state) in the page store. Since models keep references to their data, data will also be stored if it hasn't been detached from the model first. In order for the data to be stored it must be serializeable. Detaching the data from a model reduces the memory overhead on the server and also allows models to be associated with data that isn't serializeable. LoadableDetachableModel Wicket provides an abstract implementation of a detachable model, LoadableDetachableModel.
It is a model that can be serialized to the page store without its data; its reference to its data is declared as transient. It implements IModel and IDetachable. LoadableDetachableModel calls its load method when the view component it is attached to needs access to its data. This allows clients, which implement this method, to load the data it wraps from any data source, a database for instance. We will see an example of using the LoadableDetachableModel later in the exercise when we implement the code for the view. DataView The DataView is a repeating view component. It makes it very simple to populate a repeating view from a database. DataView's are constructed as follows:
  • protected DataView(String id, IDataProvider dataProvider)
  • protected DataView(String id, IDataProvider dataProvider, int itemsPerPage)
Both constructors take an id of String as their first parameter. Its value must be set to the wicket:id attribute of the HTML tag we are attaching the DataView component to. Both constructors take an IDataProvider as their second parameter. The IDataProvider acts as an interface between the database and the Dataview. itemsPerPage, an int, can be passed as a third parameter and is used when implementing pagination. For this article, we will use the first constructor, which takes only two parameters, an id and an IDataprovider. The IDataProvider Interface - a wrapper around data
IDataProvier is really nothing more than a wrapper around a collection. It extends IDetachable and publishes three methods that must be implemented:
  • iterator(int first, int count) - Gets an iterator for the subset of total data.
  • model(T object - Callback used by the consumer of this data provider to wrap the object retrieved from the iterator(int, int) with a model (usually a detachable one).
  • size() - Gets the total number of items in the collection represented by the DataProvider.
Implementing an IDataProvider Below is the implementation of IDataProvieder that will be used by our DataView component: Let's discuss each of the methods in our implementation of IDataProvider:
  • iterator calls the CustomerJpaController's findCustomerEntities method with 2 parameters, count and first and will return an Iterator for the list of Customer objects that the findCustomerEntities method returns.
  • size calls the CustomerJpaController's getCustomerCount method to get the count of Customers and returns the result.
  • model creates and returns an anonymous LoadableDetachableModel object which wraps our Customer entity object which will be detached after rendering has completed.
  • detach has an empty implementation because we do not have any models directly associated with our implementation of IDataProvider that need to be detached.
We create an anonymous instance of the DataView component and add it to our HomePage as follows:
There are a few things to notice in the above code:
  • We are attaching the DataView to an HTML element whose wicket:id is rows. We will discuss the HomePage.html markup later.
  • populateItem will be called by the DataView component for each Customer object provided by customerDataProvider.
  • We are using a CompoundPropertyModel to bind the fields in the the Customer object to the four Label components. The field in the Customer object is identified by the id we pass to each Label's constructor.
  • Because there is a 1 to many relationship between the Customer and the DiscountCode entity objects, we must use discountCode.discountCode to reference the discountCode field in the DiscountCode entity associated with the Custmoer entity.
Here is the complete code for HomePage.java: Here is the complete markup for HomePage.html. Notice how each of the wicket:id attribute values match the id values we passed to our DataView and four Labels : Add some styling to our page Lets add some styling to our page:
  1. Right click the Web Pages node in the Projects pane and select New | Other which will open the New File window.
  2. Select Web from the Categories pane and select Cascading Style Sheet from the File Types pane and click Next.
  3. Enter style for the CSS File Name and click Finish which will open the style.css file in the editor.
Add the following styling attributes to the style.css file:Modify CustomerJpaController Lets modify the JPA query in the CustomerJpaController class to return our Customer entities in ascending CustomerId order:
  1. Fully expand the Source Packages node in the Projects pane and double click the CustomerJpaController node. This will open the file in the editor.
  2. Locate the findCustomerEntities(boolean all, int maxResults, int firstResult) method and add order by o.customerId to the JPA query string.
The complete code for the method should now look like the following: Now lets run the project. Run the project Run the project by right clicking the project node in the Projects pane and selecting Run which will open your browser and render the following:Summary
  • We create a Wicket DataView to render repeating data in an HTML table to the browser.
  • We implement an instance of IDataProvider to act as an interface between the database and the DataView.
  • Our implementation of IDataProvider's model method creates and returns a LoadableDetachable model.
  • We assign a CompoundPropertyModel to the view, wrapping the Customer object.
  • We create four Label components. Each is bound to a field in the Customer object. The field in the Customer object is identified by the id we pass to each Label's constructor.
  • We modified our JPA query to return our Customer entities in customerId order.
Well, that concludes our discussion of working with JPA/Hibernate and Wicket repeating views with Netbeans. Please note that you are not limited to using Hibernate as your persistence provider; the same principles we applied here will work with any JPA compatible persistence provider, such as EclipseLink. Similarly, these techniques will work with a number of database systems, such as MySql for example. In a future post, I will discuss what I believe to be is a more efficient, effective and easier method of working with JPA and Wicket. Using Netbeans v6.5 I will demonstrate how to create a Java EE5 enterprise application and create EJBs that provide back-end database services through dependency injection to a Wicket web application. Stay tuned!

Tuesday, March 31, 2009

JPA/Hibernate and Wicket Repeating Views with Netbeans- Part 1

This is the first part in a multi-part series of articles that will teach you how to create Web applications that use the Apache Wicket Web framework and JPA/Hibernate. In particular, these articles will demonstrate the following:
  • Using Netbeans to create Mavan based Apache Wicket projects.
  • Using Netbeans to add and configure Hibernatea, a JPA comaptable Persistence provider to the project.
  • Render tabular data from a database to the browser using Apache Wicket repeating views and models.
At the end of this series of articles we will have created an Apache Wicket Web application that retrieves data from a database using JPA and Hibernate and formats the data in a tabular view in the browser using an Apache Wicket DataView control. This article, the first in this series, will cover the following topics:
  • Creating a Maven Apache Wicket Web project in Netbeans
  • Configuring the project to use JPA and Hibernate.
  • Adding the required libraries to the project using Maven
  • Mapping POJOs to Database tables using JPA support in Netbeans.
  • Creating a JPA utility class that adds CRUD capability using JPA support in Netbeans
***Note - There are numerous ways to configure the 3 layers (presentation, business, and domain) found in 3-tier Java applications. In this article we will employ a direct approach; we will use tight-coupling that binds our code directly to the JPA persistence service. In future articles we will explore using other methods such as Spring IOC (Inversion Of Control) and EJB (Enterprise Java Beans) to layer the different services in loosely coupled fashion. You will need the following to complete this exercise:
  • Netbeans v6.5 or greater
  • Maven Netbeans Plugin
  • Derby Sample Database which should have been installed when you downloaded and installed Netbeans
Creating a Maven Apache Wicket Web project in Netbeans To create the project that will serve as the foundation for the remainder of this series of artices, please review and follow the exercises in my previous article, Netbeans Maven Projects. This will give you a good overview of Maven, and creating an Apache Wicket Maven based project using Netbeans. Once you have completed creating the project, please start Netbeans and open the project. Remove the junit test files from the project Testing with junit is a good practice but we won't need to use it for this exercise, so we will remove the project's test classes. Instead of physically deleting them, however, we will use Netbeans' safe delete option to remove them from the project. Please follow these steps:
  1. Completely expand the Test Packages node in the Projects pane and select both the Start.java and TestHomePage.java files
  2. Right click and select Delete which will open the Delete window.
  3. Click the Safely delete checkbox so that it is checked and then click the Refactor button. This will remove the 2 files from the project but will not delete them.
Adding JPA and Hibernate to the project Please follow these steps to add JPA and Hibernate to the project:
  1. Right click the project node in the Projects pane and select New | Other. This will open the New File window. Now select Persistence from the Categories pane and Entity Classes from Database from the File Types pane as pictured below:
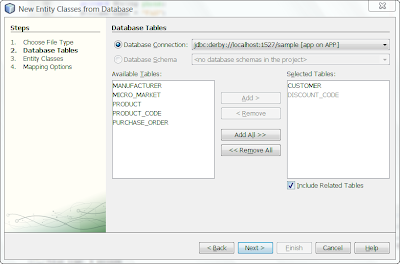
  2. Click the Next button and in the Database connection drop down menu select the jdbc derby sample database. In the Available Tables list box select Customer an click the Add button which will then add the Customer and the Discount_Code tables to be included in the Selected Tables list box as pictured below:
  3. Now click the Next button and in the Package text field enter Hibernate for the name of the Java package and then click the Create Persistence Unit button which will open the Create Persistence Unit window.
  4. From the Persistence Library drop down menu please select Hibernate and then click the Create button which will close the Create Persistence Unit window.
  5. Now click Next and Finish which will close the New Entity Classes from Database window.
As a result of the above steps, Netbeans has added numerous files to our project. If you fully expand Other Sources node in the Projects pane you will see that Netbeans has added the persistence.xml file to our project. This is the file that is used by JPA to cinfigure persistence at runtime. If you double click the persistence.xml file node it will open in the editor. In this file you can see that there is a Provider tag that specifies that we have chosen Hibernate as the persistence provider:
<provider>org.hibernate.ejb.HibernatePersistence</provider>
You can also see that there are 2 class tags which identify the Java classes that represent our business entity classes, Customer and DiscountCode:
<class>hibernate.Customer</class> <class>hibernate.DiscountCode</class>
In addition to the above tags, there are numerous property tags that are used to identify the database driver, username and password, connection url and cache provider. JPA uses these properties at run time as well to connect to the da. Please fully expand the libraries node in the Project pane and you will notice that the hibernate-3.2.5.ga.jar Hibernate library has been added to our project. Later, we will use Netbeans' Maven support to replace this library with a more recent version.
Please fully expand the Source Packages node in the Project pane. Notice that 2 Pojos, Customer.java and DiscountCode.java, our entity classes, have been added and are located in the hibernate package as pictured below:Double click each Pojo and they will open in Netbeans' Java editor window. Notice how each Pojo has numerous errors which we will now correct by adding libraries to our project using Netbeans' Maven support. Replacing and adding libraries to our project We need to replace and add a few libraries to our project. We will use Netbeans Maven support to do this. First, lets replace the hibernate-3.2.5.ga.jar with a more recent version. Right click the Libraries node in the Project pane and select Add Library. This will open the Add Library window, which will allow us to search for the most recent version of this library. Please follow these steps:
  1. In the GroupId text box enter org.hibernate
  2. In the ArtifactId text box press the space bar on your keyboard. This will open a list of all the Artifacts that are identified by the org.hibernate GroupId we entered.
  3. From this list select Hibernate.
  4. In the Version text box press the space bar on your keyboard. This will open a list of all the different versions that are available for this library.
  5. Select 3.2.6.ga from the list.
The Add Library window should now appear as pictured below: 
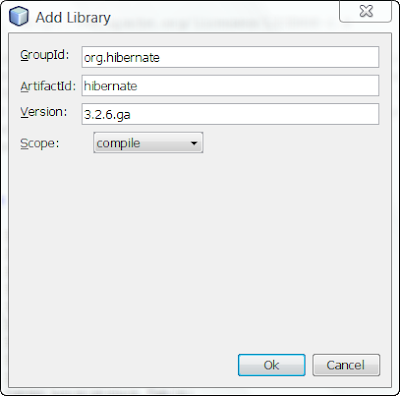
Click the Ok button to close this window. We have replaced the hibernate-3.2.5.ga.jar with the hibernate-3.2.6.ga.jar and you can confirm this by expanding the Libraries node in the Project window. Next we need to add support JPA/Hibernate annotations. We will do this using the same procedure above by right clicking the Libraries pane in the Project window, selecting Add Library which will open the Add Library window, which will allow us to search for the most recent version of this library. Please follw these steps:
  1. In the GroupId text box enter org.hibernate
  2. In the ArtifactId text box press the space bar on your keyboard. This will open a list of all the Artifacts that are identified by the org.hibernate GroupId we entered.
  3. From this list select hibernate-annotations.
  4. In the Version text box press the space bar on your keyboard. This will open a list of all the different versions that are available for this library.
  5. Select 3.4.0.GA from the list.
The Add Library window should now appear as pictured below: 
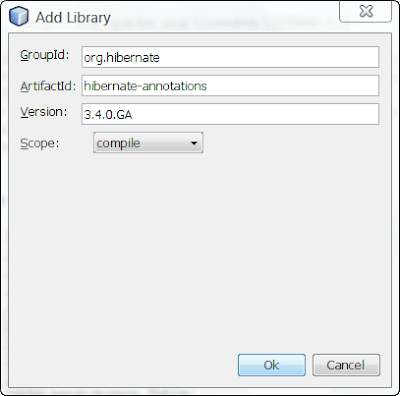
Click the Ok button to close this window. We have added the hibernate-annotations-3.4.0.GA.jar and you can confirm this by expanding the Libraries node in the Project window. Next we need to add support for Hibernate entity management. We will do this using the same procedure above by right clicking the Libraries pane in the Project window, selecting Add Library which will open the Add Library window, which will allow us to search for the most recent version of this library. Please follw these steps:
  1. In the GroupId text box enter org.hibernate
  2. In the ArtifactId text box press the space bar on your keyboard. This will open a list of all the Artifacts that are identified by the org.hibernate GroupId we entered.
  3. From this list select hibernate-entitymanager.
  4. In the Version text box press the space bar on your keyboard. This will open a list of all the different versions that are available for this library.
  5. Select 3.4.0.GA from the list.
The Add Library window should now appear as pictured below: 
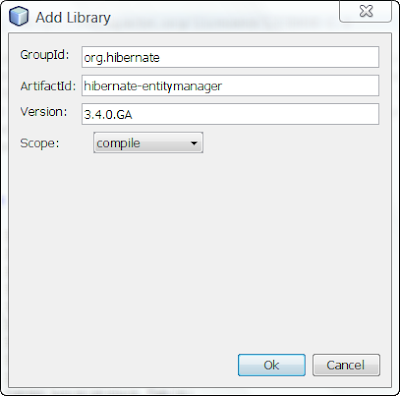
Click the Ok button to close this window. We have added the hibernate-entitymanager-3.4.0.GA.jar and you can confirm this by expanding the Libraries node in the Project window. Next we need to add javax.persistence support. We will do this using the same procedure above by right clicking the Libraries pane in the Project window, selecting Add Library which will open the Add Library window, which will allow us to search for the most recent version of this library. Please follw these steps:
  1. In the GroupId text box enter javax.persistence
  2. In the ArtifactId text box press the space bar on your keyboard. This will open a list of all the Artifacts that are identified by the org.hibernate GroupId we entered.
  3. From this list select persistence-api.
  4. In the Version text box press the space bar on your keyboard. This will open a list of all the different versions that are available for this library.
  5. Select 1.0 from the list.
The Add Library window should now appear as pictured below: 
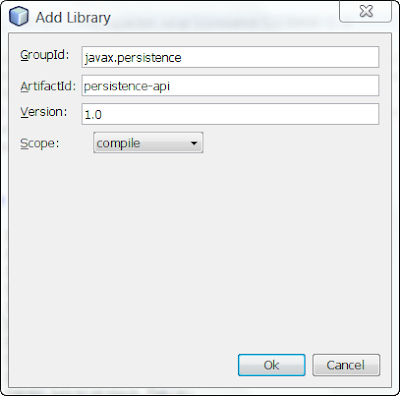
Click the Ok button to close this window. We have added the persistence-api-1.0.jar and you can confirm this by expanding the Libraries node in the Project window. Next we need to add Derby database driver support. We will do this using the same procedure above by right clicking the Libraries pane in the Project window, selecting Add Library which will open the Add Library window, which will allow us to search for the most recent version of this library. Please follw these steps:
  1. In the GroupId text box enter org.apache.derby
  2. In the ArtifactId text box press the space bar on your keyboard. This will open a list of all the Artifacts that are identified by the org.hibernate GroupId we entered.
  3. From this list select derbyclient.
  4. In the Version text box press the space bar on your keyboard. This will open a list of all the different versions that are available for this library.
  5. Select 10.4.2.0 from the list.
The Add Library window should now appear as pictured below: Click the Ok button to close this window. We have added the derbyclient-10.4.2.0.jar and you can confirm this by expanding the Libraries node in the Project window. Next we need to add support for transactions. We will do this using the same procedure above by right clicking the Libraries pane in the Project window, selecting Add Library which will open the Add Library window, which will allow us to search for the most recent version of this library. Please follw these steps:
  1. In the GroupId text box enter javax.transaction
  2. In the ArtifactId text box press the space bar on your keyboard. This will open a list of all the Artifacts that are identified by the org.hibernate GroupId we entered.
  3. From this list select jta.
  4. In the Version text box press the space bar on your keyboard. This will open a list of all the different versions that are available for this library.
  5. Select 1.1 from the list.
The Add Library window should now appear as pictured below: 
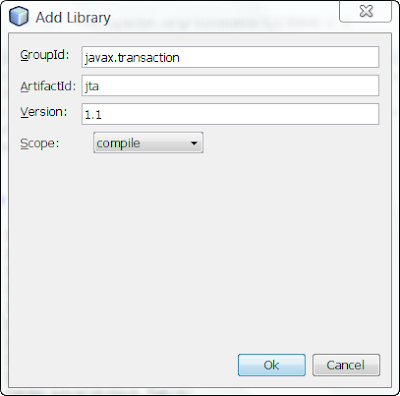
Click the Ok button to close this window. We have added the jta-1.1.jar and you can confirm this by expanding the Libraries node in the Project window. We have added all the libraries that we will need to run and test our project. Build the project by right clicking the project node in the Projects pane and select Build. Your project should build without any errors. Creating a JPA Controller Class A JPA Controller class provides methods that support CRUD operations. We could write this ourselves but we can have Netbeans generate this class for us. To do so, please follow these steps:
  1. Right click the project node in the Project pane and select New | Other. This will open the New File window.
  2. Select Persistence from the Categories pane and JPA Controller Classes from Entity Classes from the File Types pane and click Next.
  3. Click Add All to add the 2 available entity classes to the list of selected entity classes and click Next.
  4. Select hibernate from the Package drop down menu and then click Finish.
Netbeans has added the CustomerJPAController.java file to our hibernate package and created a new hibernate.exceptions package which contains numerous files for dealing with persistence exceptions that can occur. If you double click on the CustomerJPAController.java file in the hibernate package it will open in the Netbeans Java editor. Please take a few minutes to look at the code that was generated in this file. There are methods for your basic CRUD operations including transaction support. We will take advantage of the findCustomerEntities method to retrieve a list of Customer entities. Developing a testing strategy We need to test our project to prove the following:
  • We can connect to the sample Derby database.
  • We can query the Customer table to return all the rows.
  • We can get a list of Customer entities as a result from the query and the list contains the correct number of entities.
We can determine the correct number of Customer entities that should be returned by viewing the contents of the Customer table using Netbeans database support. Please follow these steps:
  1. In the Services window, expand the Databases node and right click the jdbc derby sample database node and then select Connect to connect to the database.
  2. Once the connection to the database is made, expand the Tables node, right click the Customer table and select View Data. This will open a SQL Command window.
In the SQL Command window you should see a result set containing all the rows in the Customer table, and the total number of rows returned should be indicated as well. When I run this it indicates that there are 13 rows of data but your results may be different. What is important is that we now know that our test should confirm the number that you see when you display the contents of the Customer table in the SQL Command window: Adding code to HomePage.java to test Now lets add the code to test our project. Please follow these steps:
  1. Fully expand the Source Packages node in the Projects pane and double click the HomePage.java file which will open the file in the Netbeans Java editor window.
  2. Add this method to the HomePage class: private void TestDatabase(){ CustomerJpaController custcont = new CustomerJpaController(); int i = custcont.findCustomerEntities().size(); System.out.println("custcont.findCustomerEntities() returned " + Integer.valueOf(i) + " Customer entities"); }
  3. Modify the HomePage constructor to call our new method. The constructor should look like the following: public HomePage(final PageParameters parameters) { // call out method TestDatabase(); // Add the simplest type of label add(new Label("message", "If you see this message wicket is properly configured and running")); }
Testing our application Right click the project node in the Projects pane and select Run. This could take a few moments because Maven may need to download dependencies from a Maven repository if they aren't already in your local repository. Once the project builds without errors it will be deployed to the server and then it will run. You should see the output in your browser. Now switch back to Netbeans and click on the Server tab in the Output window. Scroll down to the bottom of the window and you should see something like the following:
  • INFO: custcont.findCustomerEntities() returned 13 Customer entities
13 exactly matches the number of rows returned when I displayed the contents of the Customer table. We have confirmed that we can connect, query and get results back from our database. Job well done! Summary
  • We added all the latest versions of the required libraries.
  • We configured JPA/Hibernate.
  • We added 2 Pojos to represent our domain objects.
  • We added CRUD support.
  • We created a testing strategy.
  • We tested and confirmed that our application works as anticipated.
What's Next In the next article in this series we will add to our project, giving it the ability to display the contents of the Customer table in the browser. We will use Apache Wicket models and the DataView control to implement the displaying of the data.

About Me

My photo
New York, NY, United States
Software Developer