Showing posts with label ee5. Show all posts
Showing posts with label ee5. Show all posts
Saturday, August 29, 2009
Improving Wicket's Support for Java EE5 Applications
I am a huge fan of the Wicket Web framework. Wicket has made Web application development fun again for me and for many other developers by greatly lowering the impedance mismatch that exists between HTTP and the Java language.
As perfect as Wicket is, though, it could use some improvement in its ability to support Java EE5 based applications. So here I offer my take on what I believe can be done to make Wicket an even better framework.
Currently Wicket's support for Java EE5 applications is provided by wicket-contrib-javaee. By adding this add-on to your Wicket application you can reference the functionality exposed by any EJB simply by using the @EJB annotation and adding a few lines of initialization code to the Wicket WebApplication class.
However, some developers who have worked with this add-on have voiced concerns about it causing problems in their applications. At the same time, the support behind this add-on appears to be somewhat questionable. This is an unfortunate state of affairs but one which could be rectified if the functionality provided by it was instead folded into the core Wicket distribution. This should not be seen as an endorsement of EE but rather as a recognition that there is a significant interest to employ Wicket in EE applications. This recognition would be similar to that which has already been given to Spring and Guice by having included their interfacing libraries as part of Wicket's core distribution. Such an adaption could result in a greater acceptance of Wicket in environments where EE is the chosen platform for Enterprise applications.
In conjunction with this I would also suggest that the next edition of the marvelous Wicket In Action book include a new chapter dedicated to showing just how easy it is to create this type of application. I would gladly contribute it myself if I were asked :)
Sincerely,
Jeff
Thursday, May 21, 2009
Wicket + EJB + DI With Netbeans - Part 3
Part 3 - Using The @EJB Annotation To Provide Dependency Injection Support In The Web Tier And Consuming The Services Provided By Their Backing EJBs
For this last part of the tutorial I am going to demonstrate how to use Wicket in an EE container environment such as Glassfish. wicket-contrib-javaee is a wicket module that provides integration through Java EE 5 resource injection. With wicket-contrib-javaee you can use the following 3 annotations in your wicket pages: Now we need to modify HomePage.java where we wiill include the @EJB annotation for the CustomerFacade ejb and consume its services.
Adding The @EJB Annotation
Open HomePage.java in the editor and add the following to the HomePage class definition:
@EJB(name="WicketEETutorial1-ejb/CustomerFacade")
private CustomerFacadeLocal customerEjb;
*** Note that the name we are providing for the @EJB annotation is the same one we used when we added the EJB reference to the web.xml file.
Now everything is in place for us to actually consume the data access services that are provided by the CustomerFacade ejb so lets add some more code to the HomePage constructor to get a list of Customer entities and get a count of how many entities there are in the list.
Consuming The Data Access Services Provided By The CustomerFacade ejb
Modify the HomePage constructor so that it looks exactly like the following:
public HomePage() {
add(new Label("sayhello","Hello, World!"));
List
Now we need to modify HomePage.java where we wiill include the @EJB annotation for the CustomerFacade ejb and consume its services.
Adding The @EJB Annotation
Open HomePage.java in the editor and add the following to the HomePage class definition:
@EJB(name="WicketEETutorial1-ejb/CustomerFacade")
private CustomerFacadeLocal customerEjb;
*** Note that the name we are providing for the @EJB annotation is the same one we used when we added the EJB reference to the web.xml file.
Now everything is in place for us to actually consume the data access services that are provided by the CustomerFacade ejb so lets add some more code to the HomePage constructor to get a list of Customer entities and get a count of how many entities there are in the list.
Consuming The Data Access Services Provided By The CustomerFacade ejb
Modify the HomePage constructor so that it looks exactly like the following:
public HomePage() {
add(new Label("sayhello","Hello, World!"));
List customers = customerEjb.findAll();
int count = customers.size();
add(new Label("customercount",String.valueOf(count)));
}
Right click the editor and select Fix Imports to add the needed import statements. Your HomePage.java file should now look like the following; 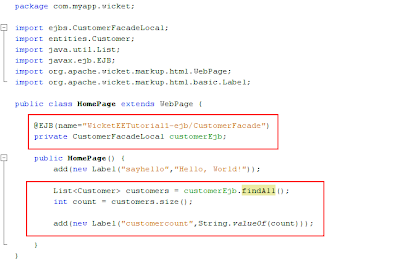 Open HomePage.html in the editor and modify its markup so that it looks exactly like the following;
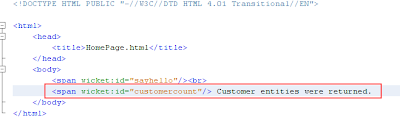 We have added a Wicket component that will display the number of Customer entities in the list of Customers returned from calling the findAll method of the CustomerFacade ejb.
We are now ready to build and run our application.
Running Our Application
Rick click the WicketEETutorial1 node in the Projects pane and select Run to build and run the application. Your browser should open and render the following; 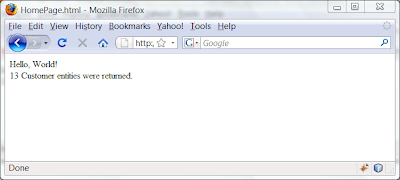 As you can see from the above image, we were able to obtain a reference to the CustomerFacade ejb via the use of the @EJB annotation and call the findAll method which the CustomerFacade ejb exposes. findAll returned a list of Customer entities and from the list we were able to obtain a count of Customer entities.
Summary
Netbeans greatly simplifies the whole process of generating the Enterprise Application's modules. Netbeans wizards generate a lot of code that we would otherwise have to hand code ourselves. To a very large degree Netbeans trivializes Java EE5 applications allowing us to focus on the domain issues of the application and not its plumbing and wiring.
Who said Java EE was too heavy and complex? I hope this tutorial demonstrated that neither is true.
With the addition of the wicket-contrib-javaee jar file, Wicket applications gain the ability to use Java EE5 annotations that allow it to take full advantage of services esxposed in enterprise java beans when running in a Java EE5 container such as the one Glassfish provides.
All in all, very cool, isn't it? And easy, too!And how cool is it to be able to use Wicket as the web framework in a Java EE application and have it be able to consume services exposed through ejbs using standard Java EE annotations?
Though this application was trivial by design so as to keep it simple for demonstration purposes, the principles demonstrated here will work for applications of much greater size and complexity.
Conclusion
This concludes the tutorial and I hope you had as much fun following along as I had presenting it. Please feel free to provide your comments. I look forward to hearing from you.
As you can see from the above image, we were able to obtain a reference to the CustomerFacade ejb via the use of the @EJB annotation and call the findAll method which the CustomerFacade ejb exposes. findAll returned a list of Customer entities and from the list we were able to obtain a count of Customer entities.
Summary
Netbeans greatly simplifies the whole process of generating the Enterprise Application's modules. Netbeans wizards generate a lot of code that we would otherwise have to hand code ourselves. To a very large degree Netbeans trivializes Java EE5 applications allowing us to focus on the domain issues of the application and not its plumbing and wiring.
Who said Java EE was too heavy and complex? I hope this tutorial demonstrated that neither is true.
With the addition of the wicket-contrib-javaee jar file, Wicket applications gain the ability to use Java EE5 annotations that allow it to take full advantage of services esxposed in enterprise java beans when running in a Java EE5 container such as the one Glassfish provides.
All in all, very cool, isn't it? And easy, too!And how cool is it to be able to use Wicket as the web framework in a Java EE application and have it be able to consume services exposed through ejbs using standard Java EE annotations?
Though this application was trivial by design so as to keep it simple for demonstration purposes, the principles demonstrated here will work for applications of much greater size and complexity.
Conclusion
This concludes the tutorial and I hope you had as much fun following along as I had presenting it. Please feel free to provide your comments. I look forward to hearing from you.
- @EJB
- @PersistenceUnit
- @Resource
- Right click the Libraries node and select Add Jar/Folder. This will open the Add Jar/Folder window.
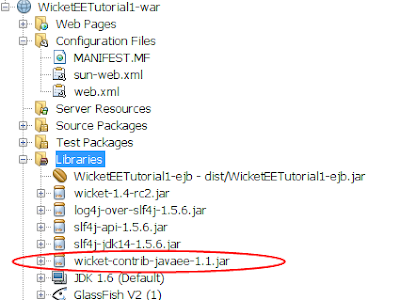
- Navigate to the location where you saved the wicket-contrib-javaee-1.1.jar file and select it. Make sure that the Copy To Libraries Folder option is selected.
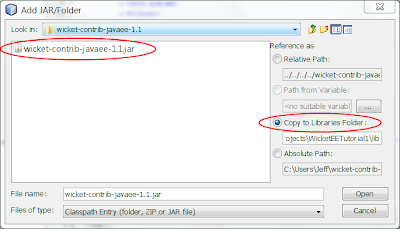
- Click Open and Netbeans will add the jar file to the module.


- Right click the Libraries node and select Add Jar/Folder. This will open the Add Jar/Folder window.
- Navigate to the location where you saved the wicket distribution that we downloaded in Part 1 of this tutorial. In the lib folder select the wicket-ioc jar file. Make sure that the Copy To Libraries Folder option is selected.
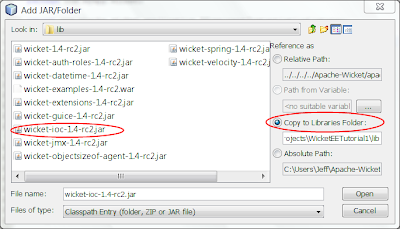
- Click Open and Netbeans will add the jar file to the module.
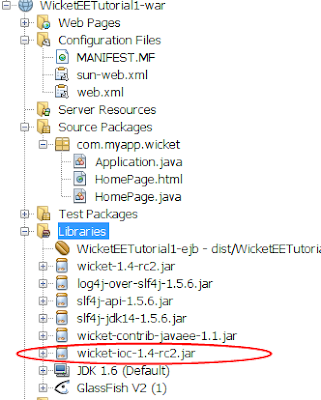


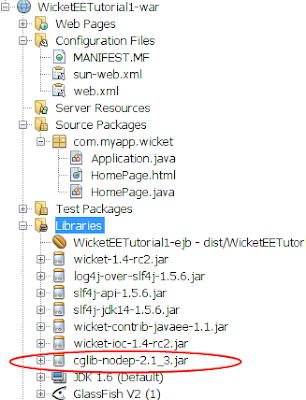
- Right click the Libraries node and select Add Jar/Folder. This will open the Add Jar/Folder window.
- Navigate to the location where you saved the cglib jar file and select it. Make sure that the Copy To Libraries Folder option is selected.
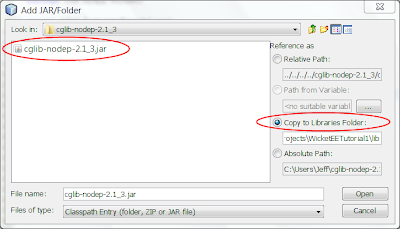
- Click Open and Netbeans will add the jar file to the module.


- Expand the EJB References panel and click the Add button. This will open the Add EJB Reference window.
- Enter WicketEETutorial1-ejb/CustomerFacade for the EJB Reference Name.
- Select Session for the EJB Type.
- Select Local for Interface Type.
- Enter ejbs.CustomerFacadeLocal for the Local Interface.

- Click the OK button to save the changes to the web.xml file.

 Now we need to modify HomePage.java where we wiill include the @EJB annotation for the CustomerFacade ejb and consume its services.
Adding The @EJB Annotation
Open HomePage.java in the editor and add the following to the HomePage class definition:
@EJB(name="WicketEETutorial1-ejb/CustomerFacade")
private CustomerFacadeLocal customerEjb;
*** Note that the name we are providing for the @EJB annotation is the same one we used when we added the EJB reference to the web.xml file.
Now everything is in place for us to actually consume the data access services that are provided by the CustomerFacade ejb so lets add some more code to the HomePage constructor to get a list of Customer entities and get a count of how many entities there are in the list.
Consuming The Data Access Services Provided By The CustomerFacade ejb
Modify the HomePage constructor so that it looks exactly like the following:
public HomePage() {
add(new Label("sayhello","Hello, World!"));
List
Now we need to modify HomePage.java where we wiill include the @EJB annotation for the CustomerFacade ejb and consume its services.
Adding The @EJB Annotation
Open HomePage.java in the editor and add the following to the HomePage class definition:
@EJB(name="WicketEETutorial1-ejb/CustomerFacade")
private CustomerFacadeLocal customerEjb;
*** Note that the name we are providing for the @EJB annotation is the same one we used when we added the EJB reference to the web.xml file.
Now everything is in place for us to actually consume the data access services that are provided by the CustomerFacade ejb so lets add some more code to the HomePage constructor to get a list of Customer entities and get a count of how many entities there are in the list.
Consuming The Data Access Services Provided By The CustomerFacade ejb
Modify the HomePage constructor so that it looks exactly like the following:
public HomePage() {
add(new Label("sayhello","Hello, World!"));
List Open HomePage.html in the editor and modify its markup so that it looks exactly like the following;
 We have added a Wicket component that will display the number of Customer entities in the list of Customers returned from calling the findAll method of the CustomerFacade ejb.
 As you can see from the above image, we were able to obtain a reference to the CustomerFacade ejb via the use of the @EJB annotation and call the findAll method which the CustomerFacade ejb exposes. findAll returned a list of Customer entities and from the list we were able to obtain a count of Customer entities.
Summary
Netbeans greatly simplifies the whole process of generating the Enterprise Application's modules. Netbeans wizards generate a lot of code that we would otherwise have to hand code ourselves. To a very large degree Netbeans trivializes Java EE5 applications allowing us to focus on the domain issues of the application and not its plumbing and wiring.
Who said Java EE was too heavy and complex? I hope this tutorial demonstrated that neither is true.
With the addition of the wicket-contrib-javaee jar file, Wicket applications gain the ability to use Java EE5 annotations that allow it to take full advantage of services esxposed in enterprise java beans when running in a Java EE5 container such as the one Glassfish provides.
All in all, very cool, isn't it? And easy, too!And how cool is it to be able to use Wicket as the web framework in a Java EE application and have it be able to consume services exposed through ejbs using standard Java EE annotations?
Though this application was trivial by design so as to keep it simple for demonstration purposes, the principles demonstrated here will work for applications of much greater size and complexity.
Conclusion
This concludes the tutorial and I hope you had as much fun following along as I had presenting it. Please feel free to provide your comments. I look forward to hearing from you.
As you can see from the above image, we were able to obtain a reference to the CustomerFacade ejb via the use of the @EJB annotation and call the findAll method which the CustomerFacade ejb exposes. findAll returned a list of Customer entities and from the list we were able to obtain a count of Customer entities.
Summary
Netbeans greatly simplifies the whole process of generating the Enterprise Application's modules. Netbeans wizards generate a lot of code that we would otherwise have to hand code ourselves. To a very large degree Netbeans trivializes Java EE5 applications allowing us to focus on the domain issues of the application and not its plumbing and wiring.
Who said Java EE was too heavy and complex? I hope this tutorial demonstrated that neither is true.
With the addition of the wicket-contrib-javaee jar file, Wicket applications gain the ability to use Java EE5 annotations that allow it to take full advantage of services esxposed in enterprise java beans when running in a Java EE5 container such as the one Glassfish provides.
All in all, very cool, isn't it? And easy, too!And how cool is it to be able to use Wicket as the web framework in a Java EE application and have it be able to consume services exposed through ejbs using standard Java EE annotations?
Though this application was trivial by design so as to keep it simple for demonstration purposes, the principles demonstrated here will work for applications of much greater size and complexity.
Conclusion
This concludes the tutorial and I hope you had as much fun following along as I had presenting it. Please feel free to provide your comments. I look forward to hearing from you.
Monday, May 18, 2009
Wicket + EJB + DI With Netbeans - Part 2
Part 2 - Creating Entity Classes That Map To An Existing Database And Exposing Data Access Services Through EJBs With Netbeans
For this part of the tutorial I am going to use the Sample database that comes with the Java DB which should have been installed when you installed Netbeans and Glassfish. You can verify that the Sample database is recognized by Netbeans by expanding the Database node in the Services pane where you should see a connection listed there that looks like the highlighted one below. If you fully expand the connection node you can see that there are a number of tables already defined. For this tutorial we want to create one entity class for the Customer table. However, we will not have to hand code this entity class because Netbeans has excellent tooling support for generating entity classes that map to tables in a database.
 Creating Our Customer Entity Class
Please follow these steps to create the Customer entity class for the Customer table in the Sample database:
Creating Our Customer Entity Class
Please follow these steps to create the Customer entity class for the Customer table in the Sample database:
 Netbeans will also generate the persistence.xml file and place it under the Configuration Files tab.
 With our entity class and persistence unit file created we can now go on and encapsulate our database access code in EJBs. Like our entity class we will not have to hand code our database access code. Netbeans has excellent tooling support for generating database access code that map to existing entity classes.
Creating Our Customer Data Access EJB
Please follow these steps to create the EJB that will encapsulate the database access code:
With our entity class and persistence unit file created we can now go on and encapsulate our database access code in EJBs. Like our entity class we will not have to hand code our database access code. Netbeans has excellent tooling support for generating database access code that map to existing entity classes.
Creating Our Customer Data Access EJB
Please follow these steps to create the EJB that will encapsulate the database access code:
 Summary
This concludes Part 2 of the tutorial. As you can see, Netbeans greatly simplifies coding the service tear in an Enterprise Application. We have taken advantage of the tooling available in Netbeans to generate our Customer entity class, persistence.xml and CustomerFacade EJB class files for us. In the next part of this tutorial, Part 3, we will expand the web tier to consume the services exposed by the CustomerFacade EJB that we have just created.
Summary
This concludes Part 2 of the tutorial. As you can see, Netbeans greatly simplifies coding the service tear in an Enterprise Application. We have taken advantage of the tooling available in Netbeans to generate our Customer entity class, persistence.xml and CustomerFacade EJB class files for us. In the next part of this tutorial, Part 3, we will expand the web tier to consume the services exposed by the CustomerFacade EJB that we have just created.
 If you fully expand the connection node you can see that there are a number of tables already defined. For this tutorial we want to create one entity class for the Customer table. However, we will not have to hand code this entity class because Netbeans has excellent tooling support for generating entity classes that map to tables in a database.
 Creating Our Customer Entity Class
Please follow these steps to create the Customer entity class for the Customer table in the Sample database:
Creating Our Customer Entity Class
Please follow these steps to create the Customer entity class for the Customer table in the Sample database:
- In the Projects pane right click the WicketEETutorial1-ejb module node and select New|Other from the context menu. This will open the New File window. In the Categories pane select Persistence and in the File Types pane select Entity Classes From Database and click Next.
- Expand the Data Source drop-down menu in the Data Tables Pane and select the jdbc/sample option. Netbeans will fill the Available Tables list with all the tables defined in the Sample DB.
- Uncheck the Include Related Tables option.
- Select the CUSTOMER table from the list of Available Tables.

- Click the Add button and then click Next.
- Enter entities as the package name in the Package field and the click the Create Persistence Unit button. In the Create Persistence Unit window accept all the defaults and click the Create button. Now click the Next button.
- In the Mapping Options pane select java.util.List for the Collection Type and click the Finish button.

 Netbeans will also generate the persistence.xml file and place it under the Configuration Files tab.
 With our entity class and persistence unit file created we can now go on and encapsulate our database access code in EJBs. Like our entity class we will not have to hand code our database access code. Netbeans has excellent tooling support for generating database access code that map to existing entity classes.
Creating Our Customer Data Access EJB
Please follow these steps to create the EJB that will encapsulate the database access code:
With our entity class and persistence unit file created we can now go on and encapsulate our database access code in EJBs. Like our entity class we will not have to hand code our database access code. Netbeans has excellent tooling support for generating database access code that map to existing entity classes.
Creating Our Customer Data Access EJB
Please follow these steps to create the EJB that will encapsulate the database access code:
- In the Projects pane right click the WicketEETutorial1-ejb module node and select New|Other from the context menu. This will open the New File window. In the Categories pane select Persistence and in the File Types pane select Session Beans For Entity Classes and click Next. As you can see, Netbeans has filled the Available Entity Classes list with the Customer entity class we created.
- Select the Customer entity in the list of Available Entity Classes.

- Click the Add buttom and then click the Next button.
- In the Generated Session Beans pane enter ejbs for the package name. We want to create a local interface so make sure the Local checkbox is checked.

- Now click the Finish button.


 Summary
This concludes Part 2 of the tutorial. As you can see, Netbeans greatly simplifies coding the service tear in an Enterprise Application. We have taken advantage of the tooling available in Netbeans to generate our Customer entity class, persistence.xml and CustomerFacade EJB class files for us. In the next part of this tutorial, Part 3, we will expand the web tier to consume the services exposed by the CustomerFacade EJB that we have just created.
Summary
This concludes Part 2 of the tutorial. As you can see, Netbeans greatly simplifies coding the service tear in an Enterprise Application. We have taken advantage of the tooling available in Netbeans to generate our Customer entity class, persistence.xml and CustomerFacade EJB class files for us. In the next part of this tutorial, Part 3, we will expand the web tier to consume the services exposed by the CustomerFacade EJB that we have just created.
Wednesday, May 6, 2009
Wicket + EJB + DI With Netbeans - Part 1
Introduction
This 3 part tutorial demonstrates how easy it is to create a Java EE5 Enterprise Application with Netbeans. The Web tier of the Enterprise Application will be based on the Wicket Web framework and the services tier -- the EJBs (Enterprise Java Beans) -- will serve up data from a database which will be consumed by the Web tier.
In particular, it demonstrates how easy it is for the Web tier to consume the services exposed by EJBs and to manage references to the EJBs through DI (dependency injection) using the @EJB annotation and the wicket-contrib-javaee jar library.
The tutorial has 3 parts covered in 3 separate articles:
 The 3 modules and their associated projects that were generated for us are summarized below:
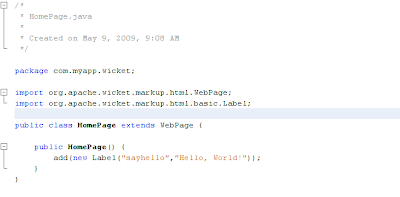
 To keep this part of the tutorial as simple as can be, the web application will for now only display the gratuitous Hello, World! In the web tier module I created the following source code package and 3 files:
 The contents of each of the above files is shown below:
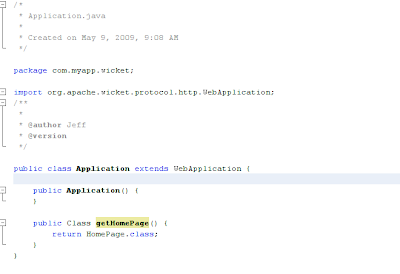

 The web.xml file which is located under the Configuration Files tab in the Projects pane needs to be modified as well and should look exactly like the following highlighted text:
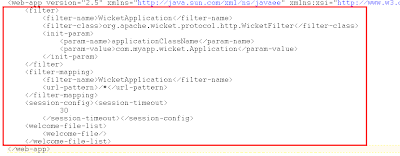 As can be seen from the Home.html and Home.java files, the span element with the wicket:id of sayhello will have its contents replaced with Hello, World!
Running The Application
When we build and run the application the following is rendered in the browser:
As can be seen from the Home.html and Home.java files, the span element with the wicket:id of sayhello will have its contents replaced with Hello, World!
Running The Application
When we build and run the application the following is rendered in the browser: Summary
This concludes Part 1 of the tutorial. As you can see, we have successfully created, built and run a Java EE5 Enterprise Application with a web tier using the Wicket web framework. The application as it now stands is trivial as it only displays the ubiquitous Hello, World! In the next part of this tutorial, Part 2, we will expand on the service side (the EJBs) and in Part 3, we will expand the web tier to consume the services exposed by the EJBs.
Summary
This concludes Part 1 of the tutorial. As you can see, we have successfully created, built and run a Java EE5 Enterprise Application with a web tier using the Wicket web framework. The application as it now stands is trivial as it only displays the ubiquitous Hello, World! In the next part of this tutorial, Part 2, we will expand on the service side (the EJBs) and in Part 3, we will expand the web tier to consume the services exposed by the EJBs.
- Part 1 will demonstrate creating the Enterprise Application in Netbeans and configuring the Web tier to use the latest build of the Wicket framework.
- Part 2 will demonstrate creating entity classes that map to an existing database and exposing data access services through EJBs.
- Part 3 will demonstrate using the @EJB annotation to provide dependency injection support in the Web tier and consuming the services provided by their backing EJBs.
- Open Netbeans.
- Select File|New Project from the main menu. This will open the New Project window
- In the Categories pane select Java EE and in the Projects pane select Enterprise Application and click Next.
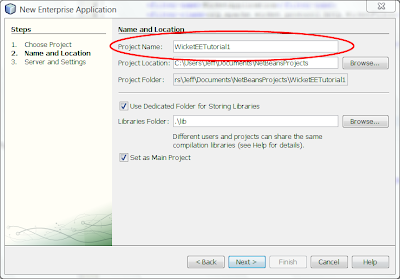
- Enter WicketEETutorial1 or any other name you chose for the Project Name as pictured below and click Next.
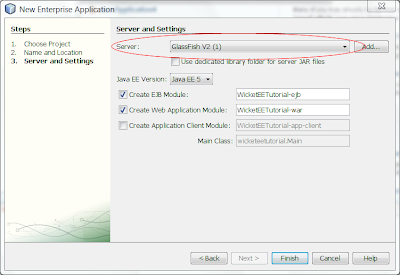
- From the Server drop-down selection list select Glassfish v2 or better. Accept the other options' default settings as pictured below and click Finish.


 The 3 modules and their associated projects that were generated for us are summarized below:
- WicketEETutorial1 is an Enterprise Application module project and its ear (enterprise archive) file is what will be deployed to the server.
- WicketEETutorial1-ejb is an EJB module project and it is here where we will define our entity classes and encapsulate our JPA data access code in EJBs (Enterprise Java Beans). This module will serve as our service layer tier and provide both domain and business functionality to our Web application. Its jar file is included in the ear file mentioned above.
- WicketEETutorial1-war is a Web module project and it is here where we will define our presentation layer tier. Its war (web archive) file is included in the ear file mentioned above. As a default, Netbeans configures the web tier to serve up JSP pages. In the next step we will change this so that the web tier will use the Wicket web framework instead.
 To keep this part of the tutorial as simple as can be, the web application will for now only display the gratuitous Hello, World! In the web tier module I created the following source code package and 3 files:
 The contents of each of the above files is shown below:

 The web.xml file which is located under the Configuration Files tab in the Projects pane needs to be modified as well and should look exactly like the following highlighted text:
 As can be seen from the Home.html and Home.java files, the span element with the wicket:id of sayhello will have its contents replaced with Hello, World!
Running The Application
When we build and run the application the following is rendered in the browser:
As can be seen from the Home.html and Home.java files, the span element with the wicket:id of sayhello will have its contents replaced with Hello, World!
Running The Application
When we build and run the application the following is rendered in the browser: Summary
This concludes Part 1 of the tutorial. As you can see, we have successfully created, built and run a Java EE5 Enterprise Application with a web tier using the Wicket web framework. The application as it now stands is trivial as it only displays the ubiquitous Hello, World! In the next part of this tutorial, Part 2, we will expand on the service side (the EJBs) and in Part 3, we will expand the web tier to consume the services exposed by the EJBs.
Summary
This concludes Part 1 of the tutorial. As you can see, we have successfully created, built and run a Java EE5 Enterprise Application with a web tier using the Wicket web framework. The application as it now stands is trivial as it only displays the ubiquitous Hello, World! In the next part of this tutorial, Part 2, we will expand on the service side (the EJBs) and in Part 3, we will expand the web tier to consume the services exposed by the EJBs.
Subscribe to:
Posts (Atom)


