- Feedback on the Web is readily available; just Google the library or functionality you are interested in. Chatter on the web will either confirm your choice or send you looking elsewhere.
- Bug issues can often be resolved by a quick Google search.
- Numerous support groups are available for the most popular open source projects.
Maven is a software project management and comprehension tool. Based on the concept of a project object model (POM), Maven can manage a project's build, reporting and documentation from a central piece of information.As far as descriptions go, the above is obviously acurate. But what it doesn't describe is how Maven actually resolves the issues of dependency when developing applications in today's open source environment. Imagine that you are a provider of an open source library. If your library is anything other than trivial, you most likely incorporate other open source libraries to satisfy some API, feature or functionality. You test your library and once you are satisfied that your library works as expected you publish it and make it available to the open source community. But you also provide a POM that users of your library can use to incorporate your library into their own Maven based projects. The POM not only 'defines' your library but also defines all the dependencies that your library has on other libraries. You publish your POM on one of the POM repositories so that other developers can discover it and use it to incorporate your library into their applications. Now imagine that you are a developer writing the next killer Web application and you want to incorporate the functionality provided by the open source library mentioned above. Using Maven, how would you do that and how would you do that using the Netbeans IDE? Well, Netbeans provides excellent support for Maven based projects. In Netbeans v6.5, this support comes in the form of a Netbeans plugin. My understanding is that future versions of Netbeans will incorporate Maven directly and will not require a plugin to provide Maven project support. Installing The Netbeans Maven Plugin If you haven't already installed the Netbeans Maven plugin, doing so is easy. Please follow the steps below:
- Open Netbeans v6.5.
- Select Tools | Plugins from the main menu. This will open up the Plugins window.
- Select the Available Plugins tab and type 'Maven' into the search text box which is located above and to the right of the Plugin window's main two pannels.
- Select the Maven plugin and click the Install button located beneath and to the left of the Plugin window's main two pannels.
- Open Netbeans v6.5.
- Select File | New Project from the main menu. This will open the New Project window.
- Select Maven from the Categories pannel and Maven Project from the Projects pannel and click the Next button on the bottom of the New Project window.
- In the Maven Archetypes list box select Archetypes from remote Maven Repositories. Notice that when you select this option that Netbeans goes out to the Maven Repositores and discovers all the Archetypes available there and presents these as available options for your selection. In the list of available Archetypes select Wicket Quickstart Archetype as pictured below:

- Click the Next button and then click Finish. Netbeans will now create a Maven based project based on your having previously selected the Wicket Quickstart Archetype and when it is done it will open the project in the Project window as pictured below:


 If you double click on the pom.xml file, Netbeans will open it in its XML editor as pictured below:
 POM dependency Tag
When viewing the pom.xml file in the editor, scroll down until you see the following:
POM dependency Tag
When viewing the pom.xml file in the editor, scroll down until you see the following:
<!-- WICKET DEPENDENCIES -->
<dependency>
<groupid>org.apache.wicket</groupid>
<artifactid>wicket</artifactid>
<version>${wicket.version}</version>
</dependency>
The dependency tag above declares a project build dependency. In this case, it represents a dependency on Apache Wicket. The groupId and artifactId tags above serve to uniquely identify the target of the dependency, and the version tag above serves to identify the version of the dependency, which in this case is identified by a property declared as follows:
<wicket.version>1.4-rc2</wicket.version>
Also notice that in the POM file there are numerous other dependency declarations including the following:
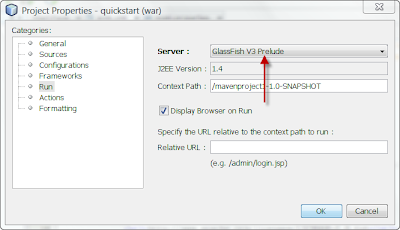 Click OK. When we build and run our application, Netbeans will deploy it to the server we just selected.
Running A POM Based Project
Now run the application by right clicking the project node in the Project window and selecting Run. You should see the following rendered in your browser window:
Click OK. When we build and run our application, Netbeans will deploy it to the server we just selected.
Running A POM Based Project
Now run the application by right clicking the project node in the Project window and selecting Run. You should see the following rendered in your browser window: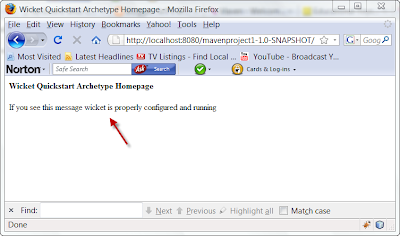 Summary
Using Netbeans and Maven we were able to create a brand new project based on the Wicket Quickstart Archetype we selected. All the dependencies for the project were declared in the application's pom.xml file for us. When building the project, any dependency that couldn't be resolved locally was satisfied by downloading the dependency. This only took a few minutes. Imagine if you had to do all this manually. Netbeans with Maven support has taken the hassle out of working with open source. This will allow you to take better advantage of the many great open source products that are available when you create your next killer application.
URLs To Some Of The Items Mentioned
Netbeans
Maven
Wicket
Summary
Using Netbeans and Maven we were able to create a brand new project based on the Wicket Quickstart Archetype we selected. All the dependencies for the project were declared in the application's pom.xml file for us. When building the project, any dependency that couldn't be resolved locally was satisfied by downloading the dependency. This only took a few minutes. Imagine if you had to do all this manually. Netbeans with Maven support has taken the hassle out of working with open source. This will allow you to take better advantage of the many great open source products that are available when you create your next killer application.
URLs To Some Of The Items Mentioned
Netbeans
Maven
Wicket
- slf4j - a a simple facade or abstraction for various logging frameworks such as Log4J
- log4j - the actual logging implementation
- junit - testing framework
 Click OK. When we build and run our application, Netbeans will deploy it to the server we just selected.
Running A POM Based Project
Now run the application by right clicking the project node in the Project window and selecting Run. You should see the following rendered in your browser window:
Click OK. When we build and run our application, Netbeans will deploy it to the server we just selected.
Running A POM Based Project
Now run the application by right clicking the project node in the Project window and selecting Run. You should see the following rendered in your browser window: Summary
Using Netbeans and Maven we were able to create a brand new project based on the Wicket Quickstart Archetype we selected. All the dependencies for the project were declared in the application's pom.xml file for us. When building the project, any dependency that couldn't be resolved locally was satisfied by downloading the dependency. This only took a few minutes. Imagine if you had to do all this manually. Netbeans with Maven support has taken the hassle out of working with open source. This will allow you to take better advantage of the many great open source products that are available when you create your next killer application.
URLs To Some Of The Items Mentioned
Netbeans
Maven
Wicket
Summary
Using Netbeans and Maven we were able to create a brand new project based on the Wicket Quickstart Archetype we selected. All the dependencies for the project were declared in the application's pom.xml file for us. When building the project, any dependency that couldn't be resolved locally was satisfied by downloading the dependency. This only took a few minutes. Imagine if you had to do all this manually. Netbeans with Maven support has taken the hassle out of working with open source. This will allow you to take better advantage of the many great open source products that are available when you create your next killer application.
URLs To Some Of The Items Mentioned
Netbeans
Maven
Wicket


No comments:
Post a Comment
Note: Only a member of this blog may post a comment.