Hi there,
Today I will introduce developing Apache Wicket applications using the Netbeans IDE v6.5. So lets get started.
Installing Netbeans IDE v6.5 and the Wicket v1.4 Plugin
First and foremost, if you haven't already, download and install Netbeans v6.5 which you can find
here. By selecting the 'All' bundle option you will download and install everything you need to follow along with the examples.
Once you have installed the Netbeans IDE, you should download and install the Wicket plugin for Netbeans v6.5 which you can find
here. As there are 2 plugins listed on this page, please make sure that you select, download and install the one for Wicket v1.4 which will install the v1.4 Wicket libraries. Follow the installation instructions as provided on the page.
This plugin was contributed by
Geertjan Wielenga, a technical writer in the Netbeans Docs team who has contributed an amazing amount of material to the Netbeans community.
Creating a Wicket Application
With Netbeans and the Wicket plugin installed, now we can create our first Netbeans Wicket project. Start Netbeans and click File | New Project from the main menu. This will open the New Project window as pictured below:
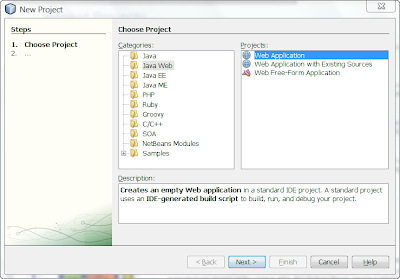
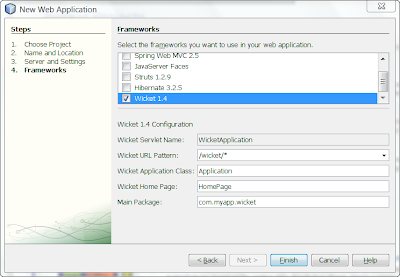
In the Categories list select Java Web and in the Project list select Wicket Application and then click Next. Accept all the default options in the Server and Settings window and click Next. In the Framework window, select Wicket 1.4 from the list of available Frameworks and then click Finish as pictured below:
This will create a Wicket project which will be opened in the Netbeans IDE as pictured below:
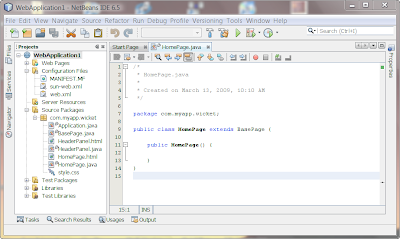
The plugin generates numerous files for you including the Server and Web descriptor files which are used to deploy and configure your web application on the application server, as well as basic Java, HTML and resource files that you can use as templates to start developing your application.
Select Run | Run Main Project from the main menu to build, deploy and run the application. You should see the following rendered in your client browser:
 The Structure of a Wicket Application
Wicket is different than most other Java Web frameworks that I have worked with or that I am familiar with, in that Wicket's convention is that it expects Java and markup files to reside side-by-side in the same Java package. This can be seen in the above screenshot.
A rendered Web page in a Wicket application is implemented with at least 2 files, a Java Class file and a markup file. Both files must have the same names and are case sensitive. As we can see from the above screehshot, both HomePage.java and HomePage.html files are used when there is a request to render the HomePage html file to the client browser and they reside side-by-side to eachother.
Just Java and HTML
One of the advantages when working with Apache Wicket is that you create your application using just plain old Java, X/HTML, CSS, and resources. Another advantage is that you don't mix markup and scripting in your HTML files as is often the case in other frameworks. In other words, when you view a markup file in a Wicket application you will only see HTML. There is no spaghetti-code intermixed inside your markup.
This clean separation of code and markup helps when developing and maintaining your applications by making your applications easier to read and understand. It also allows programmers and designers/graphic artists to work together on the same pages. Designers and graphic artists shouldn't have to be programers in order to do their jobs so not having to work with markup files that have server-side scripting code in them can eliminate that problem.
Double click on the HomePage.html file located in the Projects window. It will open in the Netbeans HTLM editor window as pictured below:
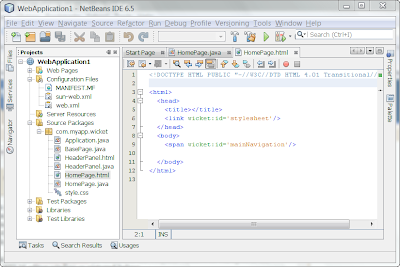
What you see is what you would expect to see when viewing markup - HTML!
Extending Our Application
The rendered page in our new application isn't much to look at but it will serve as a foundation to demonstrate adding dynamic content to a web page using Wicket. For this demonstration we will add markup and Java code to render the ubiquitous "Hello, World!" message as well as the current date and time in the client browser.
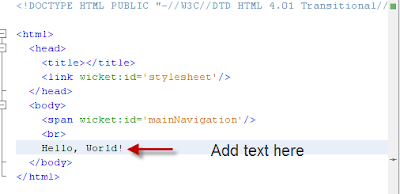
But for the first crack at this, lets cheat and show how to do this by just adding static text to the HomePage.html file.
Double click HomePage.html in the Netbeans Project window. The file will open in the Netbeans HTML editor. Add the text as pictured below:
Select Run | Run Main Project from the main menu to build, deploy and run the application. You should see the following rendered in your client browser:
 Adding Dynamic Content
If all we want to do is to display static text then our job would be done, but static pages are boring. Lets add some code and markup to make this page display the current date and time as well when the page is rendered.
Double click HomePage.html in the Netbeans Project window. The file will open in the Netbeans HTML editor. Modify and add the text as pictured below:
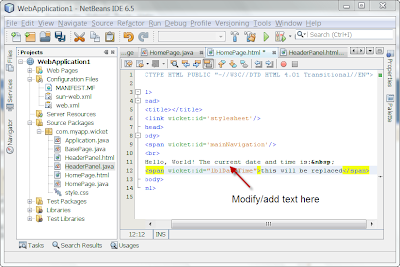
Notice that we've added a span tag to the markup and that it has a wicket:id attribute whose value is lblDateTime. When we create a Wicket componet to contribute to the body of this span tag we will pass this same value to the component's constructor as its first parameter which is its id.
Double click HomePage.java in the Netbeans Project window. The file will open in the Netbeans Java editor. Modify the HomePage class as pictured below:
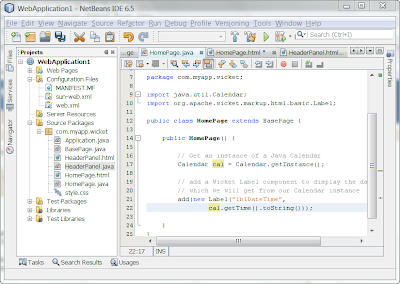
In the HomePage constructor we obtain and instance of a Calendar object which will be used to get the current date and time. Then we add a Label to the page. A Label is a Wicket component that adds its content to the body of any HTML element that it is associated with. The association between the HTML element and the component is made through the component's id value which we pass as the first parameter in the Label's constructor. The id value we pass is the same value that was assigned to the wicket:id attribute of the span tag in the HomePage.html file.
The second parameter we pass in the Label's constructor is the value of what we want to add to the body of the span element that the Label component is associated with. In this case, we will pass the current date and time as a string.
Select Run | Run Main Project from the main menu to build, deploy and run the application. You should see the following rendered in your client browser:
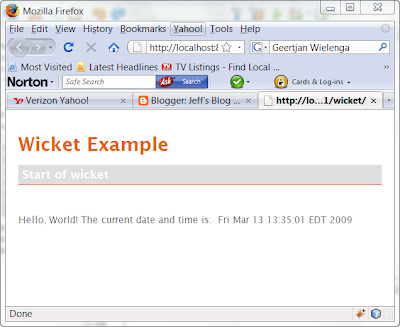
Although this application is trivial, the principles used here are the same ones used when developing real world enterprise Wicket applications.
Synergy - Netbeans and Wicket
As demonstrated, Netbeans with the Wicket v1.4 plugin provide many features and services for creating, developing and maintaining your Wicket applications. It is a highly productive and intuitive environment. Wicket offers Java Web developers a simple, intuitive, and productive framework to create Web applications with. Now that Netbeans has solid support for Wicket, I believe both will continue to grow in popularity.
 In the Categories list select Java Web and in the Project list select Wicket Application and then click Next. Accept all the default options in the Server and Settings window and click Next. In the Framework window, select Wicket 1.4 from the list of available Frameworks and then click Finish as pictured below:
 This will create a Wicket project which will be opened in the Netbeans IDE as pictured below:
 The plugin generates numerous files for you including the Server and Web descriptor files which are used to deploy and configure your web application on the application server, as well as basic Java, HTML and resource files that you can use as templates to start developing your application.
Select Run | Run Main Project from the main menu to build, deploy and run the application. You should see the following rendered in your client browser:
The plugin generates numerous files for you including the Server and Web descriptor files which are used to deploy and configure your web application on the application server, as well as basic Java, HTML and resource files that you can use as templates to start developing your application.
Select Run | Run Main Project from the main menu to build, deploy and run the application. You should see the following rendered in your client browser:
 The Structure of a Wicket Application
Wicket is different than most other Java Web frameworks that I have worked with or that I am familiar with, in that Wicket's convention is that it expects Java and markup files to reside side-by-side in the same Java package. This can be seen in the above screenshot.
A rendered Web page in a Wicket application is implemented with at least 2 files, a Java Class file and a markup file. Both files must have the same names and are case sensitive. As we can see from the above screehshot, both HomePage.java and HomePage.html files are used when there is a request to render the HomePage html file to the client browser and they reside side-by-side to eachother.
Just Java and HTML
One of the advantages when working with Apache Wicket is that you create your application using just plain old Java, X/HTML, CSS, and resources. Another advantage is that you don't mix markup and scripting in your HTML files as is often the case in other frameworks. In other words, when you view a markup file in a Wicket application you will only see HTML. There is no spaghetti-code intermixed inside your markup.
This clean separation of code and markup helps when developing and maintaining your applications by making your applications easier to read and understand. It also allows programmers and designers/graphic artists to work together on the same pages. Designers and graphic artists shouldn't have to be programers in order to do their jobs so not having to work with markup files that have server-side scripting code in them can eliminate that problem.
Double click on the HomePage.html file located in the Projects window. It will open in the Netbeans HTLM editor window as pictured below:
The Structure of a Wicket Application
Wicket is different than most other Java Web frameworks that I have worked with or that I am familiar with, in that Wicket's convention is that it expects Java and markup files to reside side-by-side in the same Java package. This can be seen in the above screenshot.
A rendered Web page in a Wicket application is implemented with at least 2 files, a Java Class file and a markup file. Both files must have the same names and are case sensitive. As we can see from the above screehshot, both HomePage.java and HomePage.html files are used when there is a request to render the HomePage html file to the client browser and they reside side-by-side to eachother.
Just Java and HTML
One of the advantages when working with Apache Wicket is that you create your application using just plain old Java, X/HTML, CSS, and resources. Another advantage is that you don't mix markup and scripting in your HTML files as is often the case in other frameworks. In other words, when you view a markup file in a Wicket application you will only see HTML. There is no spaghetti-code intermixed inside your markup.
This clean separation of code and markup helps when developing and maintaining your applications by making your applications easier to read and understand. It also allows programmers and designers/graphic artists to work together on the same pages. Designers and graphic artists shouldn't have to be programers in order to do their jobs so not having to work with markup files that have server-side scripting code in them can eliminate that problem.
Double click on the HomePage.html file located in the Projects window. It will open in the Netbeans HTLM editor window as pictured below:
 What you see is what you would expect to see when viewing markup - HTML!
Extending Our Application
The rendered page in our new application isn't much to look at but it will serve as a foundation to demonstrate adding dynamic content to a web page using Wicket. For this demonstration we will add markup and Java code to render the ubiquitous "Hello, World!" message as well as the current date and time in the client browser.
But for the first crack at this, lets cheat and show how to do this by just adding static text to the HomePage.html file.
Double click HomePage.html in the Netbeans Project window. The file will open in the Netbeans HTML editor. Add the text as pictured below:
What you see is what you would expect to see when viewing markup - HTML!
Extending Our Application
The rendered page in our new application isn't much to look at but it will serve as a foundation to demonstrate adding dynamic content to a web page using Wicket. For this demonstration we will add markup and Java code to render the ubiquitous "Hello, World!" message as well as the current date and time in the client browser.
But for the first crack at this, lets cheat and show how to do this by just adding static text to the HomePage.html file.
Double click HomePage.html in the Netbeans Project window. The file will open in the Netbeans HTML editor. Add the text as pictured below:
 Select Run | Run Main Project from the main menu to build, deploy and run the application. You should see the following rendered in your client browser:
 Adding Dynamic Content
If all we want to do is to display static text then our job would be done, but static pages are boring. Lets add some code and markup to make this page display the current date and time as well when the page is rendered.
Double click HomePage.html in the Netbeans Project window. The file will open in the Netbeans HTML editor. Modify and add the text as pictured below:
Adding Dynamic Content
If all we want to do is to display static text then our job would be done, but static pages are boring. Lets add some code and markup to make this page display the current date and time as well when the page is rendered.
Double click HomePage.html in the Netbeans Project window. The file will open in the Netbeans HTML editor. Modify and add the text as pictured below:
 Notice that we've added a span tag to the markup and that it has a wicket:id attribute whose value is lblDateTime. When we create a Wicket componet to contribute to the body of this span tag we will pass this same value to the component's constructor as its first parameter which is its id.
Double click HomePage.java in the Netbeans Project window. The file will open in the Netbeans Java editor. Modify the HomePage class as pictured below:
Notice that we've added a span tag to the markup and that it has a wicket:id attribute whose value is lblDateTime. When we create a Wicket componet to contribute to the body of this span tag we will pass this same value to the component's constructor as its first parameter which is its id.
Double click HomePage.java in the Netbeans Project window. The file will open in the Netbeans Java editor. Modify the HomePage class as pictured below:
 In the HomePage constructor we obtain and instance of a Calendar object which will be used to get the current date and time. Then we add a Label to the page. A Label is a Wicket component that adds its content to the body of any HTML element that it is associated with. The association between the HTML element and the component is made through the component's id value which we pass as the first parameter in the Label's constructor. The id value we pass is the same value that was assigned to the wicket:id attribute of the span tag in the HomePage.html file.
The second parameter we pass in the Label's constructor is the value of what we want to add to the body of the span element that the Label component is associated with. In this case, we will pass the current date and time as a string.
Select Run | Run Main Project from the main menu to build, deploy and run the application. You should see the following rendered in your client browser:
In the HomePage constructor we obtain and instance of a Calendar object which will be used to get the current date and time. Then we add a Label to the page. A Label is a Wicket component that adds its content to the body of any HTML element that it is associated with. The association between the HTML element and the component is made through the component's id value which we pass as the first parameter in the Label's constructor. The id value we pass is the same value that was assigned to the wicket:id attribute of the span tag in the HomePage.html file.
The second parameter we pass in the Label's constructor is the value of what we want to add to the body of the span element that the Label component is associated with. In this case, we will pass the current date and time as a string.
Select Run | Run Main Project from the main menu to build, deploy and run the application. You should see the following rendered in your client browser:
 Although this application is trivial, the principles used here are the same ones used when developing real world enterprise Wicket applications.
Synergy - Netbeans and Wicket
As demonstrated, Netbeans with the Wicket v1.4 plugin provide many features and services for creating, developing and maintaining your Wicket applications. It is a highly productive and intuitive environment. Wicket offers Java Web developers a simple, intuitive, and productive framework to create Web applications with. Now that Netbeans has solid support for Wicket, I believe both will continue to grow in popularity.
Although this application is trivial, the principles used here are the same ones used when developing real world enterprise Wicket applications.
Synergy - Netbeans and Wicket
As demonstrated, Netbeans with the Wicket v1.4 plugin provide many features and services for creating, developing and maintaining your Wicket applications. It is a highly productive and intuitive environment. Wicket offers Java Web developers a simple, intuitive, and productive framework to create Web applications with. Now that Netbeans has solid support for Wicket, I believe both will continue to grow in popularity.


Hi Jeff,
ReplyDeleteMy name is James Branam and I'm the NetBeans Community Docs Manager. Your blog entry would make a fantastic tutorial for our Community Docs wiki (http://wiki.netbeans.org//CommunityDocs). Would you be willing to contribute it? If you need any help or have any questions, please contact me at james.branam@sun.com. I look forward to hearing from you.
Wonderful tutorial.
ReplyDeleteI guess, Wicket is the one I have been searching for...
Vikrant
Vikrant,
ReplyDeleteThank you for your kind words.
Jeff
Good Tutorial!
ReplyDeleteThank you
Irshad