This is the first part in a multi-part series of articles that will teach you how to create Web applications that use the Apache Wicket Web framework and JPA/Hibernate. In particular, these articles will demonstrate the following:
- Using Netbeans to create Mavan based Apache Wicket projects.
- Using Netbeans to add and configure Hibernatea, a JPA comaptable Persistence provider to the project.
- Render tabular data from a database to the browser using Apache Wicket repeating views and models.
At the end of this series of articles we will have created an Apache Wicket Web application that retrieves data from a database using JPA and Hibernate and formats the data in a tabular view in the browser using an Apache Wicket DataView control.
This article, the first in this series, will cover the following topics:
- Creating a Maven Apache Wicket Web project in Netbeans
- Configuring the project to use JPA and Hibernate.
- Adding the required libraries to the project using Maven
- Mapping POJOs to Database tables using JPA support in Netbeans.
- Creating a JPA utility class that adds CRUD capability using JPA support in Netbeans
***Note - There are numerous ways to configure the 3 layers (presentation, business, and domain) found in 3-tier Java applications. In this article we will employ a direct approach; we will use tight-coupling that binds our code directly to the JPA persistence service. In future articles we will explore using other methods such as Spring IOC (Inversion Of Control) and EJB (Enterprise Java Beans) to layer the different services in loosely coupled fashion.
You will need the following to complete this exercise:
- Netbeans v6.5 or greater
- Maven Netbeans Plugin
- Derby Sample Database which should have been installed when you downloaded and installed Netbeans
Creating a Maven Apache Wicket Web project in Netbeans
To create the project that will serve as the foundation for the remainder of this series of artices, please review and follow the exercises in my previous article,
Netbeans Maven Projects. This will give you a good overview of Maven, and creating an Apache Wicket Maven based project using Netbeans.
Once you have completed creating the project, please start Netbeans and open the project.
Remove the junit test files from the project
Testing with junit is a good practice but we won't need to use it for this exercise, so we will remove the project's test classes. Instead of physically deleting them, however, we will use Netbeans' safe delete option to remove them from the project. Please follow these steps:
- Completely expand the Test Packages node in the Projects pane and select both the Start.java and TestHomePage.java files
- Right click and select Delete which will open the Delete window.
- Click the Safely delete checkbox so that it is checked and then click the Refactor button. This will remove the 2 files from the project but will not delete them.
Adding JPA and Hibernate to the project
Please follow these steps to add JPA and Hibernate to the project:
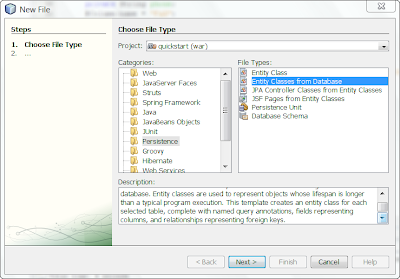
- Right click the project node in the Projects pane and select New | Other. This will open the New File window. Now select Persistence from the Categories pane and Entity Classes from Database from the File Types pane as pictured below:
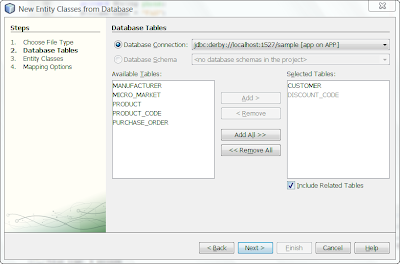
- Click the Next button and in the Database connection drop down menu select the jdbc derby sample database. In the Available Tables list box select Customer an click the Add button which will then add the Customer and the Discount_Code tables to be included in the Selected Tables list box as pictured below:
- Now click the Next button and in the Package text field enter Hibernate for the name of the Java package and then click the Create Persistence Unit button which will open the Create Persistence Unit window.
- From the Persistence Library drop down menu please select Hibernate and then click the Create button which will close the Create Persistence Unit window.
- Now click Next and Finish which will close the New Entity Classes from Database window.
As a result of the above steps, Netbeans has added numerous files to our project. If you fully expand Other Sources node in the Projects pane you will see that Netbeans has added the persistence.xml file to our project. This is the file that is used by JPA to cinfigure persistence at runtime. If you double click the persistence.xml file node it will open in the editor. In this file you can see that there is a Provider tag that specifies that we have chosen Hibernate as the persistence provider:
<provider>org.hibernate.ejb.HibernatePersistence</provider>
You can also see that there are 2 class tags which identify the Java classes that represent our business entity classes, Customer and DiscountCode:
<class>hibernate.Customer</class>
<class>hibernate.DiscountCode</class>
In addition to the above tags, there are numerous property tags that are used to identify the database driver, username and password, connection url and cache provider. JPA uses these properties at run time as well to connect to the da.
Please fully expand the libraries node in the Project pane and you will notice that the hibernate-3.2.5.ga.jar Hibernate library has been added to our project. Later, we will use Netbeans' Maven support to replace this library with a more recent version.
Please fully expand the Source Packages node in the Project pane. Notice that 2 Pojos, Customer.java and DiscountCode.java, our entity classes, have been added and are located in the hibernate package as pictured below:

Double click each Pojo and they will open in Netbeans' Java editor window. Notice how each Pojo has numerous errors which we will now correct by adding libraries to our project using Netbeans' Maven support.
Replacing and adding libraries to our project
We need to replace and add a few libraries to our project. We will use Netbeans Maven support to do this. First, lets replace the hibernate-3.2.5.ga.jar with a more recent version.
Right click the Libraries node in the Project pane and select Add Library. This will open the Add Library window, which will allow us to search for the most recent version of this library. Please follow these steps:
- In the GroupId text box enter org.hibernate
- In the ArtifactId text box press the space bar on your keyboard. This will open a list of all the Artifacts that are identified by the org.hibernate GroupId we entered.
- From this list select Hibernate.
- In the Version text box press the space bar on your keyboard. This will open a list of all the different versions that are available for this library.
- Select 3.2.6.ga from the list.
The Add Library window should now appear as pictured below:
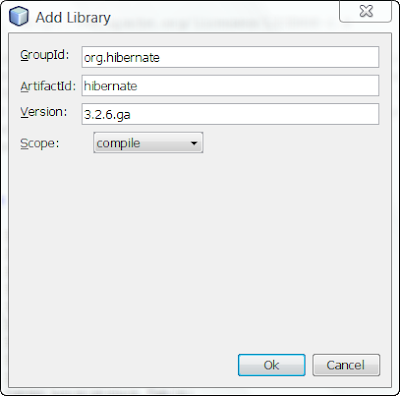
Click the Ok button to close this window. We have replaced the hibernate-3.2.5.ga.jar with the hibernate-3.2.6.ga.jar and you can confirm this by expanding the Libraries node in the Project window.
Next we need to add support JPA/Hibernate annotations. We will do this using the same procedure above by right clicking the Libraries pane in the Project window, selecting Add Library which will open the Add Library window, which will allow us to search for the most recent version of this library. Please follw these steps:
- In the GroupId text box enter org.hibernate
- In the ArtifactId text box press the space bar on your keyboard. This will open a list of all the Artifacts that are identified by the org.hibernate GroupId we entered.
- From this list select hibernate-annotations.
- In the Version text box press the space bar on your keyboard. This will open a list of all the different versions that are available for this library.
- Select 3.4.0.GA from the list.
The Add Library window should now appear as pictured below:
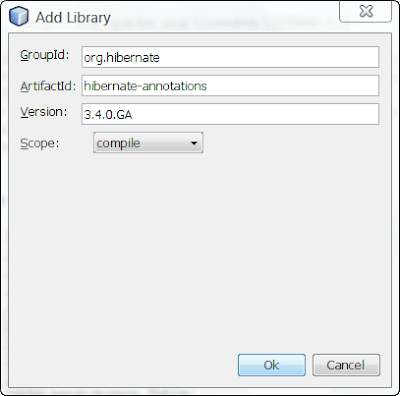
Click the Ok button to close this window. We have added the hibernate-annotations-3.4.0.GA.jar and you can confirm this by expanding the Libraries node in the Project window.
Next we need to add support for Hibernate entity management. We will do this using the same procedure above by right clicking the Libraries pane in the Project window, selecting Add Library which will open the Add Library window, which will allow us to search for the most recent version of this library. Please follw these steps:
- In the GroupId text box enter org.hibernate
- In the ArtifactId text box press the space bar on your keyboard. This will open a list of all the Artifacts that are identified by the org.hibernate GroupId we entered.
- From this list select hibernate-entitymanager.
- In the Version text box press the space bar on your keyboard. This will open a list of all the different versions that are available for this library.
- Select 3.4.0.GA from the list.
The Add Library window should now appear as pictured below:
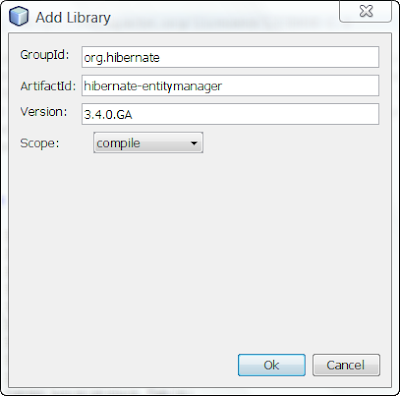
Click the Ok button to close this window. We have added the hibernate-entitymanager-3.4.0.GA.jar and you can confirm this by expanding the Libraries node in the Project window.
Next we need to add javax.persistence support. We will do this using the same procedure above by right clicking the Libraries pane in the Project window, selecting Add Library which will open the Add Library window, which will allow us to search for the most recent version of this library. Please follw these steps:
- In the GroupId text box enter javax.persistence
- In the ArtifactId text box press the space bar on your keyboard. This will open a list of all the Artifacts that are identified by the org.hibernate GroupId we entered.
- From this list select persistence-api.
- In the Version text box press the space bar on your keyboard. This will open a list of all the different versions that are available for this library.
- Select 1.0 from the list.
The Add Library window should now appear as pictured below:
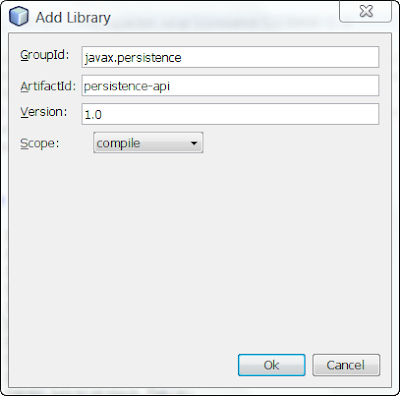
Click the Ok button to close this window. We have added the persistence-api-1.0.jar and you can confirm this by expanding the Libraries node in the Project window.
Next we need to add Derby database driver support. We will do this using the same procedure above by right clicking the Libraries pane in the Project window, selecting Add Library which will open the Add Library window, which will allow us to search for the most recent version of this library. Please follw these steps:
- In the GroupId text box enter org.apache.derby
- In the ArtifactId text box press the space bar on your keyboard. This will open a list of all the Artifacts that are identified by the org.hibernate GroupId we entered.
- From this list select derbyclient.
- In the Version text box press the space bar on your keyboard. This will open a list of all the different versions that are available for this library.
- Select 10.4.2.0 from the list.
The Add Library window should now appear as pictured below:
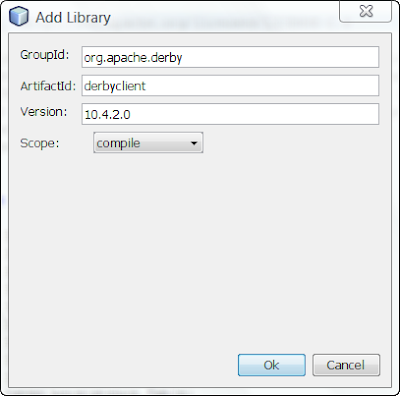
Click the Ok button to close this window. We have added the derbyclient-10.4.2.0.jar and you can confirm this by expanding the Libraries node in the Project window.
Next we need to add support for transactions. We will do this using the same procedure above by right clicking the Libraries pane in the Project window, selecting Add Library which will open the Add Library window, which will allow us to search for the most recent version of this library. Please follw these steps:
- In the GroupId text box enter javax.transaction
- In the ArtifactId text box press the space bar on your keyboard. This will open a list of all the Artifacts that are identified by the org.hibernate GroupId we entered.
- From this list select jta.
- In the Version text box press the space bar on your keyboard. This will open a list of all the different versions that are available for this library.
- Select 1.1 from the list.
The Add Library window should now appear as pictured below:
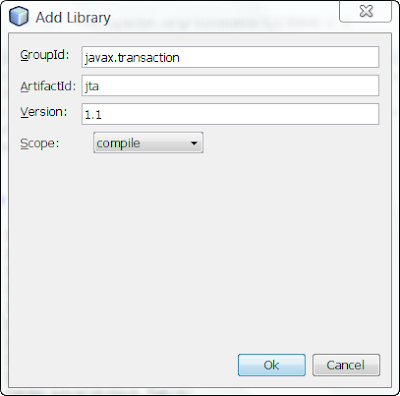
Click the Ok button to close this window. We have added the jta-1.1.jar and you can confirm this by expanding the Libraries node in the Project window.
We have added all the libraries that we will need to run and test our project. Build the project by right clicking the project node in the Projects pane and select Build. Your project should build without any errors.
Creating a JPA Controller Class
A JPA Controller class provides methods that support CRUD operations. We could write this ourselves but we can have Netbeans generate this class for us. To do so, please follow these steps:
- Right click the project node in the Project pane and select New | Other. This will open the New File window.
- Select Persistence from the Categories pane and JPA Controller Classes from Entity Classes from the File Types pane and click Next.
- Click Add All to add the 2 available entity classes to the list of selected entity classes and click Next.
- Select hibernate from the Package drop down menu and then click Finish.
Netbeans has added the CustomerJPAController.java file to our hibernate package and created a new hibernate.exceptions package which contains numerous files for dealing with persistence exceptions that can occur.
If you double click on the CustomerJPAController.java file in the hibernate package it will open in the Netbeans Java editor. Please take a few minutes to look at the code that was generated in this file. There are methods for your basic CRUD operations including transaction support. We will take advantage of the findCustomerEntities method to retrieve a list of Customer entities.
Developing a testing strategy
We need to test our project to prove the following:
- We can connect to the sample Derby database.
- We can query the Customer table to return all the rows.
- We can get a list of Customer entities as a result from the query and the list contains the correct number of entities.
We can determine the correct number of Customer entities that should be returned by viewing the contents of the Customer table using Netbeans database support. Please follow these steps:
- In the Services window, expand the Databases node and right click the jdbc derby sample database node and then select Connect to connect to the database.
- Once the connection to the database is made, expand the Tables node, right click the Customer table and select View Data. This will open a SQL Command window.
In the SQL Command window you should see a result set containing all the rows in the Customer table, and the total number of rows returned should be indicated as well. When I run this it indicates that there are 13 rows of data but your results may be different. What is important is that we now know that our test should confirm the number that you see when you display the contents of the Customer table in the SQL Command window:
 Adding code to HomePage.java to test
Now lets add the code to test our project. Please follow these steps:
- Fully expand the Source Packages node in the Projects pane and double click the HomePage.java file which will open the file in the Netbeans Java editor window.
- Add this method to the HomePage class:
private void TestDatabase(){
CustomerJpaController custcont = new CustomerJpaController();
int i = custcont.findCustomerEntities().size();
System.out.println("custcont.findCustomerEntities() returned " +
Integer.valueOf(i) + " Customer entities");
}
- Modify the HomePage constructor to call our new method. The constructor should look like the following:
public HomePage(final PageParameters parameters) {
// call out method
TestDatabase();
// Add the simplest type of label
add(new Label("message",
"If you see this message wicket is properly configured and running"));
}
Testing our application
Right click the project node in the Projects pane and select Run. This could take a few moments because Maven may need to download dependencies from a Maven repository if they aren't already in your local repository. Once the project builds without errors it will be deployed to the server and then it will run. You should see the output in your browser. Now switch back to Netbeans and click on the Server tab in the Output window. Scroll down to the bottom of the window and you should see something like the following:
- INFO: custcont.findCustomerEntities() returned 13 Customer entities
13 exactly matches the number of rows returned when I displayed the contents of the Customer table. We have confirmed that we can connect, query and get results back from our database.
Job well done!
Summary
- We added all the latest versions of the required libraries.
- We configured JPA/Hibernate.
- We added 2 Pojos to represent our domain objects.
- We added CRUD support.
- We created a testing strategy.
- We tested and confirmed that our application works as anticipated.
What's Next
In the next article in this series we will add to our project, giving it the ability to display the contents of the Customer table in the browser. We will use Apache Wicket models and the DataView control to implement the displaying of the data.


 Add some styling to our page
Lets add some styling to our page:
Add some styling to our page
Lets add some styling to our page:
 Modify CustomerJpaController
Lets modify the JPA query in the CustomerJpaController class to return our Customer entities in ascending CustomerId order:
Modify CustomerJpaController
Lets modify the JPA query in the CustomerJpaController class to return our Customer entities in ascending CustomerId order:
 Now lets run the project.
Run the project
Run the project by right clicking the project node in the Projects pane and selecting Run which will open your browser and render the following:
Now lets run the project.
Run the project
Run the project by right clicking the project node in the Projects pane and selecting Run which will open your browser and render the following: Summary


 Posts
Posts


