Developing Great Software

Tuesday, March 31, 2009

JPA/Hibernate and Wicket Repeating Views with Netbeans- Part 1

This is the first part in a multi-part series of articles that will teach you how to create Web applications that use the Apache Wicket Web framework and JPA/Hibernate. In particular, these articles will demonstrate the following:
  • Using Netbeans to create Mavan based Apache Wicket projects.
  • Using Netbeans to add and configure Hibernatea, a JPA comaptable Persistence provider to the project.
  • Render tabular data from a database to the browser using Apache Wicket repeating views and models.
At the end of this series of articles we will have created an Apache Wicket Web application that retrieves data from a database using JPA and Hibernate and formats the data in a tabular view in the browser using an Apache Wicket DataView control. This article, the first in this series, will cover the following topics:
  • Creating a Maven Apache Wicket Web project in Netbeans
  • Configuring the project to use JPA and Hibernate.
  • Adding the required libraries to the project using Maven
  • Mapping POJOs to Database tables using JPA support in Netbeans.
  • Creating a JPA utility class that adds CRUD capability using JPA support in Netbeans
***Note - There are numerous ways to configure the 3 layers (presentation, business, and domain) found in 3-tier Java applications. In this article we will employ a direct approach; we will use tight-coupling that binds our code directly to the JPA persistence service. In future articles we will explore using other methods such as Spring IOC (Inversion Of Control) and EJB (Enterprise Java Beans) to layer the different services in loosely coupled fashion. You will need the following to complete this exercise:
  • Netbeans v6.5 or greater
  • Maven Netbeans Plugin
  • Derby Sample Database which should have been installed when you downloaded and installed Netbeans
Creating a Maven Apache Wicket Web project in Netbeans To create the project that will serve as the foundation for the remainder of this series of artices, please review and follow the exercises in my previous article, Netbeans Maven Projects. This will give you a good overview of Maven, and creating an Apache Wicket Maven based project using Netbeans. Once you have completed creating the project, please start Netbeans and open the project. Remove the junit test files from the project Testing with junit is a good practice but we won't need to use it for this exercise, so we will remove the project's test classes. Instead of physically deleting them, however, we will use Netbeans' safe delete option to remove them from the project. Please follow these steps:
  1. Completely expand the Test Packages node in the Projects pane and select both the Start.java and TestHomePage.java files
  2. Right click and select Delete which will open the Delete window.
  3. Click the Safely delete checkbox so that it is checked and then click the Refactor button. This will remove the 2 files from the project but will not delete them.
Adding JPA and Hibernate to the project Please follow these steps to add JPA and Hibernate to the project:
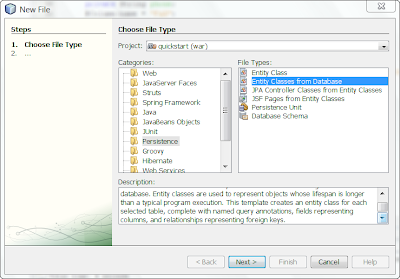
  1. Right click the project node in the Projects pane and select New | Other. This will open the New File window. Now select Persistence from the Categories pane and Entity Classes from Database from the File Types pane as pictured below:
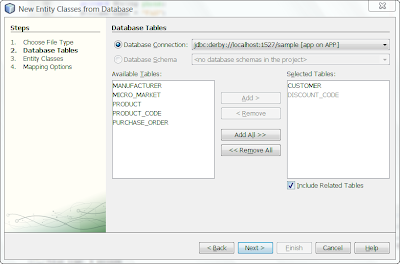
  2. Click the Next button and in the Database connection drop down menu select the jdbc derby sample database. In the Available Tables list box select Customer an click the Add button which will then add the Customer and the Discount_Code tables to be included in the Selected Tables list box as pictured below:
  3. Now click the Next button and in the Package text field enter Hibernate for the name of the Java package and then click the Create Persistence Unit button which will open the Create Persistence Unit window.
  4. From the Persistence Library drop down menu please select Hibernate and then click the Create button which will close the Create Persistence Unit window.
  5. Now click Next and Finish which will close the New Entity Classes from Database window.
As a result of the above steps, Netbeans has added numerous files to our project. If you fully expand Other Sources node in the Projects pane you will see that Netbeans has added the persistence.xml file to our project. This is the file that is used by JPA to cinfigure persistence at runtime. If you double click the persistence.xml file node it will open in the editor. In this file you can see that there is a Provider tag that specifies that we have chosen Hibernate as the persistence provider:
<provider>org.hibernate.ejb.HibernatePersistence</provider>
You can also see that there are 2 class tags which identify the Java classes that represent our business entity classes, Customer and DiscountCode:
<class>hibernate.Customer</class> <class>hibernate.DiscountCode</class>
In addition to the above tags, there are numerous property tags that are used to identify the database driver, username and password, connection url and cache provider. JPA uses these properties at run time as well to connect to the da. Please fully expand the libraries node in the Project pane and you will notice that the hibernate-3.2.5.ga.jar Hibernate library has been added to our project. Later, we will use Netbeans' Maven support to replace this library with a more recent version.
Please fully expand the Source Packages node in the Project pane. Notice that 2 Pojos, Customer.java and DiscountCode.java, our entity classes, have been added and are located in the hibernate package as pictured below:Double click each Pojo and they will open in Netbeans' Java editor window. Notice how each Pojo has numerous errors which we will now correct by adding libraries to our project using Netbeans' Maven support. Replacing and adding libraries to our project We need to replace and add a few libraries to our project. We will use Netbeans Maven support to do this. First, lets replace the hibernate-3.2.5.ga.jar with a more recent version. Right click the Libraries node in the Project pane and select Add Library. This will open the Add Library window, which will allow us to search for the most recent version of this library. Please follow these steps:
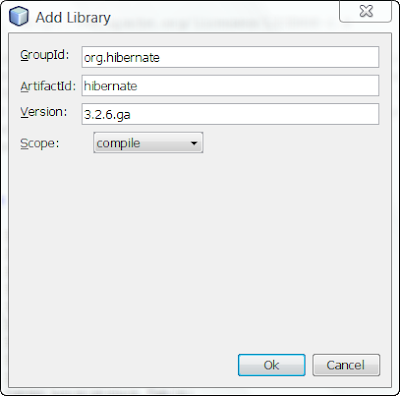
  1. In the GroupId text box enter org.hibernate
  2. In the ArtifactId text box press the space bar on your keyboard. This will open a list of all the Artifacts that are identified by the org.hibernate GroupId we entered.
  3. From this list select Hibernate.
  4. In the Version text box press the space bar on your keyboard. This will open a list of all the different versions that are available for this library.
  5. Select 3.2.6.ga from the list.
The Add Library window should now appear as pictured below: Click the Ok button to close this window. We have replaced the hibernate-3.2.5.ga.jar with the hibernate-3.2.6.ga.jar and you can confirm this by expanding the Libraries node in the Project window. Next we need to add support JPA/Hibernate annotations. We will do this using the same procedure above by right clicking the Libraries pane in the Project window, selecting Add Library which will open the Add Library window, which will allow us to search for the most recent version of this library. Please follw these steps:
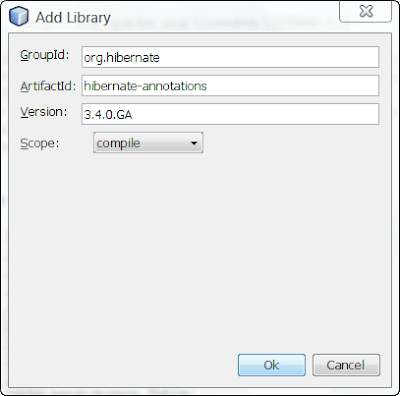
  1. In the GroupId text box enter org.hibernate
  2. In the ArtifactId text box press the space bar on your keyboard. This will open a list of all the Artifacts that are identified by the org.hibernate GroupId we entered.
  3. From this list select hibernate-annotations.
  4. In the Version text box press the space bar on your keyboard. This will open a list of all the different versions that are available for this library.
  5. Select 3.4.0.GA from the list.
The Add Library window should now appear as pictured below: Click the Ok button to close this window. We have added the hibernate-annotations-3.4.0.GA.jar and you can confirm this by expanding the Libraries node in the Project window. Next we need to add support for Hibernate entity management. We will do this using the same procedure above by right clicking the Libraries pane in the Project window, selecting Add Library which will open the Add Library window, which will allow us to search for the most recent version of this library. Please follw these steps:
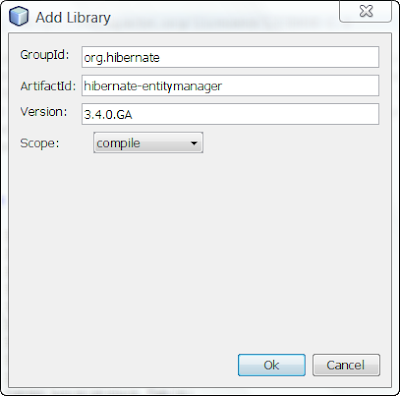
  1. In the GroupId text box enter org.hibernate
  2. In the ArtifactId text box press the space bar on your keyboard. This will open a list of all the Artifacts that are identified by the org.hibernate GroupId we entered.
  3. From this list select hibernate-entitymanager.
  4. In the Version text box press the space bar on your keyboard. This will open a list of all the different versions that are available for this library.
  5. Select 3.4.0.GA from the list.
The Add Library window should now appear as pictured below: Click the Ok button to close this window. We have added the hibernate-entitymanager-3.4.0.GA.jar and you can confirm this by expanding the Libraries node in the Project window. Next we need to add javax.persistence support. We will do this using the same procedure above by right clicking the Libraries pane in the Project window, selecting Add Library which will open the Add Library window, which will allow us to search for the most recent version of this library. Please follw these steps:
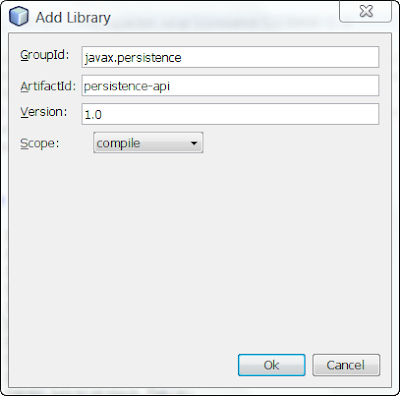
  1. In the GroupId text box enter javax.persistence
  2. In the ArtifactId text box press the space bar on your keyboard. This will open a list of all the Artifacts that are identified by the org.hibernate GroupId we entered.
  3. From this list select persistence-api.
  4. In the Version text box press the space bar on your keyboard. This will open a list of all the different versions that are available for this library.
  5. Select 1.0 from the list.
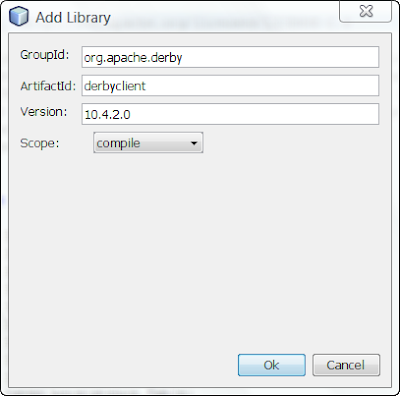
The Add Library window should now appear as pictured below: Click the Ok button to close this window. We have added the persistence-api-1.0.jar and you can confirm this by expanding the Libraries node in the Project window. Next we need to add Derby database driver support. We will do this using the same procedure above by right clicking the Libraries pane in the Project window, selecting Add Library which will open the Add Library window, which will allow us to search for the most recent version of this library. Please follw these steps:
  1. In the GroupId text box enter org.apache.derby
  2. In the ArtifactId text box press the space bar on your keyboard. This will open a list of all the Artifacts that are identified by the org.hibernate GroupId we entered.
  3. From this list select derbyclient.
  4. In the Version text box press the space bar on your keyboard. This will open a list of all the different versions that are available for this library.
  5. Select 10.4.2.0 from the list.
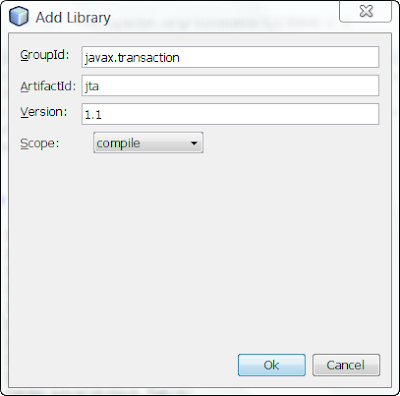
The Add Library window should now appear as pictured below: Click the Ok button to close this window. We have added the derbyclient-10.4.2.0.jar and you can confirm this by expanding the Libraries node in the Project window. Next we need to add support for transactions. We will do this using the same procedure above by right clicking the Libraries pane in the Project window, selecting Add Library which will open the Add Library window, which will allow us to search for the most recent version of this library. Please follw these steps:
  1. In the GroupId text box enter javax.transaction
  2. In the ArtifactId text box press the space bar on your keyboard. This will open a list of all the Artifacts that are identified by the org.hibernate GroupId we entered.
  3. From this list select jta.
  4. In the Version text box press the space bar on your keyboard. This will open a list of all the different versions that are available for this library.
  5. Select 1.1 from the list.
The Add Library window should now appear as pictured below: Click the Ok button to close this window. We have added the jta-1.1.jar and you can confirm this by expanding the Libraries node in the Project window. We have added all the libraries that we will need to run and test our project. Build the project by right clicking the project node in the Projects pane and select Build. Your project should build without any errors. Creating a JPA Controller Class A JPA Controller class provides methods that support CRUD operations. We could write this ourselves but we can have Netbeans generate this class for us. To do so, please follow these steps:
  1. Right click the project node in the Project pane and select New | Other. This will open the New File window.
  2. Select Persistence from the Categories pane and JPA Controller Classes from Entity Classes from the File Types pane and click Next.
  3. Click Add All to add the 2 available entity classes to the list of selected entity classes and click Next.
  4. Select hibernate from the Package drop down menu and then click Finish.
Netbeans has added the CustomerJPAController.java file to our hibernate package and created a new hibernate.exceptions package which contains numerous files for dealing with persistence exceptions that can occur. If you double click on the CustomerJPAController.java file in the hibernate package it will open in the Netbeans Java editor. Please take a few minutes to look at the code that was generated in this file. There are methods for your basic CRUD operations including transaction support. We will take advantage of the findCustomerEntities method to retrieve a list of Customer entities. Developing a testing strategy We need to test our project to prove the following:
  • We can connect to the sample Derby database.
  • We can query the Customer table to return all the rows.
  • We can get a list of Customer entities as a result from the query and the list contains the correct number of entities.
We can determine the correct number of Customer entities that should be returned by viewing the contents of the Customer table using Netbeans database support. Please follow these steps:
  1. In the Services window, expand the Databases node and right click the jdbc derby sample database node and then select Connect to connect to the database.
  2. Once the connection to the database is made, expand the Tables node, right click the Customer table and select View Data. This will open a SQL Command window.
In the SQL Command window you should see a result set containing all the rows in the Customer table, and the total number of rows returned should be indicated as well. When I run this it indicates that there are 13 rows of data but your results may be different. What is important is that we now know that our test should confirm the number that you see when you display the contents of the Customer table in the SQL Command window: Adding code to HomePage.java to test Now lets add the code to test our project. Please follow these steps:
  1. Fully expand the Source Packages node in the Projects pane and double click the HomePage.java file which will open the file in the Netbeans Java editor window.
  2. Add this method to the HomePage class: private void TestDatabase(){ CustomerJpaController custcont = new CustomerJpaController(); int i = custcont.findCustomerEntities().size(); System.out.println("custcont.findCustomerEntities() returned " + Integer.valueOf(i) + " Customer entities"); }
  3. Modify the HomePage constructor to call our new method. The constructor should look like the following: public HomePage(final PageParameters parameters) { // call out method TestDatabase(); // Add the simplest type of label add(new Label("message", "If you see this message wicket is properly configured and running")); }
Testing our application Right click the project node in the Projects pane and select Run. This could take a few moments because Maven may need to download dependencies from a Maven repository if they aren't already in your local repository. Once the project builds without errors it will be deployed to the server and then it will run. You should see the output in your browser. Now switch back to Netbeans and click on the Server tab in the Output window. Scroll down to the bottom of the window and you should see something like the following:
  • INFO: custcont.findCustomerEntities() returned 13 Customer entities
13 exactly matches the number of rows returned when I displayed the contents of the Customer table. We have confirmed that we can connect, query and get results back from our database. Job well done! Summary
  • We added all the latest versions of the required libraries.
  • We configured JPA/Hibernate.
  • We added 2 Pojos to represent our domain objects.
  • We added CRUD support.
  • We created a testing strategy.
  • We tested and confirmed that our application works as anticipated.
What's Next In the next article in this series we will add to our project, giving it the ability to display the contents of the Customer table in the browser. We will use Apache Wicket models and the DataView control to implement the displaying of the data.

Thursday, March 26, 2009

Netbeans Maven Projects

Developing Java applications today is a lot like building with Lego blocks. Applications are typically composed of numerous modules and libraries, some of which you write yourself and others which are obtained from open source projects. Relying on open source to provide functionality to your applications offers many advantages. Following the DRY (Don't Repeat Yourself) principle, why recreate the wheel?
  • Feedback on the Web is readily available; just Google the library or functionality you are interested in. Chatter on the web will either confirm your choice or send you looking elsewhere.
  • Bug issues can often be resolved by a quick Google search.
  • Numerous support groups are available for the most popular open source projects.
Incorporating open source into your application brings a unique set of challenges. Many open source projects rely on other open source projects to provide APIs and/or implementations to their products. This is, after all, just another example of the DRY principle. For example, numerous open source libraries incorporate logging but instead of 'hard coding' to a specific logging implementation, such as Log4J, they code to the commons-logging or the Simple Logging Facade for Java (SLF4J) library, which are open source projects which act as a bridge between different logging implementations. This is an example of the Service Provider pattern where an API and possibly abstract classes provide a contract and that contract is fulfilled by numerous implementations. So how does one create applications today when faced with piecing them together from the Lego blocks made up of open source libraries and where the challenge is in resolving all the interdependencies between libraries that exist in such an environment? Trying to manually create a build script and gather all the required libraries and their correct versions has become a monumental task. It would be far better if there were a means of offloading this responsibility from the developer. That is where Maven comes into play. Maven Maven is defined on the Apache Maven project's web site as follows:
Maven is a software project management and comprehension tool. Based on the concept of a project object model (POM), Maven can manage a project's build, reporting and documentation from a central piece of information.
As far as descriptions go, the above is obviously acurate. But what it doesn't describe is how Maven actually resolves the issues of dependency when developing applications in today's open source environment. Imagine that you are a provider of an open source library. If your library is anything other than trivial, you most likely incorporate other open source libraries to satisfy some API, feature or functionality. You test your library and once you are satisfied that your library works as expected you publish it and make it available to the open source community. But you also provide a POM that users of your library can use to incorporate your library into their own Maven based projects. The POM not only 'defines' your library but also defines all the dependencies that your library has on other libraries. You publish your POM on one of the POM repositories so that other developers can discover it and use it to incorporate your library into their applications. Now imagine that you are a developer writing the next killer Web application and you want to incorporate the functionality provided by the open source library mentioned above. Using Maven, how would you do that and how would you do that using the Netbeans IDE? Well, Netbeans provides excellent support for Maven based projects. In Netbeans v6.5, this support comes in the form of a Netbeans plugin. My understanding is that future versions of Netbeans will incorporate Maven directly and will not require a plugin to provide Maven project support. Installing The Netbeans Maven Plugin If you haven't already installed the Netbeans Maven plugin, doing so is easy. Please follow the steps below:
  1. Open Netbeans v6.5.
  2. Select Tools | Plugins from the main menu. This will open up the Plugins window.
  3. Select the Available Plugins tab and type 'Maven' into the search text box which is located above and to the right of the Plugin window's main two pannels.
  4. Select the Maven plugin and click the Install button located beneath and to the left of the Plugin window's main two pannels.
Follow the prompts. When all is completed you will have installed Maven project support into the Netbeans IDE. Creating a Netbeans Maven Based Project I will use Netbeans' Maven project support to create a Web project based on the Apache Wicket framework. To create a Wicket application please follow the steps below:
  1. Open Netbeans v6.5.
  2. Select File | New Project from the main menu. This will open the New Project window.
  3. Select Maven from the Categories pannel and Maven Project from the Projects pannel and click the Next button on the bottom of the New Project window.
  4. In the Maven Archetypes list box select Archetypes from remote Maven Repositories. Notice that when you select this option that Netbeans goes out to the Maven Repositores and discovers all the Archetypes available there and presents these as available options for your selection. In the list of available Archetypes select Wicket Quickstart Archetype as pictured below:
  5. Click the Next button and then click Finish. Netbeans will now create a Maven based project based on your having previously selected the Wicket Quickstart Archetype and when it is done it will open the project in the Project window as pictured below:
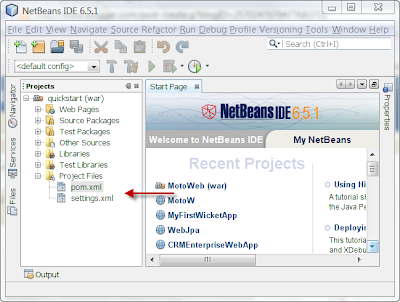
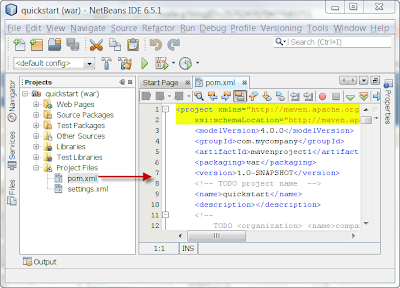
You have now created an Apache Wicked Maven based application. Now lets explore some of the advantages that Maven provides to project management. POMs Maven projects in Netbeans do not use ANT build scripts. Instead, it uses a POM that it generates when the project is created. In our case, the POM it generated for our project was from the POM repository and because we selected Wicket Quickstart Archetype the POM it generated is specifc to Maven based Apache Wicket applications. When you expand the Project Files folder in the Projects pane you can see 2 items there as pictured below: If you double click on the pom.xml file, Netbeans will open it in its XML editor as pictured below: POM dependency Tag When viewing the pom.xml file in the editor, scroll down until you see the following:
<!-- WICKET DEPENDENCIES --> <dependency> <groupid>org.apache.wicket</groupid> <artifactid>wicket</artifactid> <version>${wicket.version}</version> </dependency> The dependency tag above declares a project build dependency. In this case, it represents a dependency on Apache Wicket. The groupId and artifactId tags above serve to uniquely identify the target of the dependency, and the version tag above serves to identify the version of the dependency, which in this case is identified by a property declared as follows: <wicket.version>1.4-rc2</wicket.version> Also notice that in the POM file there are numerous other dependency declarations including the following:
  • slf4j - a a simple facade or abstraction for various logging frameworks such as Log4J
  • log4j - the actual logging implementation
  • junit - testing framework
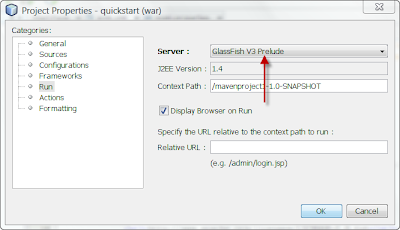
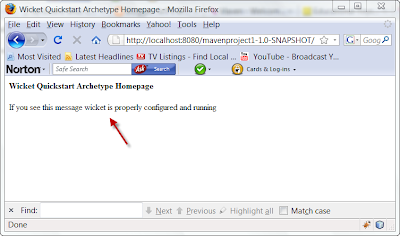
The dependeny declarations in the POM declare all the dependencies for our project and are used when building the project. Building POM Based Projects Go ahead and build the project by right clicking the project node in the Project pane and selecting Build. The build process generates output in the Output window. Go ahead and take a look at the generated output by clicking the Output tab. If you have never installed the Apache Wicket framework and specifically, never installed the specified version declared in the POM, you will notice that all the required jar files were downloaded for you. You didn't have to do anything like going to a web site and downloading the jars yourself. And this is true for all the other dependencies declared in the POM, too. This is one of the great benefits of using Maven; declare a dependency in the POM and when the project is built dependencies that are not already located in in your local or other repository will be downloaded onto your computer. Yes, this can add overhead to the build process but it only occurs when the required dependencies aren't already present in your local respository or some other repository that you can declare. Selecting A Server For Deployment Before we can run our application we have to tell Netbeans what server we want to deploy it on. Right click the project node in the Project folder and select Properties which will open the Project Properties window. Select Run from the Categories pannel which will display numerous runtime options, one of which is the Server option. From the Server drop down menu located on the right panel of the Project Properties window select a server of your choice such as GlassFish V3 Prelude as pictured below: Click OK. When we build and run our application, Netbeans will deploy it to the server we just selected. Running A POM Based Project Now run the application by right clicking the project node in the Project window and selecting Run. You should see the following rendered in your browser window: Summary Using Netbeans and Maven we were able to create a brand new project based on the Wicket Quickstart Archetype we selected. All the dependencies for the project were declared in the application's pom.xml file for us. When building the project, any dependency that couldn't be resolved locally was satisfied by downloading the dependency. This only took a few minutes. Imagine if you had to do all this manually. Netbeans with Maven support has taken the hassle out of working with open source. This will allow you to take better advantage of the many great open source products that are available when you create your next killer application. URLs To Some Of The Items Mentioned Netbeans Maven Wicket

Friday, March 13, 2009

Netbeans And Apache Wicket

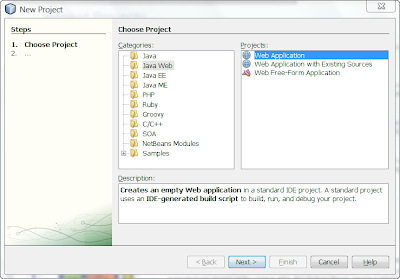
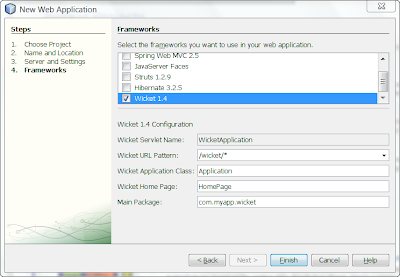
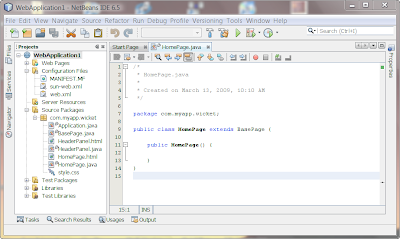
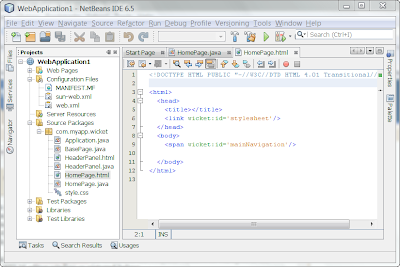
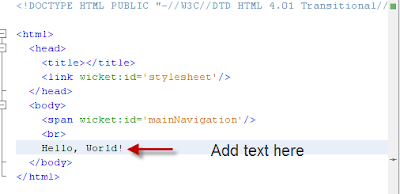
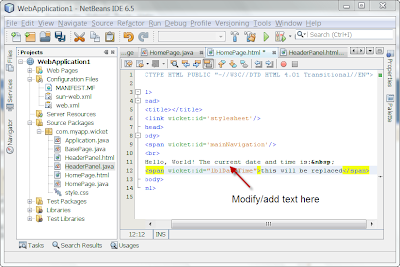
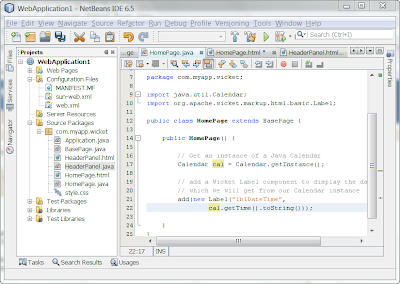
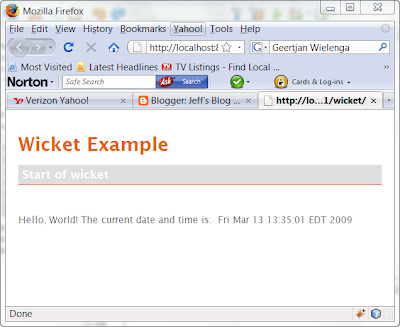
Hi there, Today I will introduce developing Apache Wicket applications using the Netbeans IDE v6.5. So lets get started. Installing Netbeans IDE v6.5 and the Wicket v1.4 Plugin First and foremost, if you haven't already, download and install Netbeans v6.5 which you can find here. By selecting the 'All' bundle option you will download and install everything you need to follow along with the examples. Once you have installed the Netbeans IDE, you should download and install the Wicket plugin for Netbeans v6.5 which you can find here. As there are 2 plugins listed on this page, please make sure that you select, download and install the one for Wicket v1.4 which will install the v1.4 Wicket libraries. Follow the installation instructions as provided on the page. This plugin was contributed by Geertjan Wielenga, a technical writer in the Netbeans Docs team who has contributed an amazing amount of material to the Netbeans community. Creating a Wicket Application With Netbeans and the Wicket plugin installed, now we can create our first Netbeans Wicket project. Start Netbeans and click File | New Project from the main menu. This will open the New Project window as pictured below: In the Categories list select Java Web and in the Project list select Wicket Application and then click Next. Accept all the default options in the Server and Settings window and click Next. In the Framework window, select Wicket 1.4 from the list of available Frameworks and then click Finish as pictured below: This will create a Wicket project which will be opened in the Netbeans IDE as pictured below: The plugin generates numerous files for you including the Server and Web descriptor files which are used to deploy and configure your web application on the application server, as well as basic Java, HTML and resource files that you can use as templates to start developing your application. Select Run | Run Main Project from the main menu to build, deploy and run the application. You should see the following rendered in your client browser: The Structure of a Wicket Application Wicket is different than most other Java Web frameworks that I have worked with or that I am familiar with, in that Wicket's convention is that it expects Java and markup files to reside side-by-side in the same Java package. This can be seen in the above screenshot. A rendered Web page in a Wicket application is implemented with at least 2 files, a Java Class file and a markup file. Both files must have the same names and are case sensitive. As we can see from the above screehshot, both HomePage.java and HomePage.html files are used when there is a request to render the HomePage html file to the client browser and they reside side-by-side to eachother. Just Java and HTML One of the advantages when working with Apache Wicket is that you create your application using just plain old Java, X/HTML, CSS, and resources. Another advantage is that you don't mix markup and scripting in your HTML files as is often the case in other frameworks. In other words, when you view a markup file in a Wicket application you will only see HTML. There is no spaghetti-code intermixed inside your markup. This clean separation of code and markup helps when developing and maintaining your applications by making your applications easier to read and understand. It also allows programmers and designers/graphic artists to work together on the same pages. Designers and graphic artists shouldn't have to be programers in order to do their jobs so not having to work with markup files that have server-side scripting code in them can eliminate that problem. Double click on the HomePage.html file located in the Projects window. It will open in the Netbeans HTLM editor window as pictured below: What you see is what you would expect to see when viewing markup - HTML! Extending Our Application The rendered page in our new application isn't much to look at but it will serve as a foundation to demonstrate adding dynamic content to a web page using Wicket. For this demonstration we will add markup and Java code to render the ubiquitous "Hello, World!" message as well as the current date and time in the client browser. But for the first crack at this, lets cheat and show how to do this by just adding static text to the HomePage.html file. Double click HomePage.html in the Netbeans Project window. The file will open in the Netbeans HTML editor. Add the text as pictured below: Select Run | Run Main Project from the main menu to build, deploy and run the application. You should see the following rendered in your client browser: Adding Dynamic Content If all we want to do is to display static text then our job would be done, but static pages are boring. Lets add some code and markup to make this page display the current date and time as well when the page is rendered. Double click HomePage.html in the Netbeans Project window. The file will open in the Netbeans HTML editor. Modify and add the text as pictured below: Notice that we've added a span tag to the markup and that it has a wicket:id attribute whose value is lblDateTime. When we create a Wicket componet to contribute to the body of this span tag we will pass this same value to the component's constructor as its first parameter which is its id. Double click HomePage.java in the Netbeans Project window. The file will open in the Netbeans Java editor. Modify the HomePage class as pictured below: In the HomePage constructor we obtain and instance of a Calendar object which will be used to get the current date and time. Then we add a Label to the page. A Label is a Wicket component that adds its content to the body of any HTML element that it is associated with. The association between the HTML element and the component is made through the component's id value which we pass as the first parameter in the Label's constructor. The id value we pass is the same value that was assigned to the wicket:id attribute of the span tag in the HomePage.html file. The second parameter we pass in the Label's constructor is the value of what we want to add to the body of the span element that the Label component is associated with. In this case, we will pass the current date and time as a string. Select Run | Run Main Project from the main menu to build, deploy and run the application. You should see the following rendered in your client browser: Although this application is trivial, the principles used here are the same ones used when developing real world enterprise Wicket applications. Synergy - Netbeans and Wicket As demonstrated, Netbeans with the Wicket v1.4 plugin provide many features and services for creating, developing and maintaining your Wicket applications. It is a highly productive and intuitive environment. Wicket offers Java Web developers a simple, intuitive, and productive framework to create Web applications with. Now that Netbeans has solid support for Wicket, I believe both will continue to grow in popularity.

Monday, March 9, 2009

Adventure With Wicket - Custom Controls

As I mentioned in my introduction, I am developing a web site and I am using Apache Wicket as my Java Web Framework. Today I decided to tackle creating a custom web page control that would encapsulate a tabbed menu bar that you find frequently used on web pages. The common method to implement a tabbed menu bar is through a combination of HTML, css and JavaScript on the client side and some server side scripting as well. As Wicket is often described as being just HTML and Java I thought this would be a good candidate to encapsulate into a Wicket custom component. So with my copy of "Wicket In Action" (a book by Martijn Dashorst and Eelco Hillenius, which is published by Manning and I highly recommend) in hand I set out to implement the control. First, like any good developer, I came up with a number of requirements which I've identified as follows:
  • The tabbed menu bar will be rendered in the browser using the ul and li tags which is a common practice employed by web page designers. When combined with the correct style sheet attributes the list can be rendered horizontally:
  • The number of tabs displayed in the menu bar must be dynamic and defined by a model which in essence would consist of a list of menu tab items. Below is the MenuItem Java class that I defined to represent a single menu bar tab:
  • As for usability, the control must be configurable and provide options that specify styling for the selected and non selected tabs, identity of the current tag, a model representing the list of MenuItems, and an id which will be used to render the html id attribute of the containing html div tag for the control's child html elements. The id is important because it will be used to customize the JavsScript that is rendered to provide client-side scripting of the control but more on that later. Here's the Java code for the custom control:
With the requirements identified and the implementation complete, all that is needed is a test. Here's a simple html snippet showing the tag that will be replaced by the Wicket panel hosting the control: And here is the Java code to instantiate the control in the page:
And here is how the control appears when it is rendered in the client browser: Overall, developing custom controls for Wicket applications isn't difficult and I find it much more intuitive than when I've done similar tasks with other frameworks . I use sort of a top-down approach to this kind of task, which allows for an iterative development process where each iteration adds more functionality and specificity. There were a number of topics that I admitedly didn't touch on here such as the generation of the client-side JavaScript and the use of the AbstractReadOnlyModel class. I will discuss these in a future article.

Saturday, March 7, 2009

Introduction

Welcome! My name is Jeff Schwartz and this is my blog where I will be posting about software development. I'll assume that if you are following the articles that you too are either a software developer or that you are interested in software development. Occasionally, I may "speak my mind" on other issues, but this will be a place where I mostly discuss software development. So you wont get a large window into my personal life here other than what I feel comfortable divulging (see bottom of article for that little window). What's wrong with Web application frameworks Developing Web sites over the years has afforded me the opportunity to experience the good, the bad and the ugly of the development process. Part of that process has been having to deal with numerous Web frameworks with promising potential but that ultimately fail to live up to what can only be described as hype. For the most part every framework that I have been exposed to have fallen far short of expectations for requiring far too much configuration and for failing to take into account established and best practices such as failing to implement the MVC (Model View Controller) pattern and failing to provide a component based architecture. In addition to these, the most egregious of their failings in my opinion is that they do not hide the fact that the Web is a stateless protocol. This is most easily recognizable when studying how most Web frameworks deal or do not deal with session state. Those that do not deal with session state offload the responsibility to the developer by providing a hash (a mechanism to save a value and associate it with a name as well as to retrieve a value by its name) to save and retrieve string values and which is stored on the server and persisted over the life of a user's session while browsing a web site. This mechanism is perhaps the greatest single source of complexity, frustration and errors that a developer will experience over the course of an application's lifetime. All this lead me on the search for the Holly Grail, a Web application frameworks that didn't succumb to the same shortcomings as I perceived them. So I began looking for alternatives. I looked at Ruby On Rails but I hated the mixed markup/code pages. I wanted a framework that promoted a separation of concerns. I looked at PHP but like ROR it also has mixed markup/code pages. I looked at Java EE but I wasn't thrilled about the popular Java Web frameworks that seemed to be discussed the most; way too much XML configuration required to get even the simplest of web applications up and running in my opinion. Then I heard of an open source, statefull, MVC, component based framework written in Java called Apache Wicket and it was like love at first sight. I read everything I could get my hands on about it and almost everything about it just seemed right to me. Most compelling is its non intrusive Ajax support. Wicket, it seemed to me, had to be written by people who actually have experience writing real world web applications, especially large applications. Below I list the strengths of the Wicket Web framework:
  1. It is a true MVC component based framework that allows me to do everything using just Java and HTML.
  2. It is statefull. It hides the stateless nature of the HTTP protocol from the developer.
  3. Its Ajax support is excellent and unobtrusive.
  4. It requires almost no XML configuration other than the typical Java application server and application descriptors which are minimal.
To be fair, Wicket isn't perfect. Its shortcomings, as I see them, are the following:
  1. Wicket can sometimes require more coding than some frameworks (ASP.net and JSF, for example) because there are no widget libraries that allow a developer to drag and drop controls off of a palette and onto an HTML page and gaining the benefit of the generated code behind the widgets.
  2. A developer can easily abuse the statefull nature of the Wicket framework and overtax the server. Developers must learn to employ loadable and detachable data models to reduce the likelihood of this. Thankfully, Wicket provides its own LoadableDetachable abstract implementation. Developers just need to remember to use it as Wicket itself does not enforce its use.
  3. Like many open source projects, Wicket sometimes suffers from poor or inadequate documentation.
  4. Wicket doesn't seem to get the tech press coverage that other Web frameworks seem to get so sometimes you as a developer may get that black sheep of the family feeling.
Warts and all, it should come as no surprise that Wicket has become my Web application framework of choice. It is my belief that most Web frameworks will follow the lead taken by Wicket and offer similar benefits to the developer. Benefits of Java and open source I have become a huge proponent of Java and open source. Of the many benefits they provide, here are a few I think are the most important :
  • Java is open source and hence comes under the scrutiny of a large group of stake holders. These stake holders have a great deal of influence in ensuring that Java remains relevant and competitive with all the other options available such as DotNet, C/C++, PHP, Python, Ruby, etc.
  • Java is continuously evolving. Java EE, JavaFX, etc.
  • Java supports both the client (Java SE) and the enterprise (Java EE).
  • There are numerous open source libraries available that provide pre-built solutions to common requirements so that as a developer I don't have to reinvent the wheel each time a new project is begun. I am a firm believer in the DRY principal.
  • Java supports write once, run almost everywhere via the Java run time.
  • There are excellent open source development tools available, IDEs such as Eclipse and Netbeans for example, that provide tooling that minimizes the implementation effort.
  • Java and open source minimize the upfront costs to the developer as many of the tools and libraries are free.
  • Java plays well with other technologies such as numerous back-end databases.
  • Java is a a true object oriented language. I cannot over emphasize how important OO is to me. I think it just relates to how my mind works :).
My primary Java web development environment for the most part consists of the following:
  • Windows running either XP or Vista though I have Ubuntu as well and I have access to Mac OSX.
  • The open source Netbeans IDE.
  • MYSQL.
  • GlassFish Server.
  • FireFox with Firebug and JavaScript Debugger.
  • Apache Wicket Web application framework
When developing Web applications I prefer to work with native XHTML and shy away from the WYSIWYG editors. I really like the HTML editor in Netbeans. My javascript library of choice is JQuery. It is another one of those frameworks that just seems and feels right to me. I believe it, too, was written by people who have written a lot of code. For entity persistence and database query services I use both JPA/EclipseLink and Hibernate . To tie the 3 tiers together in my enterprise applications I will use the Spring framework. Spring brings a lot of features to the table but I find it most useful for its IOC (Inversion Of Control) container. Here are some links to some of the open source items that I mentioned were mentionedOh, and here is a little window into my personal life. I have 5 cats and play the guitar. I am a slave to my cats and the guitar is my only passion other than developing great software. Well, that's about it for now. In the future I will post articles that I hope you find interesting and possibly even educational. Since Wicket and Netbeans are 2 of my favorite technical subjects, I'll be writing a lot about them here. So please come back often to see what is new and feel free to comment on anything that you may read about here.

About Me

My photo
New York, NY, United States
Software Developer